

 Maintenance Connection Everywhere (MCe) · EAM/CMMS manuals
Preamble
MC Everywhere, MC LoginHub, and MC DataHub offer highly flexible and mobile-friendly configuration options that can be accessed remotely, making it easy to share configuration tasks between IT professionals and Maintenance Connection Administrators. These options are also designed to enable on-the-fly fixes and changes via cell phone, even on spotty internet connections.
Although the configuration options are powerful, they should not be accessible to everyone. However, thanks to secure remote access keys (explained here: https://info.maintenanceconnection.ca/pdfviewer/39f2ab4b-c903-4fa5-9a9f-4d40012c60f8), qualified administrators can make reasonable changes without constantly relying on the IT department. This strikes a balance between security and flexibility, allowing for more efficient and streamlined configuration management.
Before configuring MC LoginHub, it is recommended to complete the basic configuration process for MC Everywhere. Basic configuration includes defining sites, database connectivity, licensing as well as communication, URLs and remote access. This helps to ensure that MC LoginHub can be properly integrated with other Maintenance Connection modules. If you need guidance on basic configuration, you can find detailed documentation at the following link: https://info.maintenanceconnection.ca/pdfviewer/39f2ab4b-c903-4fa5-9a9f-4d40012c60f8 . Once basic configuration is complete, you can proceed to configure MC LoginHub, which will allow you to centrally manage user authentication and access control for Maintenance Connection.
This is the setup process for integrating various authentication providers with the Maintenance Connection LoginHub and the Maintenance Connection family of products, including Accruent and Maintenance Connection Canada. Once the setup is complete, you'll be able to securely log in to several products, such as MC Everywhere (MCe/MCxLE), MCExpress, MRO, Technician Workstation, the MRO report tool, and MRO's Service Requester.
Please note that authentication and authorization are complex processes that involve multiple checks and encryption methods. It's important to carefully review each step of the process, as even small oversights can cause decryption failures or security issues. Resolving such failures can require billable support time, as it may involve advanced technical expertise to diagnose small but critical differences in the settings.
We recommend taking the time to carefully and methodically complete each step of the setup process, even if it means taking an extra 15 minutes. This can save you hours of frustration and avoid costly support fees down the road.
Info Buttons
To provide the most current information, we recommend referring to the info buttons located in the LoginHub user interface during setup. These buttons offer the latest information about each area, and we strive to keep them up-to-date. To avoid any potential discrepancies or outdated information, we have chosen not to include this information in the document.
Setting up a provider for LoginHub (high level)
To obtain a Login, there are several steps you need to take:
- Set up your provider.
- Ensure that the appropriate LoginHub license(s) are installed.
- Configure the basic settings that determine what your user sees.
- Enter the necessary values provided by your provider, such as the Entity ID through Certificate.
- Test the login to verify that the basic setup is working.
- Map the information from your provider to the format you prefer in MC.
- Perform detailed testing to ensure that everything is configured as needed.
Once the initial setup is complete, you may need to return to modify Group/Role mapping, especially if changes are made in MC or in your identity provider. To access the most up-to-date information about any of these steps, simply click on the info buttons located in the LoginHub UI.
License
To activate your software, you will need to install the license provided by your installer. Unfortunately, the steps for installing a license cannot be covered in this document. Once you have successfully installed the license, you will notice that the "No licenses installed" warning will disappear.
LoginHub General Settings
When configuring MC LoginHub, you will encounter several general settings that allow you to customize the behavior of the module to suit your organization's needs. One important setting is broker connectivity, which enables authentication with offsite login providers. This can simplify the login process for users, as they can use their existing credentials from providers like Active Directory, Azure AD, SAML2, or Okta to access Maintenance Connection.
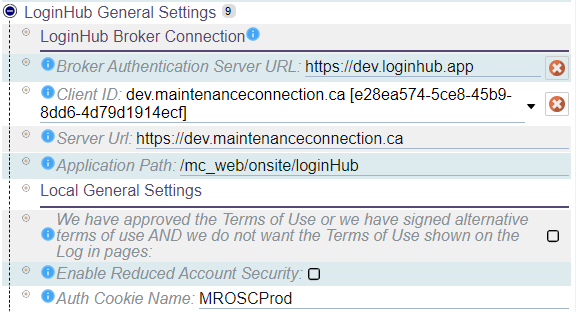
In addition to broker connectivity, you can also configure local settings for MC LoginHub. For example, you can choose to pre-approve terms and conditions for all users, ensuring that they are aware of and agree to any relevant policies or agreements. You can also reduce account security if needed, although this should be done with caution and only after carefully considering the potential risks. By adjusting these settings and others, you can fine-tune MC LoginHub to align with your organization's security and compliance requirements, while providing a user-friendly experience for all users.
Broker Connection
When configuring a provider other than Active Directory, it's important to set up the Broker settings. Each setting is accompanied by an info bubble that explains its function, making it easy to adjust the configuration to your needs. There are four key settings to consider:
- The Broker Authentication Server URL can be configured to point to an onsite installation of the LoginHub Broker services. However, this should only be changed in rare circumstances.
- The Client ID is your license client ID for communicating with the broker service.
- The Server URL is the publicly accessible server URL that will be used for login. To ensure smooth operation, this must be HTTPS - modern browsers will refuse to pass cookies over unsecured connections.
- The Application Path specifies the path on the server to access LoginHub. This setting is rarely changed, as it may require many other settings to be adjusted as well.
By carefully configuring these Broker settings, you can set up MC LoginHub to integrate seamlessly with your chosen provider and provide a reliable, user-friendly authentication experience.
Local General Settings
MC LoginHub offers several local general settings that can be configured to suit your needs.
- Reduced Account Security, which can be helpful for apps or customizations that don't fully support SSO sign-in. For example, MC Express may not function correctly without this option enabled, as it can make untrackable logins possible. While this feature is not recommended for security reasons, it's available to ensure that all apps and customizations work as intended.
- The Auth Cookie Name setting can be used to configure authentication cookies for MRO 2021.12 and later. This setting must match the [Mro].AuthCookieName value in the mc.ini file to enable login. This option only takes effect if the detected MRO application version is 2021.12 or higher, and can help to ensure that authentication works smoothly and reliably across all applications.
By adjusting these local settings, you can customize MC LoginHub to meet your specific needs and provide a seamless, secure user experience.
LoginHub Applications
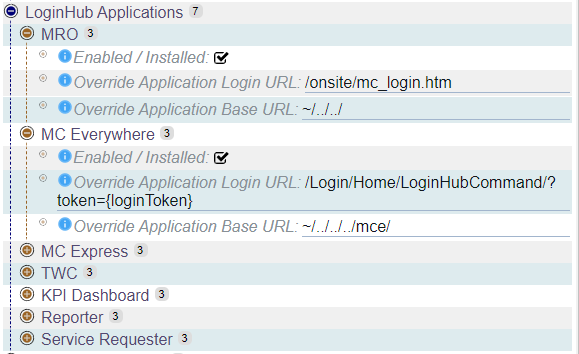
MC LoginHub Applications provides the ability to configure the applications and modules that LoginHub will connect to. Each application can be enabled or disabled, and it's possible to customize the configuration to account for non-default installation paths.
However, it's important to note that configuring these settings are rarely necessary, as default installation paths are typically recommended and MC LoginHub can automatically detect which applications are installed and licensed. As a result, manual configuration is typically unnecessary and should only be undertaken in special cases where default detection is not functioning as expected. By leaving these settings at their default values, you can ensure a smooth and reliable user experience without the need for additional customization.
LoginHub Providers
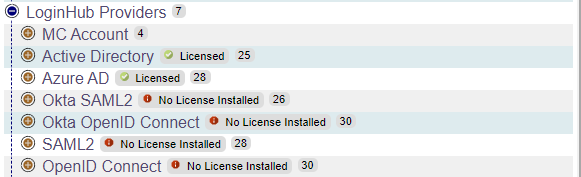
MC LoginHub Providers offer a way to configure the authentication provider(s) that will be presented to users. Each provider has a range of common and specific options that can be customized to suit your needs. The configuration process involves both the provider side (used to enable correct communication with LoginHub) and the LoginHub side (used to make the option available, determine how to communicate with the provider, select which information to sync, automatically insert data into Maintenance Connection, and match provider groups/roles to Access Groups and databases in Maintenance Connection).
Provider-side configuration is typically found in a provider-specific document, while LoginHub-side configuration determines how the provider is presented to users and how information is synced between the provider and Maintenance Connection. By carefully configuring these options, you can ensure that the authentication process is smooth and reliable, with all necessary data and permissions properly integrated. With the flexibility and power of MC LoginHub Providers, you can create a customized and highly effective authentication experience for your users.
MC Account
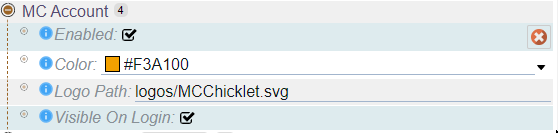
MC Account is the most basic authentication provider, typically reserved for use by administrators, IT staff, and support personnel. For most other users, it's recommended to use a full provider. By enabling the provider, you can add a button for MC Account login, adjust the wording of the button, and even change its color to match your branding or preferences.
While MC Account is a useful tool for specific use cases, it lacks the advanced features and customization options offered by other providers. For this reason, it's typically best suited to internal teams and support staff who need simple and reliable access to Maintenance Connection. By carefully configuring the provider settings, you can create a smooth and streamlined authentication experience for all users, regardless of their role or level of access.
Active Directory
Active Directory is a comprehensive provider that operates entirely onsite, making it an ideal choice for organizations with stringent security requirements that prohibit public data sharing. With AD, you can easily map users and groups, sync data, and configure custom claims to ensure that users have the appropriate level of access to Maintenance Connection.
One of the key benefits of AD is its flexibility, allowing you to map groups within groups, map multiple groups to different databases, and choose how much data to sync between AD and Maintenance Connection. This level of control is especially useful for large organizations with complex access requirements or those that need to closely manage data access for regulatory or compliance reasons.
By leveraging the power of AD, you can create a secure and streamlined authentication experience for your users, ensuring that they have the access they need to perform their roles effectively while maintaining the highest levels of data security.
General
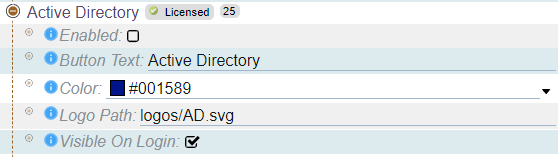
In addition to its advanced mapping and syncing capabilities, Active Directory also offers flexible configuration options for customizing the appearance and text of the login button. With AD, you can easily configure the look and feel of the login button to match your organization's branding and design guidelines, ensuring a consistent user experience across all applications and systems. These simple yet powerful customization options make it easy to create a seamless, user-friendly login experience for your team.
When you're ready to test or use, simply select "Enabled". By default, the login button will display the text "Active Directory" and the included AD Logo. However, depending on how your users see it elsewhere in your system, you may want to change the text to match your provider or to something that your users expect. The important thing is to make sure the button text and logo are meaningful to your users.
Auto-Provision Settings
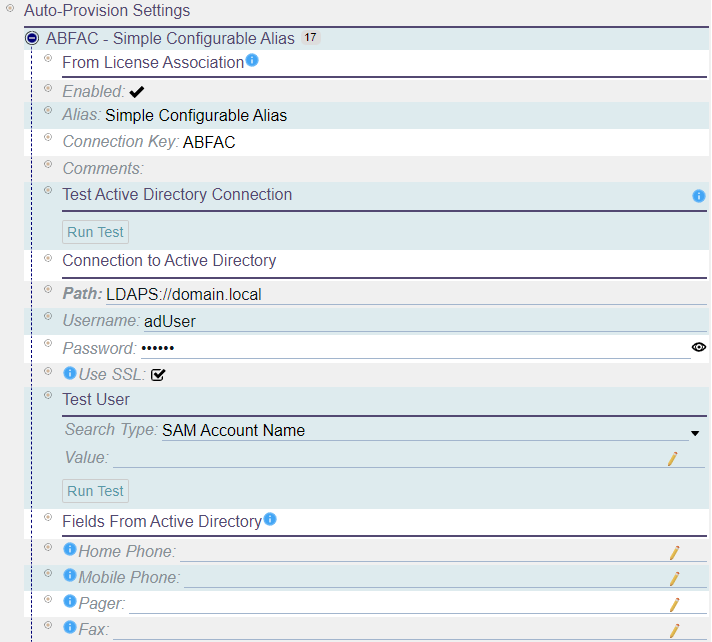
The auto-provision settings control how LoginHub connects to Active Directory and loads data for the logging in user. This settings section represents a connection between one directory and one database, and additional configurations can be added through licensing.
The settings include:
- Details from the license configuration: This includes information about the license, such as any comments or notes related to the license, an alias to help identify the license configuration, the database that the license is associated with, and whether or not the configuration is enabled.
- Connection details: This setting controls how LoginHub connects to Active Directory. It includes information such as the Active Directory path, the username and password for the account that LoginHub will use to connect to Active Directory, and whether or not SSL should be used to encrypt the connection.
- Field customization for AD fields: This setting allows you to customize which LDAP fields should be read from in order to map over to fields in the created/managed user. This customization can be important because Active Directory can contain many fields, and you may not want to sync all of them over to Maintenance Connection.
- Testing of connectivity: This setting allows you to test the connection between LoginHub and Active Directory to make sure that they can communicate with each other.
- Testing if a user record can load: This setting allows you to test if a user record can be loaded from Active Directory. This is an important step in setting up LoginHub because it ensures that the connection is working properly and that users can be properly provisioned.
After setting and saving the connection information, it is important to run a connection test. This test is necessary as it completes the setup process by retrieving the required domain information that enables successful logins.
Provider Group/Role Mapping
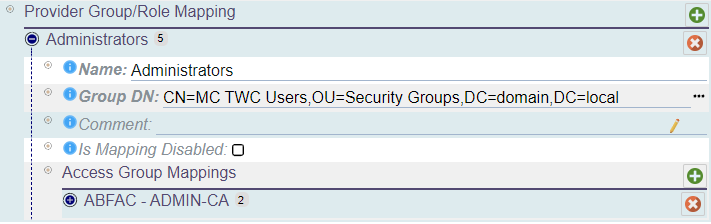
In the LoginHub configuration, Provider Group/Role Mapping allows you to map groups or roles from the directory onto access groups and databases within Maintenance Connection. You can create as many mappings as you need and each group/role can have configuration mappings for multiple databases.
To set up a mapping, you will need to enter a name, group DN (distinguished name), and optional comment. Once you have added the mapping, you can add one or multiple access group mappings per group.
An access group mapping must include a database and an access group. Keep in mind that a group cannot be mapped to multiple access groups in one database, but it can be mapped to multiple access groups in one per each database. With this configuration, you can ensure that users are assigned the appropriate access levels within Maintenance Connection based on their group or role in the directory.
Notes
- You can create multiple mappings and each group/role can have configuration mappings for many databases.
- It is possible to represent the same group multiple times in the list. While this is acceptable and supported, it is not recommended for performance reasons.
- Deleting a group mapping or an access group mapping is as simple as selecting the red X next to the mapping you wish to remove.
- Adding a new mapping is also straightforward, as you simply need to select the green + on the title bar of the mapping section you wish to add into.
- Don't forget to save your changes after making any updates. Changes are cached locally and are not submitted to the server until you select save.
- To ensure that the group mappings are properly initialized, it is necessary to run the "Generate Deep Group Mappings" command after making any changes. This command loads every configured group and ensures that the security identifier (SID) and recursive details are correctly initialized. If you do not run this command, you may encounter unexpected errors during login due to incorrect or uninitialized mapping data. It is important to remember to run this command every time you make changes to the group mappings to avoid any potential login issues.
Sync Options
When configuring your identity provider in LoginHub, keep in mind that the data structure in your provider is unlikely to match that in MC. Fortunately, LoginHub offers flexible mapping options that allow you to translate data from your provider to the values stored in MC. While it may be tempting to wish for a one-size-fits-all solution, the reality is that each provider and package keeps data differently. Some SSO software may only work with a limited number of providers or may be too simplistic to offer robust mapping options. LoginHub, on the other hand, supports thousands of ID providers and enables you to manage your users and security from the ID side. These powerful mapping settings are a key value proposition of LoginHub for MC and your identity provider.
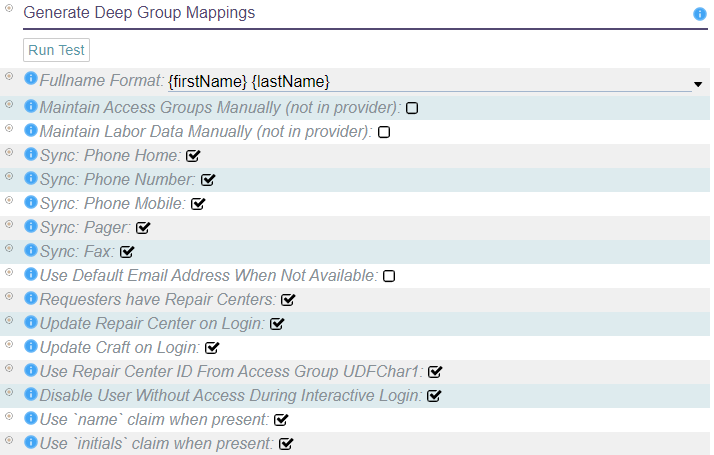
- Fullname format: If the provider does not provide the user's name, this string format will be used to create it.
- Maintain access groups manually: This disables the automatic setting of access groups for users, except during user creation. It can be useful for basic SSO providers or situations where advanced providers are used only for authentication, not authorization.
- Maintain labor data manually: This disables updates of labor records, except during user creation. This does not disable setting access groups. If both need to be disabled, "Maintain Access Groups Manually" must also be set.
- Should sync phone number, home phone number, mobile phone number, pager, and fax number: If the corresponding claim is provided, the user's Labor record will be automatically updated with the data from the provider on each login.
- Default email address: If the directory does not have an email address for the user, an invalid default email will be filled in to allow the user to login. This will give the user fewer features and no warning that they don't have all the features.
- Requester/limited users and repair centers: Requesters can be assigned to a repair center, or if not assigned, they will default to the default repair center. This uses the standard repair center logic and applies it to requesters as well.
- Repair center and craft update on login: The user's Repair Center and Craft can be updated on login, unless "Maintain Labor Data Manually" is set.
- Repair center found via Access Group UDFChar1 field: The user's Access Group is checked for a reference to a valid Repair Center ID in the UDFChar1 field. If it is found, the user will default to that Repair Center instead of the default one.
- Disable users who don't have enough access to login: During an interactive login, a user account that does not meet the access criteria can be disabled. This can be useful if "Approve Access if User is Approved/Enabled in Provider" is disabled.
- Use name claim to provide a name: If the name claim is present, it will be used as the user's fullname. Otherwise, "Fullname Format" will be used.
- Use initials claim to provide a name: If the initials claim is present, it will be used as the user's initials. Otherwise, the initials will be built from the first, middle, and last names.
Additional Claims

The Additional Claims section offers a way to import more LDAP fields from the directory while logging in. This feature works well with the Scripted Field Mapping, a licensed feature that permits running custom scripts to create users according to your specific requirements.
To add an additional claim, you must provide a name for the claim, which will be used in Scripted Field Mapping, and a source field, which is the name of the LDAP field in an LDAP browser.
Notes
- Please note that adding the same additional claim multiple times to the list is not recommended as it may cause errors, unexpected behaviors, and negatively impact performance. Therefore, we advise against representing the same additional claim multiple times in the list.
- Deleting an additional claim is as simple as selecting the red X next to the claim you wish to remove.
- Adding a new additional claim is also straightforward, as you simply need to select the green + on the title bar of the additional claims section you wish to add into.
- Don't forget to save your changes after making any updates. Changes are cached locally and are not submitted to the server until you select save.
Azure AD
Azure Active Directory (Azure AD) is a powerful authentication provider that operates fully in the cloud. Whether you're running a small or large operation, Azure AD provides the scalability and reliability to meet your needs. With the option to sync with your onsite Active Directory instance, Azure AD offers even greater flexibility and control over your authentication process.
One of the key benefits of using Azure AD is its full mapping capabilities, which enable you to map users and groups with data syncing, custom claims, and even groups within groups. Additionally, Azure AD allows for multiple mapping of groups to different databases, which can be useful if you have different applications or systems that require different levels of access or permissions.
Another advantage of using Azure AD is the ability to choose how much data to sync between your Active Directory and Maintenance Connection. This can be particularly beneficial if you have a large user base or are concerned about data privacy and security. By being able to control what data is synced, you can ensure that sensitive information is kept secure and only accessible to those who need it.
Overall, Azure AD offers a robust and flexible solution for managing your authentication and access control needs. Whether you're a small business or a large enterprise, Azure AD can help streamline your authentication process and provide the security and control you need to protect your organization's data.
General
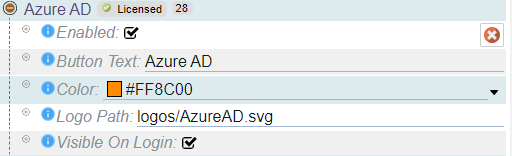
In addition to its advanced mapping and syncing capabilities, Azure Active Directory also offers flexible configuration options for customizing the appearance and text of the login button. With Azure AD, you can easily configure the look and feel of the login button to match your organization's branding and design guidelines, ensuring a consistent user experience across all applications and systems. These simple yet powerful customization options make it easy to create a seamless, user-friendly login experience for your team.
When you're ready to test or use, simply select "Enabled". By default, the login button will display the text "Azure AD" and the included Azure AD Logo. However, depending on how your users see it elsewhere in your system, you may want to change the text to match your provider or to something that your users expect. The important thing is to make sure the button text and logo are meaningful to your users.
Azure AD Connection
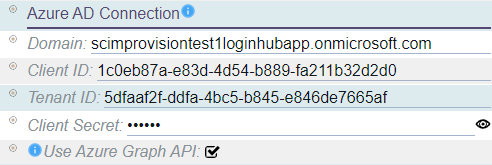
The Azure AD Connection settings control how LoginHub communicates with Azure for authentication purposes. This information is provided by your Azure application configuration, which can be found in the Azure AD configuration document.
The settings for the Azure AD Connection include:
- Domain: This is the Azure AD domain that you are using.
- Client ID: This is a unique identifier for your application in Azure AD.
- Tenant ID: This is the identifier for your Azure AD tenant, which is not unique per application.
- Client Secret: This is a secret used for encrypting communication, which is only available in the Azure UI during creation and will not be recoverable afterwards. Be sure to record the expiration date since the integration will stop working when the secret expires.
- Use Azure Graph API: This option allows the Azure Graph API to be used during login to fetch additional group and claim information. However, it requires additional permissions in Azure to work properly.
Provider Group/Role Mapping
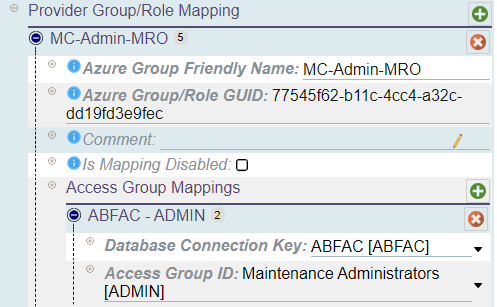
In the LoginHub configuration, Provider Group/Role Mapping allows you to map groups or roles from the directory onto access groups and databases within Maintenance Connection. You can create as many mappings as you need and each group/role can have configuration mappings for multiple databases.
To set up a mapping, you will need to enter a name, group/role GUID, and optional comment. Once you have added the mapping, you can add one or multiple access group mappings per group.
An access group mapping must include a database and an access group. Keep in mind that a group cannot be mapped to multiple access groups in one database, but it can be mapped to multiple access groups in one per each database. With this configuration, you can ensure that users are assigned the appropriate access levels within Maintenance Connection based on their group or role in the directory.
Notes
- You can create multiple mappings and each group/role can have configuration mappings for many databases.
- It is possible to represent the same group multiple times in the list. While this is acceptable and supported, it is not recommended for performance reasons.
- Deleting a group mapping or an access group mapping is as simple as selecting the red X next to the mapping you wish to remove.
- Adding a new mapping is also straightforward, as you simply need to select the green + on the title bar of the mapping section you wish to add into.
- Don't forget to save your changes after making any updates. Changes are cached locally and are not submitted to the server until you select save.
Sync Options
When configuring your identity provider in LoginHub, keep in mind that the data structure in your provider is unlikely to match that in MC. Fortunately, LoginHub offers flexible mapping options that allow you to translate data from your provider to the values stored in MC. While it may be tempting to wish for a one-size-fits-all solution, the reality is that each provider and package keeps data differently. Some SSO software may only work with a limited number of providers or may be too simplistic to offer robust mapping options. LoginHub, on the other hand, supports thousands of ID providers and enables you to manage your users and security from the ID side. These powerful mapping settings are a key value proposition of LoginHub for MC and your identity provider.
- Fullname format: If the provider does not provide the user's name, this string format will be used to create it.
- Maintain access groups manually: This disables the automatic setting of access groups for users, except during user creation. It can be useful for basic SSO providers or situations where advanced providers are used only for authentication, not authorization.
- Maintain labor data manually: This disables updates of labor records, except during user creation. This does not disable setting access groups. If both need to be disabled, "Maintain Access Groups Manually" must also be set.
- Should sync phone number, home phone number, mobile phone number, pager, and fax number: If the corresponding claim is provided, the user's Labor record will be automatically updated with the data from the provider on each login.
- Default email address: If the directory does not have an email address for the user, an invalid default email will be filled in to allow the user to login. This will give the user fewer features and no warning that they don't have all the features.
- Requester/limited users and repair centers: Requesters can be assigned to a repair center, or if not assigned, they will default to the default repair center. This uses the standard repair center logic and applies it to requesters as well.
- Repair center and craft update on login: The user's Repair Center and Craft can be updated on login, unless "Maintain Labor Data Manually" is set.
- Repair center found via Access Group UDFChar1 field: The user's Access Group is checked for a reference to a valid Repair Center ID in the UDFChar1 field. If it is found, the user will default to that Repair Center instead of the default one.
- Disable users who don't have enough access to login: During an interactive login, a user account that does not meet the access criteria can be disabled. This can be useful if "Approve Access if User is Approved/Enabled in Provider" is disabled.
- Use name claim to provide a name: If the name claim is present, it will be used as the user's fullname. Otherwise, "Fullname Format" will be used.
- Use initials claim to provide a name: If the initials claim is present, it will be used as the user's initials. Otherwise, the initials will be built from the first, middle, and last names.
Okta SAML2
Okta SAML2 is a robust cloud-based LoginHub provider that offers a wide range of capabilities for organizations of all sizes. As a provider, Okta SAML2 is designed to securely manage user authentication and authorization through SAML 2.0, a widely adopted standard for exchanging authentication and authorization data between parties.
With Okta SAML2, businesses have the flexibility to integrate with multiple third-party applications and systems, making it an ideal choice for organizations with complex IT environments. It provides a full mapping of users and groups, including custom claims, and offers the ability to sync data across different databases. Moreover, Okta SAML2 allows for the synchronization of specific data between Okta and Maintenance Connection, giving businesses full control over their data-sharing preferences.
Overall, Okta SAML2 is a comprehensive LoginHub provider that offers organizations the flexibility and security they need to manage their authentication and authorization processes. Its robust capabilities and established reputation make it a top choice for businesses looking to improve their security and streamline their IT operations.
General
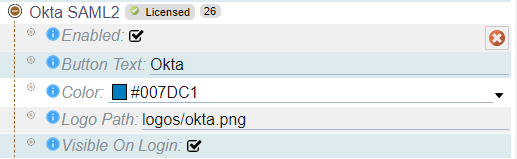
In addition to its advanced mapping and syncing capabilities, Okta SAML2 also offers flexible configuration options for customizing the appearance and text of the login button. With Okta SAML2, you can easily configure the look and feel of the login button to match your organization's branding and design guidelines, ensuring a consistent user experience across all applications and systems. These simple yet powerful customization options make it easy to create a seamless, user-friendly login experience for your team.
When you're ready to test or use Okta SAML2, simply select "Enabled". By default, the login button will display the text "Okta" and the included Okta logo. However, depending on how your users see it elsewhere in your system, you may want to change the text to match your provider or to something that your users expect. The important thing is to make sure the button text and logo are meaningful to your users.
Okta Connection
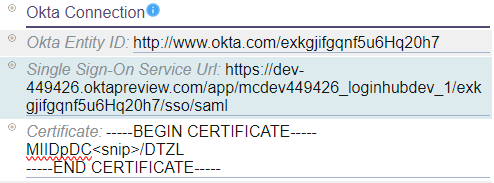
The Okta Connection settings are critical to the successful integration of LoginHub and Okta for authentication purposes. Your Okta application configuration contains this information and can be found in the Okta configuration document.
The Okta Connection settings consist of three key elements:
- Entity ID: An Entity ID is a globally unique identifier for your Identity Provider (IdP) or Service Provider (SP), which allows other services to identify your entity.
- Single Sign-On Service URL: This is a unique URL that LoginHub uses to initiate the user SSO login flow.
- Certificate: The encryption certificate used for secure communication with the SAML2 provider.
These settings are essential to establish a secure connection between LoginHub and Okta, enabling a seamless and secure authentication process for your users. By providing the Entity ID, Single Sign-On Service URL, and Certificate information, you ensure that the authentication flow between LoginHub and Okta is smooth and secure.
Overall, the Okta Connection settings play a vital role in establishing a reliable and secure integration between LoginHub and Okta, ensuring seamless and secure authentication for your organization.
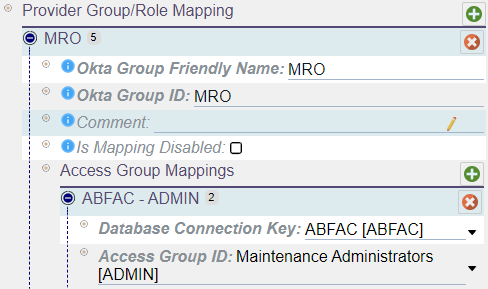
Provider Group/Role Mapping

In the LoginHub configuration, Provider Group/Role Mapping allows you to map groups or roles from the directory onto access groups and databases within Maintenance Connection. You can create as many mappings as you need and each group/role can have configuration mappings for multiple databases.
To set up a mapping, you will need to enter a name, group/role id, and optional comment. Once you have added the mapping, you can add one or multiple access group mappings per group.
An access group mapping must include a database and an access group. Keep in mind that a group cannot be mapped to multiple access groups in one database, but it can be mapped to multiple access groups in one per each database. With this configuration, you can ensure that users are assigned the appropriate access levels within Maintenance Connection based on their group or role in the directory.
Notes
- You can create multiple mappings and each group/role can have configuration mappings for many databases.
- It is possible to represent the same group multiple times in the list. While this is acceptable and supported, it is not recommended for performance reasons.
- Deleting a group mapping or an access group mapping is as simple as selecting the red X next to the mapping you wish to remove.
- Adding a new mapping is also straightforward, as you simply need to select the green + on the title bar of the mapping section you wish to add into.
- Don't forget to save your changes after making any updates. Changes are cached locally and are not submitted to the server until you select save.
Sync Options
When configuring your identity provider in LoginHub, keep in mind that the data structure in your provider is unlikely to match that in MC. Fortunately, LoginHub offers flexible mapping options that allow you to translate data from your provider to the values stored in MC. While it may be tempting to wish for a one-size-fits-all solution, the reality is that each provider and package keeps data differently. Some SSO software may only work with a limited number of providers or may be too simplistic to offer robust mapping options. LoginHub, on the other hand, supports thousands of ID providers and enables you to manage your users and security from the ID side. These powerful mapping settings are a key value proposition of LoginHub for MC and your identity provider.
- Fullname format: If the provider does not provide the user's name, this string format will be used to create it.
- Maintain access groups manually: This disables the automatic setting of access groups for users, except during user creation. It can be useful for basic SSO providers or situations where advanced providers are used only for authentication, not authorization.
- Maintain labor data manually: This disables updates of labor records, except during user creation. This does not disable setting access groups. If both need to be disabled, "Maintain Access Groups Manually" must also be set.
- Should sync phone number, home phone number, mobile phone number, pager, and fax number: If the corresponding claim is provided, the user's Labor record will be automatically updated with the data from the provider on each login.
- Default email address: If the directory does not have an email address for the user, an invalid default email will be filled in to allow the user to login. This will give the user fewer features and no warning that they don't have all the features.
- Requester/limited users and repair centers: Requesters can be assigned to a repair center, or if not assigned, they will default to the default repair center. This uses the standard repair center logic and applies it to requesters as well.
- Repair center and craft update on login: The user's Repair Center and Craft can be updated on login, unless "Maintain Labor Data Manually" is set.
- Repair center found via Access Group UDFChar1 field: The user's Access Group is checked for a reference to a valid Repair Center ID in the UDFChar1 field. If it is found, the user will default to that Repair Center instead of the default one.
- Disable users who don't have enough access to login: During an interactive login, a user account that does not meet the access criteria can be disabled. This can be useful if "Approve Access if User is Approved/Enabled in Provider" is disabled.
- Use name claim to provide a name: If the name claim is present, it will be used as the user's fullname. Otherwise, "Fullname Format" will be used.
- Use initials claim to provide a name: If the initials claim is present, it will be used as the user's initials. Otherwise, the initials will be built from the first, middle, and last names.
Okta OpenID Connect
As a cloud-based provider, Okta OpenID Connect is an ideal option for smaller companies in need of a central login authority. Although it's not as feature-rich as the Okta SAML2 provider, it still provides a competent set of capabilities for smaller companies that don't require the full range of advanced features.
Okta OpenID Connect offers full mapping of users and groups with data syncing, which enables organizations to seamlessly synchronize user data with Maintenance Connection. Additionally, it allows multiple mapping of groups to different databases and provides the flexibility to choose how much data to sync between Okta and Maintenance Connection.
While Okta OpenID Connect is more limited in its capabilities than Okta SAML2, it still provides a robust set of features that can benefit smaller companies. With its cloud-based architecture and ease of use, Okta OpenID Connect is an efficient and cost-effective solution for organizations that need a central login authority.
As a LoginHub provider, Okta OpenID Connect is a trusted authentication provider that allows users to seamlessly log in to Maintenance Connection. Its ability to map users and groups with data syncing and multiple mapping of groups to different databases makes it a valuable solution for organizations that require a central login authority.
Overall, Okta OpenID Connect provides a competent set of features for smaller companies in need of a central login authority. With its cloud-based architecture and easy-to-use interface, it's a cost-effective solution that can help organizations streamline their authentication process.
General

In addition to its advanced mapping and syncing capabilities, Okta OpenID Connect also offers flexible configuration options for customizing the appearance and text of the login button. With Okta OpenID Connect, you can easily configure the look and feel of the login button to match your organization's branding and design guidelines, ensuring a consistent user experience across all applications and systems. These simple yet powerful customization options make it easy to create a seamless, user-friendly login experience for your team.
When you're ready to test or use Okta OpenID Connect, simply select "Enabled". By default, the login button will display the text "Okta" and the included Okta logo. However, depending on how your users see it elsewhere in your system, you may want to change the text to match your provider or to something that your users expect. The important thing is to make sure the button text and logo are meaningful to your users.
Okta Connection
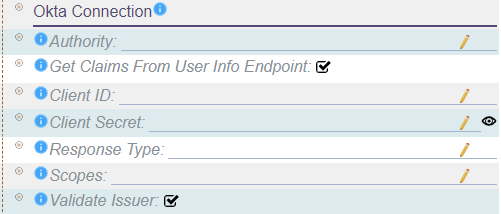
The Okta Connection settings are a crucial component of integrating LoginHub and Okta for authentication purposes. These settings are defined in your Okta application configuration, which can be accessed through the Okta configuration document.
The Okta Connection settings include the following key elements:
- Authority: The URL of the authentication server that LoginHub should connect to.
- Get Claims From User Info Endpoint: Specifies whether a second call should be made to the user info endpoint to retrieve additional claims.
- Client ID: A unique identifier that distinguishes this caller from other callers.
- Client Secret: A secret key used to access the identity provider.
- Response Type: Controls whether additional data is requested from the provider.
- Scopes: An OpenID Connect scope refers to a set of claims being requested. Maintenance Connection requires a specific set of claims to be present, which may require asking for a specific set of scopes from the provider.
- Validate Issuer: Specifies whether the token should be validated for correctness when it is received. Depending on the remote provider, this feature may need to be disabled.
These settings are crucial for establishing a secure connection between LoginHub and Okta, enabling a smooth and secure authentication process for your users. By providing the necessary information, such as the Authority, Client ID, Client Secret, and Scopes, you ensure that the authentication flow between LoginHub and Okta is smooth and secure.
Overall, the Okta Connection settings play a vital role in establishing a reliable and secure integration between LoginHub and Okta, ensuring seamless and secure authentication for your organization.
Provider Group/Role Mapping
In the LoginHub configuration, Provider Group/Role Mapping allows you to map groups or roles from the directory onto access groups and databases within Maintenance Connection. You can create as many mappings as you need and each group/role can have configuration mappings for multiple databases.
To set up a mapping, you will need to enter a name, group/role id, and optional comment. Once you have added the mapping, you can add one or multiple access group mappings per group.
An access group mapping must include a database and an access group. Keep in mind that a group cannot be mapped to multiple access groups in one database, but it can be mapped to multiple access groups in one per each database. With this configuration, you can ensure that users are assigned the appropriate access levels within Maintenance Connection based on their group or role in the directory.
Notes
- You can create multiple mappings and each group/role can have configuration mappings for many databases.
- It is possible to represent the same group multiple times in the list. While this is acceptable and supported, it is not recommended for performance reasons.
- Deleting a group mapping or an access group mapping is as simple as selecting the red X next to the mapping you wish to remove.
- Adding a new mapping is also straightforward, as you simply need to select the green + on the title bar of the mapping section you wish to add into.
- Don't forget to save your changes after making any updates. Changes are cached locally and are not submitted to the server until you select save.
Sync Options
When configuring your identity provider in LoginHub, keep in mind that the data structure in your provider is unlikely to match that in MC. Fortunately, LoginHub offers flexible mapping options that allow you to translate data from your provider to the values stored in MC. While it may be tempting to wish for a one-size-fits-all solution, the reality is that each provider and package keeps data differently. Some SSO software may only work with a limited number of providers or may be too simplistic to offer robust mapping options. LoginHub, on the other hand, supports thousands of ID providers and enables you to manage your users and security from the ID side. These powerful mapping settings are a key value proposition of LoginHub for MC and your identity provider.
- Fullname format: If the provider does not provide the user's name, this string format will be used to create it.
- Maintain access groups manually: This disables the automatic setting of access groups for users, except during user creation. It can be useful for basic SSO providers or situations where advanced providers are used only for authentication, not authorization.
- Maintain labor data manually: This disables updates of labor records, except during user creation. This does not disable setting access groups. If both need to be disabled, "Maintain Access Groups Manually" must also be set.
- Should sync phone number, home phone number, mobile phone number, pager, and fax number: If the corresponding claim is provided, the user's Labor record will be automatically updated with the data from the provider on each login.
- Default email address: If the directory does not have an email address for the user, an invalid default email will be filled in to allow the user to login. This will give the user fewer features and no warning that they don't have all the features.
- Requester/limited users and repair centers: Requesters can be assigned to a repair center, or if not assigned, they will default to the default repair center. This uses the standard repair center logic and applies it to requesters as well.
- Repair center and craft update on login: The user's Repair Center and Craft can be updated on login, unless "Maintain Labor Data Manually" is set.
- Repair center found via Access Group UDFChar1 field: The user's Access Group is checked for a reference to a valid Repair Center ID in the UDFChar1 field. If it is found, the user will default to that Repair Center instead of the default one.
- Disable users who don't have enough access to login: During an interactive login, a user account that does not meet the access criteria can be disabled. This can be useful if "Approve Access if User is Approved/Enabled in Provider" is disabled.
- Use name claim to provide a name: If the name claim is present, it will be used as the user's fullname. Otherwise, "Fullname Format" will be used.
- Use initials claim to provide a name: If the initials claim is present, it will be used as the user's initials. Otherwise, the initials will be built from the first, middle, and last names.
SAML2
SAML2, short for Security Assertion Markup Language 2.0, is a widely used open standard for authentication and authorization in web-based applications. It allows for secure exchange of user authentication and authorization data between identity providers and service providers, without exposing sensitive information to unauthorized parties.
LoginHub, a leading provider of login services, fully supports the SAML2 standard as a provider. This means that organizations can use LoginHub as an identity provider to authenticate users for their web-based applications, using SAML2 as the underlying protocol.
Several popular authentication providers, such as Google, Auth0, Ping Identity, ADFS, OneLogin, and Salesforce, offer SAML2 as an authentication method for their users. This means that organizations can choose to use any of these providers as their identity provider and still integrate with LoginHub seamlessly, using SAML2 as the protocol of choice.
One of the benefits of using SAML2 with LoginHub is the ability to fully map users and groups with data syncing, custom claims, and multiple mapping of groups to different databases. This allows organizations to streamline user management, without the need for manual updates in multiple systems. Additionally, organizations can choose the amount of data to sync between the identity provider and LoginHub, based on their specific needs.
Furthermore, SAML2 provides a highly flexible and scalable solution for identity management. It can be implemented in small or large-scale environments, and can integrate with a wide range of third-party services if desired.
LoginHub's support for SAML2 as a provider offers organizations a secure and flexible solution for identity management. By leveraging the SAML2 standard, organizations can seamlessly integrate with a wide range of authentication providers, streamline user management, and enhance security for their web-based applications.
General
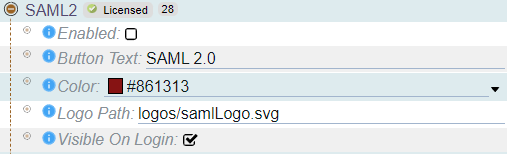
In addition to its advanced mapping and syncing capabilities, SAML2 also offers flexible configuration options for customizing the appearance and text of the login button. With SAML2, you can easily configure the look and feel of the login button to match your organization's branding and design guidelines, ensuring a consistent user experience across all applications and systems. These simple yet powerful customization options make it easy to create a seamless, user-friendly login experience for your team.
When you're ready to test or use SAML2, simply select "Enabled". By default, the login button will display the text "SAML 2.0" and a generic logo. However, depending on how your users see it elsewhere in your system, you may want to change the text to match your provider or to something that your users expect. The important thing is to make sure the button text and logo are meaningful to your users.
SAML 2.0 Connection
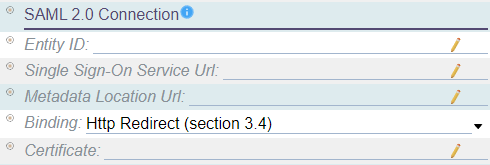
The successful integration of LoginHub and SAML for authentication purposes heavily relies on the SAML2 Connection settings. These critical settings can be found in your SAML2 application configuration with help from your SAML2 provider of choice. Note that there is no specific document to follow since the UI varies among different providers.
The SAML2 Connection settings consist of five key elements that ensure a secure connection between LoginHub and your SAML2 provider. These elements include:
- Entity ID: A globally unique identifier for either your Identity Provider (IdP) or Service Provider (SP), allowing other services to identify your entity.
- Single Sign-On Service URL: A unique URL that LoginHub uses to initiate the user SSO login flow.
- Metadata Location URL: An XML document containing information necessary for interaction with SAML-enabled identity or service providers, such as URLs of endpoints, information about supported bindings, identifiers, and public keys.
- Binding: Specifies how LoginHub should communicate to your SAML2 provider. The recommended setup depends entirely on the provider.
- Certificate: An encryption certificate used for secure communication with the SAML2 provider.
By providing the Entity ID, Single Sign-On Service URL, and Certificate information, you ensure that the authentication flow between LoginHub and your provider is smooth and secure. These settings are essential in enabling a seamless and secure authentication process for your users.
Provider Group/Role Mapping
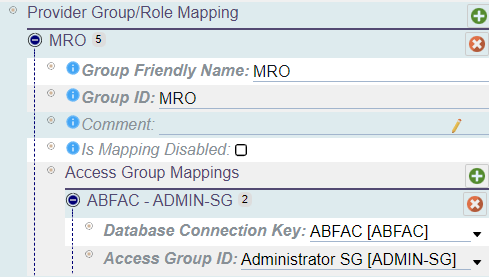
In the LoginHub configuration, Provider Group/Role Mapping allows you to map groups or roles from the directory onto access groups and databases within Maintenance Connection. You can create as many mappings as you need and each group/role can have configuration mappings for multiple databases.
To set up a mapping, you will need to enter a friendly name, group/role id, and optional comment. Once you have added the mapping, you can add one or multiple access group mappings per group.
An access group mapping must include a database and an access group. Keep in mind that a group cannot be mapped to multiple access groups in one database, but it can be mapped to multiple access groups in one per each database. With this configuration, you can ensure that users are assigned the appropriate access levels within Maintenance Connection based on their group or role in the directory.
Notes
- You can create multiple mappings and each group/role can have configuration mappings for many databases.
- It is possible to represent the same group multiple times in the list. While this is acceptable and supported, it is not recommended for performance reasons.
- Deleting a group mapping or an access group mapping is as simple as selecting the red X next to the mapping you wish to remove.
- Adding a new mapping is also straightforward, as you simply need to select the green + on the title bar of the mapping section you wish to add into.
- Don't forget to save your changes after making any updates. Changes are cached locally and are not submitted to the server until you select save.
Sync Options
When configuring your identity provider in LoginHub, keep in mind that the data structure in your provider is unlikely to match that in MC. Fortunately, LoginHub offers flexible mapping options that allow you to translate data from your provider to the values stored in MC. While it may be tempting to wish for a one-size-fits-all solution, the reality is that each provider and package keeps data differently. Some SSO software may only work with a limited number of providers or may be too simplistic to offer robust mapping options. LoginHub, on the other hand, supports thousands of ID providers and enables you to manage your users and security from the ID side. These powerful mapping settings are a key value proposition of LoginHub for MC and your identity provider.
- Fullname format: If the provider does not provide the user's name, this string format will be used to create it.
- Maintain access groups manually: This disables the automatic setting of access groups for users, except during user creation. It can be useful for basic SSO providers or situations where advanced providers are used only for authentication, not authorization.
- Maintain labor data manually: This disables updates of labor records, except during user creation. This does not disable setting access groups. If both need to be disabled, "Maintain Access Groups Manually" must also be set.
- Should sync phone number, home phone number, mobile phone number, pager, and fax number: If the corresponding claim is provided, the user's Labor record will be automatically updated with the data from the provider on each login.
- Default email address: If the directory does not have an email address for the user, an invalid default email will be filled in to allow the user to login. This will give the user fewer features and no warning that they don't have all the features.
- Requester/limited users and repair centers: Requesters can be assigned to a repair center, or if not assigned, they will default to the default repair center. This uses the standard repair center logic and applies it to requesters as well.
- Repair center and craft update on login: The user's Repair Center and Craft can be updated on login, unless "Maintain Labor Data Manually" is set.
- Repair center found via Access Group UDFChar1 field: The user's Access Group is checked for a reference to a valid Repair Center ID in the UDFChar1 field. If it is found, the user will default to that Repair Center instead of the default one.
- Disable users who don't have enough access to login: During an interactive login, a user account that does not meet the access criteria can be disabled. This can be useful if "Approve Access if User is Approved/Enabled in Provider" is disabled.
- Use name claim to provide a name: If the name claim is present, it will be used as the user's fullname. Otherwise, "Fullname Format" will be used.
- Use initials claim to provide a name: If the initials claim is present, it will be used as the user's initials. Otherwise, the initials will be built from the first, middle, and last names.
OpenID Connect
OpenID Connect (OIDC) is a widely adopted open standard for login providers, offering a secure and flexible approach to authentication and authorization. As a leading provider of identity and access management solutions, LoginHub has fully embraced this standard as a full provider, making it accessible to a wide range of organizations.
While various authentication providers offer support for OIDC, many of them are limited and restrictive when compared to SAML2 implementations. However, LoginHub offers a powerful OIDC provider that is ideal for organizations that do not have SAML2 implementations, but still require robust authentication and login features.
With the LoginHub OIDC provider, organizations can enjoy a wide range of benefits, including the ability to map users and groups, leverage custom claims (when supported by the provider), and map multiple groups to different databases. Additionally, organizations can choose the level of data synchronization between the identity provider and Maintenance Connection, ensuring a seamless and secure user experience.
LoginHub's OIDC provider is backed by years of industry experience and expertise, making it a reliable and effective choice for organizations of all sizes. Whether you're looking to improve security, streamline login processes, or enhance user experience, the LoginHub OIDC provider is a versatile and powerful solution that can help you achieve your goals.
General
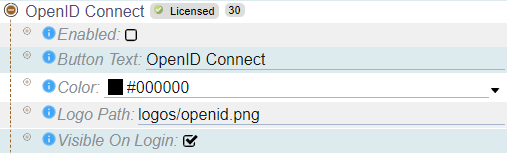
In addition to LoginHub OpenID Connect's advanced mapping and syncing capabilities, OpenID Connect offers flexible configuration options for customizing the appearance and text of the login button. With OpenID Connect, you can easily configure the look and feel of the login button to match your organization's branding and design guidelines, ensuring a consistent user experience across all applications and systems. These simple yet powerful customization options make it easy to create a seamless, user-friendly login experience for your team.
When you're ready to test or use OpenID Connect, simply select "Enabled". By default, the login button will display the text "OpenID Connect" and the corresponding logo. However, depending on how your users see it elsewhere in your system, you may want to change the text to match your provider or to something that your users expect. The important thing is to make sure the button text and logo are meaningful to your users. With OpenID Connect, you have the flexibility and control you need to create a login experience that meets the unique needs of your organization.
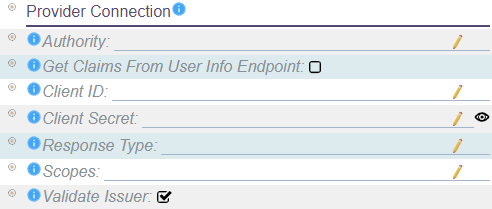
Provider Connection
The Provider Connection settings play a critical role in the integration of LoginHub and OpenID Connect for authentication purposes. These settings are typically defined in the application configuration of your identity provider. Since the UI and experience of each provider can vary significantly, there is no specific documentation provided by LoginHub for collecting this information. Instead, your provider should offer documentation and guidance on how to obtain and input the necessary settings for a successful integration.
The Provider Connection settings include the following key elements:
- Authority: The URL of the authentication server that LoginHub should connect to.
- Get Claims From User Info Endpoint: Specifies whether a second call should be made to the user info endpoint to retrieve additional claims.
- Client ID: A unique identifier that distinguishes this caller from other callers.
- Client Secret: A secret key used to access the identity provider.
- Response Type: Controls whether additional data is requested from the provider.
- Scopes: An OpenID Connect scope refers to a set of claims being requested. Maintenance Connection requires a specific set of claims to be present, which may require asking for a specific set of scopes from the provider.
- Validate Issuer: Specifies whether the token should be validated for correctness when it is received. Depending on the remote provider, this feature may need to be disabled.
As the foundation of your authentication process, it's essential to ensure that your Provider Connection settings are accurately configured. These settings will help ensure a smooth and secure user experience when accessing your applications and systems via LoginHub.
By working closely with your provider and following their documentation for obtaining and inputting the necessary settings, you can ensure a successful integration with LoginHub and OpenID Connect. Don't hesitate to reach out to your provider or the LoginHub support team if you have any questions or encounter any issues during the integration process.
Provider Group/Role Mapping
In the LoginHub configuration, Provider Group/Role Mapping allows you to map groups or roles from the directory onto access groups and databases within Maintenance Connection. You can create as many mappings as you need and each group/role can have configuration mappings for multiple databases.
To set up a mapping, you will need to enter a name, group/role id, and optional comment. Once you have added the mapping, you can add one or multiple access group mappings per group.
An access group mapping must include a database and an access group. Keep in mind that a group cannot be mapped to multiple access groups in one database, but it can be mapped to multiple access groups in one per each database. With this configuration, you can ensure that users are assigned the appropriate access levels within Maintenance Connection based on their group or role in the directory.
Notes
- You can create multiple mappings and each group/role can have configuration mappings for many databases.
- It is possible to represent the same group multiple times in the list. While this is acceptable and supported, it is not recommended for performance reasons.
- Deleting a group mapping or an access group mapping is as simple as selecting the red X next to the mapping you wish to remove.
- Adding a new mapping is also straightforward, as you simply need to select the green + on the title bar of the mapping section you wish to add into.
- Don't forget to save your changes after making any updates. Changes are cached locally and are not submitted to the server until you select save.
Sync Options
When configuring your identity provider in LoginHub, keep in mind that the data structure in your provider is unlikely to match that in MC. Fortunately, LoginHub offers flexible mapping options that allow you to translate data from your provider to the values stored in MC. While it may be tempting to wish for a one-size-fits-all solution, the reality is that each provider and package keeps data differently. Some SSO software may only work with a limited number of providers or may be too simplistic to offer robust mapping options. LoginHub, on the other hand, supports thousands of ID providers and enables you to manage your users and security from the ID side. These powerful mapping settings are a key value proposition of LoginHub for MC and your identity provider.
- Fullname format: If the provider does not provide the user's name, this string format will be used to create it.
- Maintain access groups manually: This disables the automatic setting of access groups for users, except during user creation. It can be useful for basic SSO providers or situations where advanced providers are used only for authentication, not authorization.
- Maintain labor data manually: This disables updates of labor records, except during user creation. This does not disable setting access groups. If both need to be disabled, "Maintain Access Groups Manually" must also be set.
- Should sync phone number, home phone number, mobile phone number, pager, and fax number: If the corresponding claim is provided, the user's Labor record will be automatically updated with the data from the provider on each login.
- Default email address: If the directory does not have an email address for the user, an invalid default email will be filled in to allow the user to login. This will give the user fewer features and no warning that they don't have all the features.
- Requester/limited users and repair centers: Requesters can be assigned to a repair center, or if not assigned, they will default to the default repair center. This uses the standard repair center logic and applies it to requesters as well.
- Repair center and craft update on login: The user's Repair Center and Craft can be updated on login, unless "Maintain Labor Data Manually" is set.
- Repair center found via Access Group UDFChar1 field: The user's Access Group is checked for a reference to a valid Repair Center ID in the UDFChar1 field. If it is found, the user will default to that Repair Center instead of the default one.
- Disable users who don't have enough access to login: During an interactive login, a user account that does not meet the access criteria can be disabled. This can be useful if "Approve Access if User is Approved/Enabled in Provider" is disabled.
- Use name claim to provide a name: If the name claim is present, it will be used as the user's fullname. Otherwise, "Fullname Format" will be used.
- Use initials claim to provide a name: If the initials claim is present, it will be used as the user's initials. Otherwise, the initials will be built from the first, middle, and last names.
LoginHub Entity/Database Settings

The LoginHub Entity/Database settings section displays an item for each database that is configured and licensed in the system. If you find that a database is missing or not represented correctly, you can check the license details.
These settings allow you to apply LoginHub and provider configuration to each individual database. This includes controlling the priority of access group (in cases where multiple mappings exist in the directory), configuring database defaults such as the default craft, and determining the display order of the application picker.
Access Group Settings

The Access Group settings provide several options for customizing the way access groups are managed:
- Access group priority: when a user has multiple mapped roles, you can choose which access group has the highest priority. If the access group for a user is not in the list, a random choice will be made.
- Approve any access: this option determines whether a user needs to be approved before they can login. When creating a new user, you can choose whether to approve them automatically or manually.
- Per Access Group Settings: you can assign a default repair center, craft, or automatic approval for each access group. These settings allow you to customize the way each group is managed.
Application Picker Settings
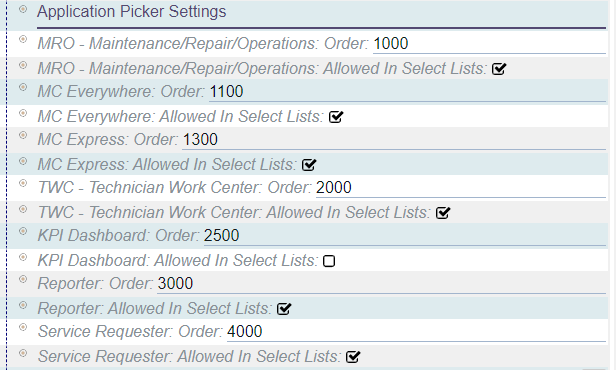
The Application Picker settings allow you to control which applications are displayed to users and in what order. By default, the settings are usually sufficient, so changes are not typically necessary. However, if you need to hide an application from the list or reorder the applications, this is where you can do so.
Please note that these settings do not apply to direct login users, which requires a separate license.
The following applications can be configured and ordered:
- MRO (Maintenance Repair and Operations)
- MC Everywhere
- MC Express
- TWC (Technician Work Center)
- KPI Dashboard
- Reporter
- Service Requester
Scripted Field Settings
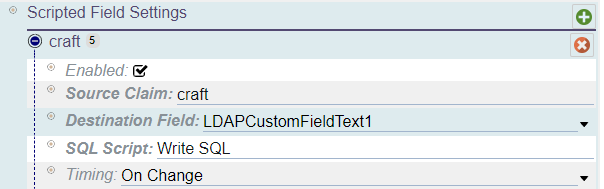
The Scripted Field Settings is an advanced feature that requires a separate license. With this feature, you can run custom scripts during the login process.
To configure this feature, you'll need to select a source claim, which should be configured in the Additional Claims for the provider. You'll also need to specify a destination field that will detect when the field changes. If the data doesn't require reporting and can be of unknown length, it's best to use the hash fields. Additionally, you'll need to specify an SQL script to run and the timing of the script, whether it should run once or every time a user logs in.