

 Maintenance Connection Everywhere (MCe) · EAM/CMMS manuals
About
The Maintenance Connection Login Hub is used to setup the links and mapping information from a LDAP source such as Active Directory to the Maintenance Connection user list and access group settings. Once the configuration has been completed, a Login Hub service can be installed which will, on a scheduled basis, setup new users for MC access and update existing users with the appropriate access rights.
Contents
Upgrading From Previous Versions 6
Upgrading to Login Hub v8.9 From Versions older than 7.0 6
Upgrading to Login Hub v8.9 from Version 7.0 or higher 7
Pre-Installation/Pre-Upgrade 7
Extract the files you will need 8
Windows Authentication environment 8
Additional Pre-installation steps 8
Installation/Upgrade Process 8
Summary Installation (Upgrade) Process 8
Configuring for Azure Active Directory 10
Configuring for Novell LDAP Only 10
Starting the Login Hub Service 10
Configuration Wizards in Detail 11
Launching the Configuration Application 11
Areas that can be Configured 12
Configuring the Connection to Maintenance Connection 12
Update Registration Database 13
Number of LDAP Connections (optional screen) 13
Select Load Balancing License 13
Map Licenses to Entity Databases 14
Configuring the LDAP Directory Type to Connect To 14
Microsoft Active Directory (Custom) 15
Configuring Special Service Options and Sync Timings 15
Advanced Capture (optional page) 17
Configuring Each LDAP Connection 18
Configuring the LDAP Directory Connection 18
Active Directory Connection (AD Only) 19
Novell Directory Connection (Novell Only) 19
Configuring LDAP Field Mapping (Active Directory Only) 19
Configuring LDAP Field Mapping (Novell Only) 20
Configuring LDAP Group Mapping 22
Map LDAP Groups onto Access Groups 23
Scripted Field Import Mapping 24
Assigning Repair Centers to Labor/Requesters 27
Importing unmapped fields into MC from LDAP 27
Appendix: Environment Setup testing and problem shooting 28
Some other, less likely, causes of getting the password/id prompt 30
Appendix: Install .NET 4.6.1 35
Appendix: Create an Application Pool 36
Appendix: Turn on Windows Authentication Feature Delegation 37
Appendix: Installing Automatic Login Pages into Maintenance Connection 38
Appendix: Initial Configuration of Login Hub 39
Check and update the Registration Database 39
Check and update each Entity database 41
Appendix: Configure Login Providers 42
Adding Azure Active directory 42
Adding a New Login Provider 42
Configuring a Login Provider 42
Active Directory 👥 (Active Directory Forced Login prompt) 43
Appendix: Bypassing the Login Screen 45
Appendix: Setting up Login to MC Express 46
Appendix: Setting up Login to MCEverywhere 47
Appendix: Issues you might run into upgrading from pre 7.0 versions 52
Case Study 1: one cause of 404.15 52
Appendix: Things that are not documented in this manual yet 54
Supported Configurations
The Login Hub Service is a very flexible integration service and can be setup many different ways. While it is impossible to actually test every possible configuration here are some known good configurations. Some of these configurations may require additional licenses to work.
- Active Directory & Server 2003+ Single MC Database
- Multiple Active Directory Forests/Domains & Server 2003+ Single MC Database
- Active Directory & Server 2003+ Multiple MC Databases
- Multiple Active Directory Forests/Domains & Server 2003+ Multiple MC Databases
- Novell Groupwise Single MC Database
- Novell Groupwise Multiple MC Databases
New installations:
Skip past the upgrade instructions, go directly to Configuration
Upgrading From Previous Versions
There have been many changes to the LDAP integration service over time. Login Hub Version 7 was a major upgrade to LDAP (and the name of the product changed due to the much wider login options, LDAP is now just a small portion of the new Login Hub, largely because of major structural changes in MC7 from MC6).
Upgrading to Login Hub v8.9 From Versions older than 7.0
Many new changes and improvements were added to v7.0 of the Login Hub. Due to the significance of the changes made the configuration and setup of previous versions cannot be automatically imported into the new software.
- Stop the Maintenance Connection LDAP Service using the Services tool in Windows.
- Start the configuration program.
- Click on Service Configuration, Uninstall the service.
- Close the configuration program.
- Backup the tool and configuration settings
- There were multiple acceptable ways of installing ldap into IIS with previous versions of the software. Through the years installers have used every single method depending upon customer requirements. No previous setups are supported. We have a single usable method now (as of 7.0) that provides login in every supported way previously and many more. Also no longer needing hacks. If the installer/upgrader cannot figure out what was done to install ldap originally they must remove MC from IIS entirely. Remove any web.config files created into MC and reinstall everything using current standards. Delete the old tool and software. This also means: Undo all the special settings that were setup for the old LoginHub
- The old configuration tool can be run (but do NOT save!) from the backup folder to enable easy discovery and transfer of settings from the old tool to the new service.
- Follow the standard Login Hub installation process
Upgrading to Login Hub v8.9 from Version 7.0 or higher
Version 8.2 is available.
1. Download the upgrade exe file and place it into the install directory, typically c:\maintenance connection\mcc_loginHub
2. Stop the LoginHub Service from the Windows Services manager
3. Run the upgrade exe. It will uninstall the previous service and upgrade files, leaving important configuration files untouched.
4. Start the configuration application.
5. Double check the license and activation status, if required enter the Maintenance Connection Setup and run or re-run the activation steps.
6. Configure any new settings (if new features have been added)
7. Install and start the Active Directory sync service
Configuration
Configuring the Login Hub service is explained in detail in the installation process. When making changes to settings the service should be stopped to ensure all settings are properly reloaded. After changes are complete start the service.
Once setup is completed it is unlikely that extensive changes will need to be made. Individual settings can be changed (mostly) without concern for affecting other settings. With the wizard style interface all connected settings will normally be addressed at once to ensure no partial changes are made.
Pre-Installation/Pre-Upgrade
Maintenance Connection
Make sure that Maintenance Connection has been installed and is working consistently.
Extract the files you will need
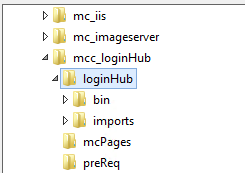
Run the mcc_loginHub_install_v8.??????.exe – this extracts the files you will need. If you are running Maintenance Connection in the default location c:\Maintenance Connection\ then you will want to extract the files in c:\Maintenance Connection\mcc_loginHub\
Windows Authentication environment
This step is only required if Active Directory is one of your providers.
This does NOT apply to Azure Active Directory. While it is a very similar name, Azure Active Directory is completely unrelated to Active Directory from our and most perspectives, it is marketing decision of MS not technical.
Only if using Active Directory (Not if only using Azure Active Directory) Windows Authentication Feature Delegation needs to be on. See Appendix: Turn on Windows Authentication Feature Delegation
We have an Appendix: Environment Setup testing and problem shooting that we strongly recommend you follow BEFORE anything else. If you are experienced setting up the Login Hub, those steps are optional and you can decide whether to do them or wait until you have problems before doing them (perhaps just run the last one, and if it works, carry on.) Experienced installers will frequently 'recognize' when they need to go back and run those tests. If you are not comfortable that you know how – then run those tests first to make sure your environment is correctly set up.
Additional Pre-installation steps
1. Everyone: Ensure that appropriate permissions have been granted within the Login Hub directory to have either anonymous querying of the Domain or a user has been setup that has sufficient permissions.
2. Only if Active Directory is one of your providers (Not needed for Azure Active Directory): Confirm that the IIS Server has been attached to the Active Directory domain.
3. Ensure the Pre-Installation questionnaire has been filled out.
4. Only if Active Directory is one of your providers (Not needed for Azure Active Directory): We recommend you go and run the Environment Setup tests again – if you've already run them above or you are experienced and confident, start with the last one, if it works, you don't need to run the previous ones. This is to make sure nothing you did above 'broke' it accidently.
Installation/Upgrade Process
Summary Installation (Upgrade) Process
Make sure you checked the pre-installation instructions above, and if this is an upgrade, ensure you read the upgrade instructions above.
The following instructions are designed to let both new and experienced installers accomplish their install with the least difficulty. If you are at all unsure – see the appendixes that are linked, they have the detailed notes for each step.
1. You need .NET 4.6.1 installed. See Appendix: Install .NET 4.6.
2. You need a mcc_loginHub AppPool. See Appendix: Create an Application Pool
3. Create an Application loginHub the /mc_web/onsite/ directory (be careful, a common mistake is to not put somewhere other than 'inside' onsite. The IIS application required to be inside the logical onsite directory.)
- Note it depends on which version of IIS Manager you are running what this is called. It may be called "Add Application" or "Add Application Directory". But it is not the 'Add Virtual Directory' option.
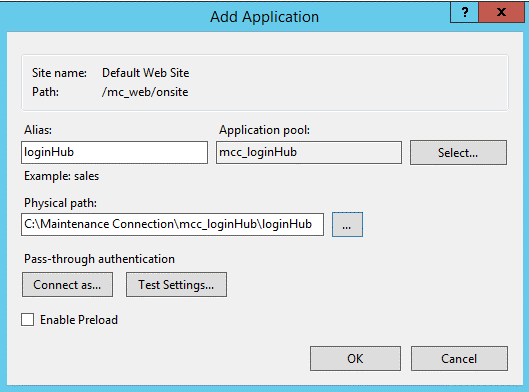
- Called (Alias) loginHub (Mandatory, note the H is capital, on some systems, some settings this may not matter, but if settings/setup change, it could start to fail later, so use 'H')
- Use the apppool from previous step
- Pointed to your /mcc_loginhub/loginHub directory (So "c:/Maintenance Connection/mcc_loginhub/loginHub by default.)
4. Edit the web.connection.config file in /mcc_loginhub/loginHub/. Change line 2 if it doesn't match your system. It should have the path to the mc.ini file. The default is set to "c:/Maintenance Connection/mc_iis/mc.ini"
5. Install Automatic Login pages (Copy the mcPages directory files to overwrite the mc_iis\onsite ones). See Appendix: Installing Automatic Login Pages into Maintenance Connection.
6. In a supported browser (IE 11, Edge, Chrome, Safari), go to MC. It should automatically load the login hub pages, in a default configuration, browse to: <servername>/mc_web.
- If you get a 404 error, check step 3 carefully. A common mistake is to put the application at the same level as onsite instead of putting it INSIDE of the onsite IIS logical directory.
- If you get the MC standard login pages. A common mistake is to forget to do the 'Installing Automatic Login' ste?
- If MC tells you that you need to run in IE 11 and you ARE running in IE 11, this is a bug in MC, and has nothing to do with the login Hub. HOWEVER … 'this' is a point where you are more likely to first run into this bug than normal. If you have this bug, you need to turn OFF 'Display intranet sites in Compatibility View' in the Compatibility View Settings of IE, or you need to fix it on the server side: https://msdn.microsoft.com/en-us/library/ff955275(v=vs.85).aspx.
7. Perform the Initial Setup if required. See Appendix: Initial Configuration of Login Hub
8. Configure the required Login Providers. See Appendix: Configure Login Providers
-

- Once complete, you can select the "Return to Login" button on the top right corner of the page
9. Login via "MC Account" Login to confirm the setup
10. If you have set up a login for Active Directory. Perform a test login via Active Directory.
- If you have already run the LoginHub Service with a successful sync, you will login
- If you have not, you will see a "Login Successful" page. This tells you the login process was successful (IIS & Active Directory are communicating properly) but your account was not found in the MC Database.
11. f requiring Active Directory or Novell LDAP sync, setup the Login Hub Service. See Configuration Wizards in Detail for more information.
Configuring for Azure Active Directory
This is explained in a separate document, if you don't have it, please ask for it.
Configuring for Novell LDAP Only
There are several ways Novell LDAP can be implemented. Contact Maintenance Connection support to create a Login Hub implementation plan for your specific Novell LDAP configuration.
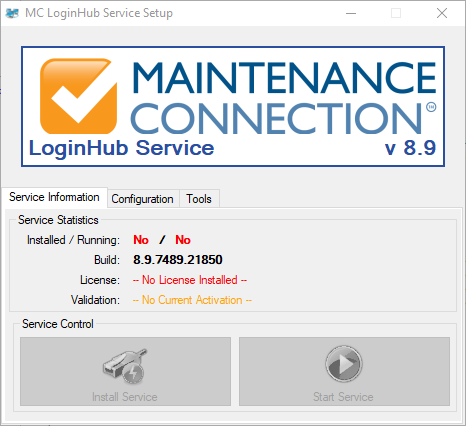
Starting the Login Hub Service
Required if you are using any providers that we provide a synchronizing service for (for example: To synchronize your Active Directory accounts.)
Once the Login Hub service has been successfully configured and tested it can be installed and started. Installing and starting the service is controlled from the Service Information tab in the configuration application. See "Launching the Configuration Application" for a screenshot and details of how to start the configuration application.
Configuration Wizards in Detail
This configuration section applies to existing installations as well as new installs. All configuration steps are the same regardless of if the product is already installed and configured. The only exception to this is an existing installation does not need to re-insert configuration information that is already present.
You cannot change configuration options while the service is running. Always stop the running service (can be done in the configuration application) before performing any changes to the configuration.
Launching the Configuration Application

To launch the configuration application, double click on the Configure.exe application.

Launching Configure.exe may display a UAC elevation prompt. Select accept to enable the configuration program to properly launch.
You will then be asked for an Impersonation Check
Make sure you select the correct account type that will be running the Login Hub Service. This will ensure that all test actions are run using the same configuration and provide more accurate test results.
Once running you will see a screen similar to the one to the left.
Areas that can be Configured
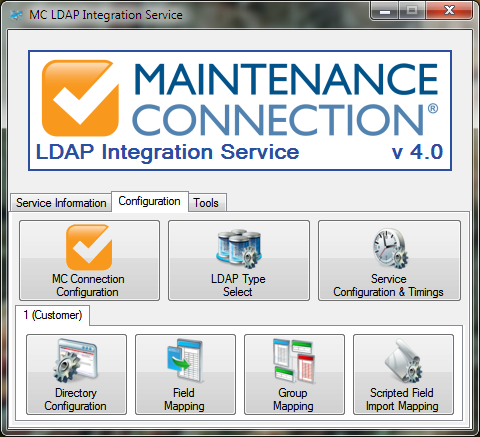
To the left is a screenshot of the various configuration wizards that can be used to configure the LDAP Integration Service. These configuration wizards are explained in the sections below.
Configuration can only occur when the service is not running.
Configuring the Connection to Maintenance Connection
.png)
Configuring access to Maintenance Connection is the first step to having the Login Hub Service running. Launch the configuration wizard by selecting the MC Connection Configuration button on the Configuration tab. The wizard will launch and step you through connecting to Maintenance Connection.
Welcome Screen
The first screen of the wizard is the welcome screen. It explains what the purpose of the wizard is. Select next.
mc.ini Path
 This page of the wizard will enable you to select the location of the mc.ini file. This file contains the required connection information to connect to the Maintenance Connection databases. Once the file is selected a test will be performed to ensure the INI information can successfully connect to the database and that the database selected is considered a valid Registration database. Select next.
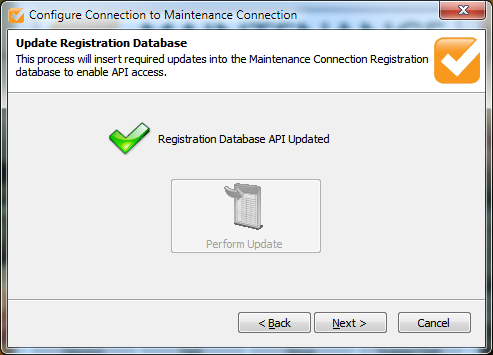 Update Registration Database
The Login Hub engine requires certain API changes to the registration database to operate. This is essential for error free execution of the service.
This should be checked on each upgrade of the service incase new features have been added to the database. If an update is required a red X will be displayed and the Perform Update button will be selectable. Perform the update if required and then select next.
Select License
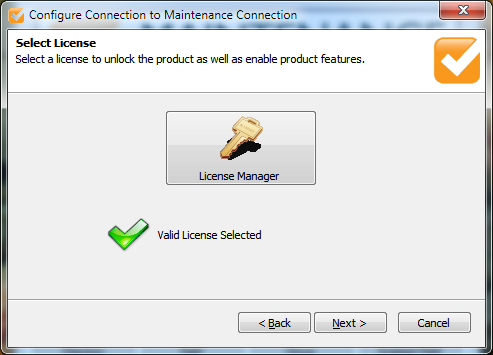
On this page you will select the license to unlock the Login Hub service. This will allow the Login Hub service to be able to execute properly and display only the most relevant configuration options. If you need assistance with the License Manager please contact your Maintenance Connection administrator. Once the license has been selected it will be validated and you will be able to select next.
Number of LDAP Connections (optional screen)
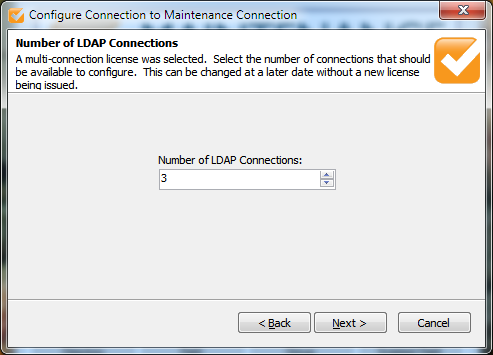
This optional page of the configuration wizard will display if you have selected a license that contains 2 or more connections. This enables the user to customize the number of configurable connections without requesting an updated license from Maintenance Connection each time. A connection is defined as the configuration information between 1 LDAP directory and 1 MC database. Unlimited connections can be configured if the proper license has been purchased and installed.
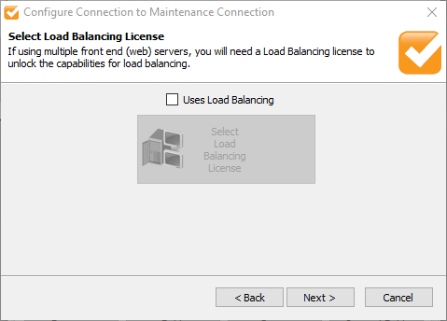
Select Load Balancing License
On this page you will configure LoginHub so it is aware if it will be running load balanced or not. Running in a load balanced cluster requires a special license to access the extra features that are typically required for load balancing. If running in a single front end server configuration (this does not impact the ability to have SQL Server on a different server), then select next. If running on a load balanced cluster enable the checkbox and select your load balancing license.
Map Licenses to Entity Databases
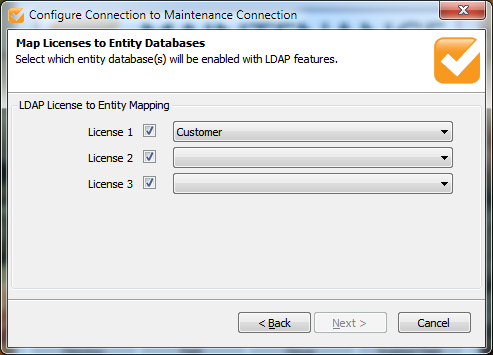
This page enables mapping each connection to a MC database. The same database can be used multiple times if required. If the mc.ini file is configured to use a fixed entity database it will be impossible to change the database references. The check boxes next to each license enables the user to temporarily disable the connection from syncing. This is useful if you want to configure a number of connections and leave them disabled until it is time to roll out the functionality to the affected users.
Update Entity Database
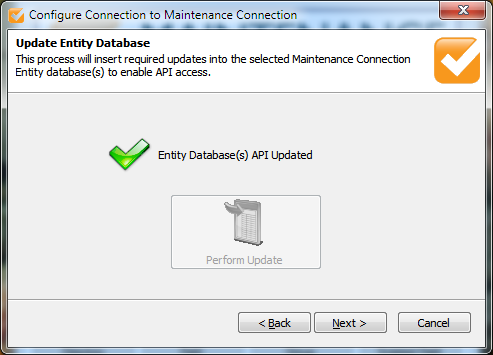
On this page you will have the ability to upgrade the entity database(s) with the updated LDAP API containing new functions, tables and columns to enable the Login Hub service to run successfully. This is essential to error free execution of the service.
This should be checked on each upgrade of the service incase new features have been added to the database. If an update is required a red X will be displayed and the Perform Update button will be selectable. Perform the update if required and then select next.
Success Page
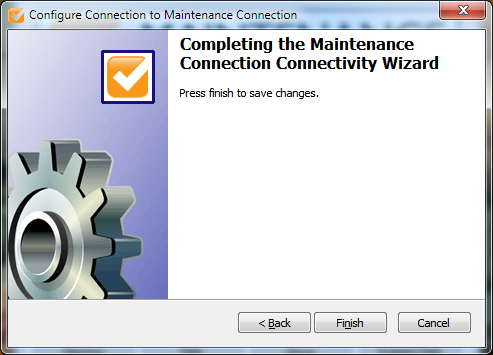
The last page will enable you to save your changes or cancel. Select finish to save your changes or select cancel to throw out your changes.
.png)
Configuring the LDAP Directory Type to Connect To
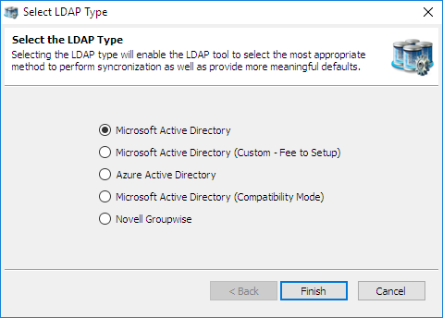
This allows you to change which type of LDAP directory you will connect to. The five available options are:
- Microsoft Active Directory
- Microsoft Active Directory (Custom – Fee to Setup)
- Azure Active Directory
- Microsoft Active Directory (Compatibility Mode)
- Novell Groupwise
Select the appropriate option for the LDAP directory you will be using. Active Directory Compatibility Mode is available for instances where Active Directory 2003 is running in compatibility mode with Active Directory 2000, or has some required features disabled. This mode may not offer 100% of available functionality.
Select finish to save your changes.
Microsoft Active Directory (Custom)
This is a special mode for custom configurations that are not supported in the default configuration. Use of this mode does require by the hour install/configuration costs to setup.
Cases where this might be useful:
- Custom Container requirements
- Local PC (not technically AD)
- Any other case where the default connection does not connect
Configuring Special Service Options and Sync Timings
.png)
This wizard allows you to configure how the service will operate in the background. This wizard contains all the global options and settings for the service are set. Keep a careful eye on all the settings as many settings have a direct impact upon the first sync and effectively do nothing after the first sync is complete.
Please consider the following carefully. These settings customize how the LDAP service works at a very base level and will cause completely different results if set differently.
Welcome Screen
The first screen of the wizard is the welcome screen. It explains what the purpose of the wizard is. Select next.
Service Timing
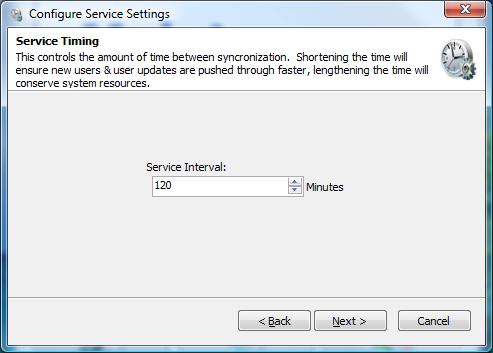
This page will enable you to configure the service interval. This is how often the service will attempt to synchronize between the LDAP directory and Maintenance Connection. Selecting a longer interval will mean that LDAP directory changes will take longer to appear into Maintenance Connection, a shorter interval will cause changes to appear sooner. Select next.
Service User Account
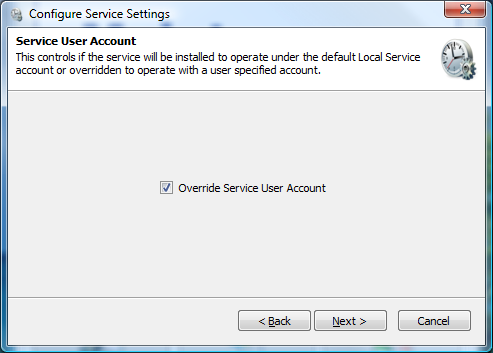
On this page you will be able to configure if the service will prompt for a special user account when installing the service. By default the service will install under the Local Service account, if this account does not have sufficient permissions to access the network (and LDAP) you will need to override the account with a different one. When you install the service it, Windows will prompt for a User Account and Password if this is enabled. Select next.
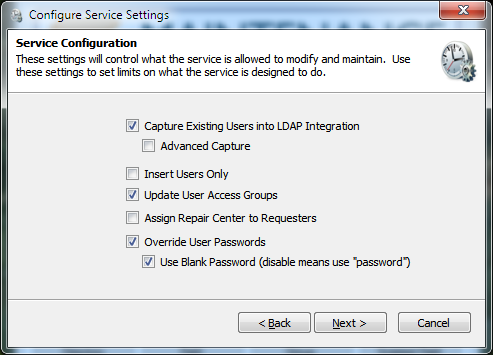
Service Configuration
On this page you will be able to configure how users are managed in the Login Hub service. The options are explained here:
- Capture Existing Users into LDAP Integration
This option is to prevent duplicate Labor/Requester records from appearing after the first sync. It will allow the service to look at user accounts already in MC and attempt to find a valid mapping with a LDAP user account. This will look in the registration database for a user record that exactly matches the LDAP user being synchronized. If existing user names are not "Domain/Username" then advanced capture will be required as well. This is recommended to be enabled.
- Advanced Capture
This is an advanced form of the previous option, it will attempt to use more advanced means of capturing existing users, including looking at Labor IDs and e-mail addresses. This is will enable a follow up page allowing you to select which advanced methods to use. This is recommended to be enabled. More details in "Advanced Capture (optional page)"
- Insert Users Only
This option is for when LDAP directory data is considered out of date. This will keep users Access Group settings matched correctly within Maintenance Connection but will not update any other LDAP sourced information such as Phone, Name and anything else. If this is set user information must be manually maintained within Maintenance Connection. If some LDAP information is considered incorrect but other information is correct this should be left disabled and "LDAP Field Mapping" should be used. This is recommended to remain disabled.
- Update User Access Groups
This option controls if the service should keep a users Access Group matched up to the LDAP directories groups. Disabling this allows Access Group changes within Maintenance Connection to be maintained. Enabling this will cause changes to a users Access Group (in MC) to be automatically reverted to the settings in the LDAP directory. This is recommended to be enabled.
- Assign Repair Center to Requesters
This option controls if the service should assign a Repair Center to requesters. If the service requester has not been assigned a Repair Center then work orders entered by the service requester will be appear in the default Repair Center. This should be enabled only if requester management uses Repair Centers.
- Override User Passwords
This option will automatically erase user passwords contained within Maintenance Connection. Enabling this option will always wipe a user's password on each sync process. Enable this option for maximum security. If using non-LDAP logins such as Tablet Hybrid or WAP this option should be disabled.
- Use Blank Password (disable means use "password")
This option controls what default password should be used on new accounts as well as what password should be used if the "Override User Passwords" option is set. This is highly recommended to remain checked. If non-LDAP logins are required it is recommended that a user go through the password reset process rather than disabling this option. Leaving this option enabled will ensure maximum security as users without a manually reset password will be unable to login except through the LDAP specific login pages.
Once configuration is complete, select next.
Advanced Capture (optional page)
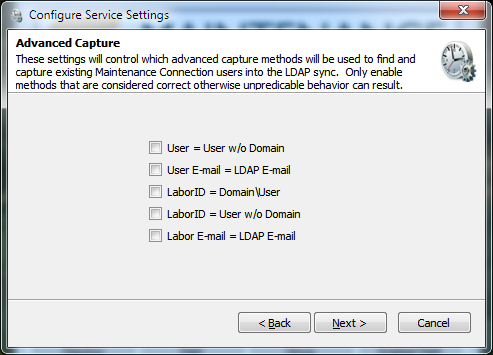
On this page you will be able to select which advanced capture methods to enable. Enabling all options will maximize the chance that existing users (from before the LDAP service was installed) will be captured into being managed by the LDAP service. Disable any options that do not make sense or will cause issues. Any capture action that results in more than 1 user being found will be discarded as a bad capture action. The available options are:
- User = User w/o Domain This option will attempt to match a record in the registration database that matches LDAP username without the domain attached.
- User E-mail = LDAP E-mail This option will attempt to match a record in the registration database using the LDAP account's e-mail address.
- Labor ID = Domain\User This option will attempt to match a record in the entity database by matching the LDAP username against the Labor/Requester IDs looking for "Domain\Username".
- Labor ID = User w/o Domain This option will attempt to match a record in the entity database by matching the LDAP username against the Labor/Requester IDs looking for the LDAP username without the domain.
- Labor E-mail = LDAP E-mail This option will attempt to match a record in the entity database using the LDAP account's e-mail address.
Ensure that you disable any capture methods that specifically make no sense for the installed Maintenance Connection environment. For instance if many users use the same e-mail address, disabling matching via e-mail address would prevent a random match from occurring.
Once the methods to perform advanced mappings with have been selected, select next.
Error Reporting
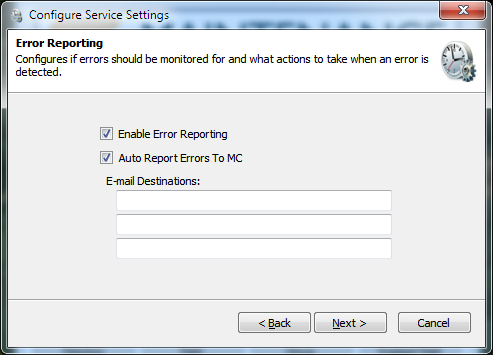
This page configures e-mail error reporting features. It is recommended to enable error reporting so that errors can be monitored by e-mail.
Regardless of the settings here errors are automatically logged to the mccErrorLog table in the registration database and full logs (max 5 days) are stored in the \log subdirectory located in the installation folder (logging to the \log directory is prevented when insufficient permissions are granted to the service user account). No reporting or logging is performed when manually executing sync procedures in the configuration UI.
Auto Report Errors To MC
This feature will automatically e-mail Maintenance Connection when Error level or above conditions occurs during the sync. E-mail reports are delivered to: errorReports@maintenanceconnection.ca. This should only ever be disabled if privacy regulations prevent sending error logs or the e-mail server is unable to deliver to outside e-mail addresses.
E-mail Destinations
This allows for entering an additional 3 e-mail destinations that can be alerted when an error occurs. Typically this should be filled in with a monitored IT support address so that if errors are related to new configuration or changed LDAP directory settings IT will be notified when the error occurs.
Success Page
Click the finish button to save your changes and close the wizard.
Configuring Each LDAP Connection
Each installed LDAP connection must be configured independently to connect to LDAP. This enables the ability to connect to multiple domain servers and/or have multiple databases or types of specific group mappings.
As shown above the bottom half of the configuration tab is headed by a second set of tabs. Each tab represents a configured connection and displays the name of the Entity database each license has been configured to connect to. To change these mappings see the instructions in "Configuring the Connection to Maintenance Connection".
Configuring the LDAP Directory Connection
.png)
Ensuring a properly setup connection to the LDAP directory is integral to having the entire integration service work.
Welcome Screen
The first screen of the wizard is the welcome screen. It explains what the purpose of the wizard is. Select next.
Active Directory Connection (AD Only)
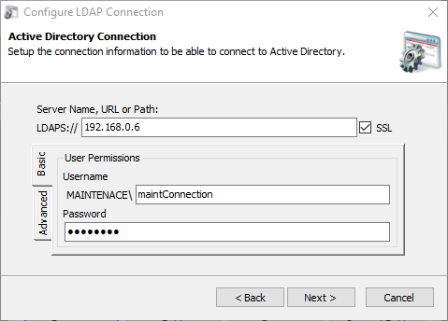
You will see the primary configuration for connecting to an Active Directory domain server. Fill in the LDAP path and a username & password for the connection. The username & password are optional though may be required depending upon the configuration of the domain server.
The advanced tab is used to change a few advanced settings for connecting to the domain server. If the domain server does not report usernames with the domain included uncheck the "Use Domain in Username". If the domain name being reported is not the domain name the server uses, for example a multi-domain environment, override the domain name and type in the correct name. Once finished select next to continue.
Novell Directory Connection (Novell Only)
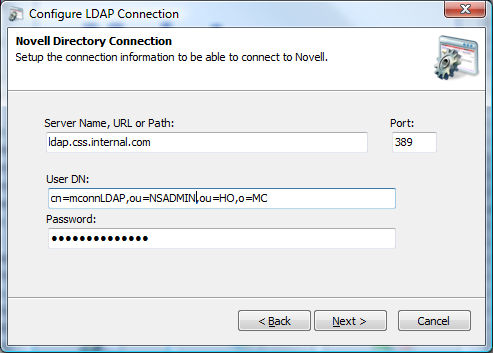
This is where you set the primary configuration for connecting to a Novell LDAP directory. Fill in the directory path and port number. Connecting to a LDAP directory also requires a fully qualified user distinguished name and the user's password. Once finished select next to continue.
Test Directory Connection
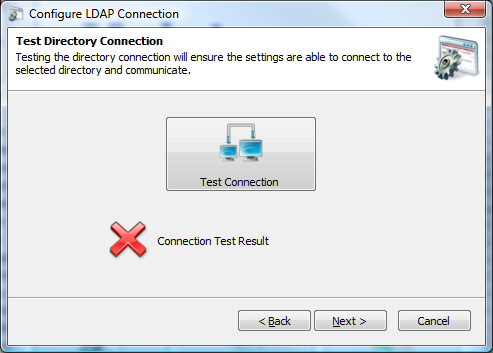
This is the wizard screen that allows you to test the connection to the LDAP directory. A connection attempt is made immediately upon going to the page. If the attempt fails a red X will appear; if it succeeds a green checkmark will be displayed. To receive a popup with error results select the Test Connection button. Once a connection is achieved select next.
Success Page
Click the finish button to save your changes and close the wizard.
Configuring LDAP Field Mapping (Active Directory Only)
Configuring the field mappings ensure that the correct information flows from Active Directory into Maintenance Connection. Due to many fields in Active Directory being predefined by the system, several fields have fixed defaults.
Welcome Screen
The first screen of the wizard is the welcome screen. It explains what the purpose of the wizard is. Select next.
Username & E-mail Address
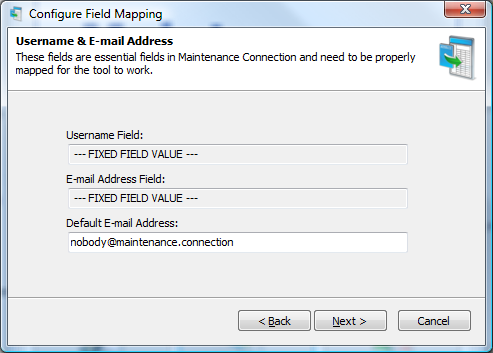
his is the page for configuring the default e-mail address of a user to be synchronized into Maintenance Connection. It is possible to insert users into Active Directory that do not have an e-mail addresses specified. Maintenance Connection does not allow this behavior and all users must have an e-mail address pre-defined. To allow for syncing users without a configured e-mail address you must setup a fallback e-mail to use. Any e-mail addresses, including invalid ones are acceptable. Select next.
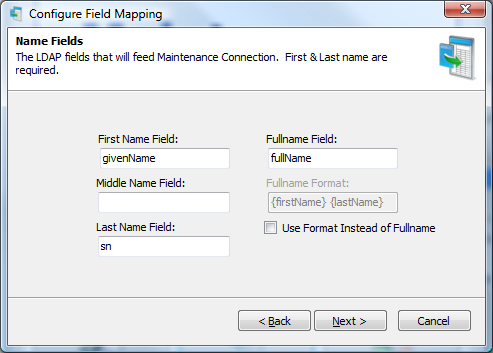
Name Fields

This is the page to configure how user's names will be added into Maintenance Connection. By default names in Active Directory are stored "Firstname Lastname". This can sometimes be undesirable behavior making it hard to look up users in Maintenance Connection (for instance using various address book functions). The Labor/Requester name can be overridden here with a custom name format. Allowed custom format fields are described on the screen. Select next.

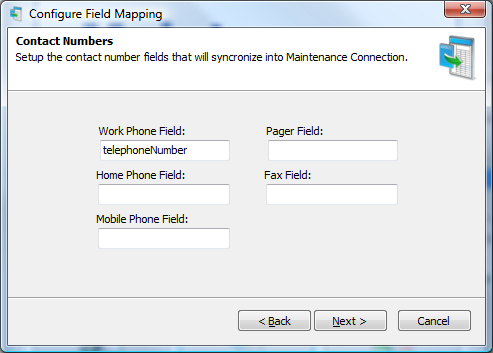
Contact Numbers
This is the page for configuring user phone numbers. If a field is configured and it does not contain any data the corresponding information in Maintenance Connection will not be overwritten. Any fields that have the checkmark next to the field unselected or are left non-configured (no value in the field) will not be synchronized. Select next.
Success Page
Click the finish button to save your changes and close the wizard.
Configuring LDAP Field Mapping (Novell Only)
.png)
Configuring the field mappings ensure that the correct information flows from LDAP into Maintenance Connection. Since standard LDAP directories do not have a long list of pre-defined fields there are many fields that need to be configured for a successful sync.
Welcome Screen
The first screen of the wizard is the welcome screen. It explains what the purpose of the wizard is. Select next.
Username & E-mail Address

This is the page where you will configure the LDAP fields for the Maintenance Connection username, the e-mail address and the default e-mail address to use in Maintenance Connection if an e-mail address is not available in the LDAP directory. Once configured select next.
Name Fields
This is the page where you configure what fields give a user their name. A full name format can be used instead of a field from the directory; anything can be hardcoded into the format. Available dynamic fields are: {firstName}, {middleName} and \lastName}. Select next when finished.
Contact Numbers
Chis is the page for configuring user phone numbers. If a field is configured and it does not contain any data the corresponding information in Maintenance Connection will not be overwritten. A non-configured field will not be synchronized. Select next.
Advanced Fields
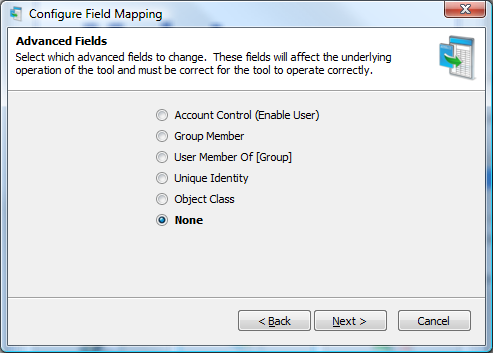
This is the advanced fields wizard page. This page leads to special advanced fields configuration pages. Each advanced field needs to be correctly configured for full operation. Once finished change the setting to None and click next.
Success Page
Click the finish button to save your changes and close the wizard.
.png)
Configuring LDAP Group Mapping
The group mapping wizard enables mapping groups from LDAP to a matching access group in Maintenance Connection.
Welcome Screen
The first screen of the wizard is the welcome screen. It explains what the purpose of the wizard is. Select next.
Search For LDAP Groups
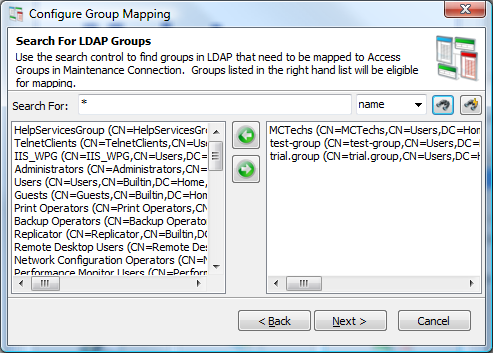
Chis is the search for LDAP groups screen. This screen allows you to filter through the entire directory of LDAP groups to a select few groups that should be mapped to Maintenance Connection. Wildcard searches are allowed. Search results appear on the left, select a result to map and select the right pointing arrow to add it to the mapped groups list.
To search for all LDAP groups instead of just a few use the find button with a lightning bolt on it ( ![]() ).
).
Once all the groups that need to be mapped are selected, click next.
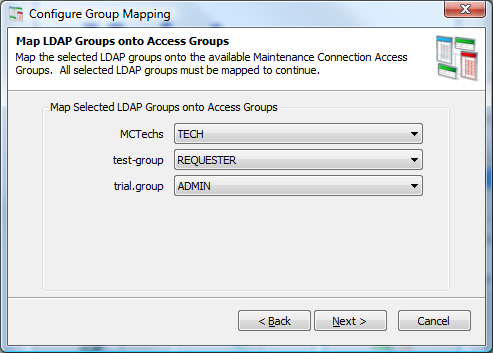
Map LDAP Groups onto Access Groups
This is the screen for mapping the previously selected LDAP groups to a Maintenance Connection access group. The LDAP groups that were selected are listed on the left and a dropdown list offering available Maintenance Connection access groups are on the right. Once all the mappings have been set, click next.
Access Group Priority
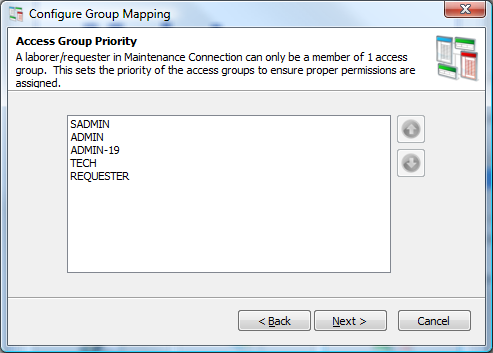
This is the screen for setting Maintenance Connection access group priority. A user in Maintenance Connection can only be assigned 1 access group, due to this if a user happens to be in 2 or more mapped LDAP roles the highest priority mapped Access Group will be the one selected. Once the Access Group priorities are ordered correctly, click next.
Access Group Auto Approval
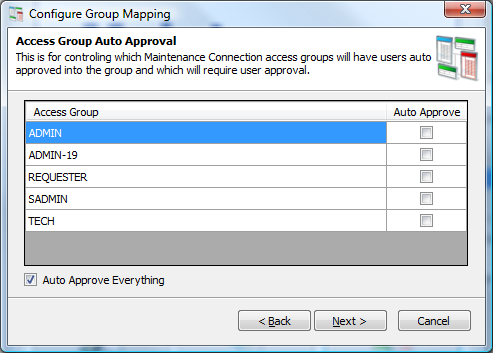
This is the screen for setting auto approvals in Maintenance Connection. This will configure if certain access groups will need manual intervention before the users assigned to them are fully approved for use in Maintenance Connection. The default is to approve everything. Once configured, click next.
Success Page
Click the finish button to save your changes and close the wizard.
Scripted Field Import Mapping
The scripted field import mapping wizard enables importing custom configured fields from LDAP into Maintenance Connection. This allows for custom logic to be implemented without requiring custom features to be implemented in the LDAP tool. Any field that is not available for mapping in the regular import (through "Configuring LDAP Field Mapping (Active Directory Only)") can be filled using this method. Also delayed processing can be performed if calculations must be performed across several imported records.
Select Script
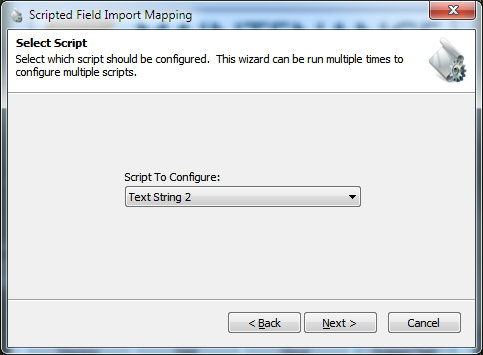
This page allows for selecting which script should be customized. Currently there are 10 available scripts that can be customized, 5 each of 2 different types. The types are:
Text String This script type stores data for change tracking and long term use in a column of the Labor table called "LDAPCustomFieldText#". The field is a varchar(50) field allowing for any type of data up to 50 characters in size to be stored.
Hash Field This script type stores data for change tracking hashed in a column of the Labor table called "LDAPCustomFieldHash#". The field is a varchar(32) field and due to storing data hashed can contain data of any type and length without limit.
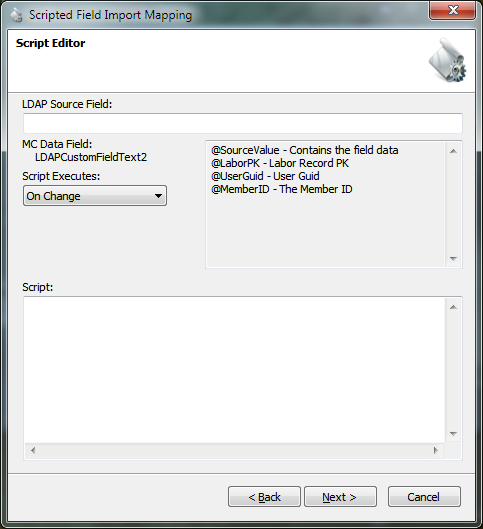
Script Editor
This page allows for editing the script.
First a LDAP source field must be entered. This is the official LDAP field name in LDAP. Presently this field can be of any type excepting special fields such as array or object reference fields.
Second when the script executes must be selected. The script can be executed on change of the LDAP field or every time the LDAP service executes.
Lastly the script must be entered. This field is of unlimited length and can contain as many SQL statements as required to perform the custom logic required. "GO" and other special SQL Manager commands are not supported. 4 SQL variables will be passed into the script as parameters:
- @SourceValue The value retrieved from the LDAP directory. This is in its original form. When using Hashed fields this is how you will retrieve the original unchanged value.
- @LaborPK The PK of the Labor/Requester record being changed.
- @UserGuid The GUID/UUID of the user record. Used as an alternative lookup method for the Labor/Requester record or a method to lookup the user in the Registration database.
- @MemberID The member ID of the user being synchronized. This will take the form of "Domain\Username"
Once the script has been entered and checked over for errors, select next to continue.
Success Page
Click the finish button to save your changes and close the wizard.
Test Tools
.png)
Co the left is a screenshot of the available test tools. These tools are used to perform various actions between the LDAP directory and Maintenance Connection. Some of these processes can be destructive processes and should be used with caution; backing up of the database is recommended.
Sync
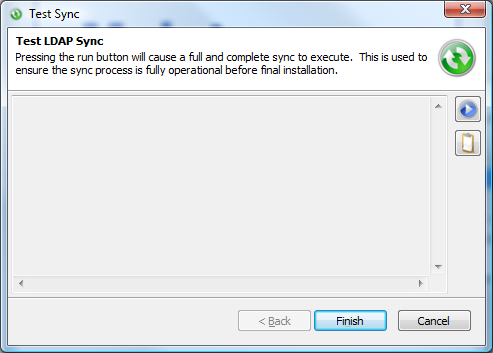
This test tool performs a full and complete sync. This is used to confirm that the tool is fully setup correctly or if a change has been made to the configuration and you do not wish to wait for a sync cycle to occur.
The play button ( ![]() ) executes the sync. In the case of issues occurring during the sync the clipboard button (
) executes the sync. In the case of issues occurring during the sync the clipboard button ( ![]() ) is available to copy the entire sync log to the clipboard for easier identification or for sending in an e-mail.
) is available to copy the entire sync log to the clipboard for easier identification or for sending in an e-mail.
Display Users To Sync
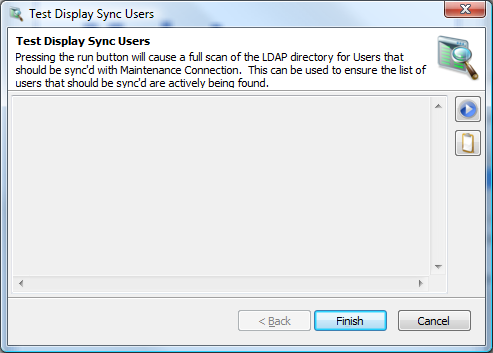
This test tool performs what might be considered "sync light". This is a non-destructive process that will execute a standard sync to simply identify which users are expected to be synced. Standard Maintenance Connection database operations are not performed.
This is used to confirm that all the users that are expected to be found are actually being found.
The play button ( ![]() ) starts the users search. The clipboard button (
) starts the users search. The clipboard button ( ![]() ) will copy the search results to the clipboard.
) will copy the search results to the clipboard.
Limited Sync
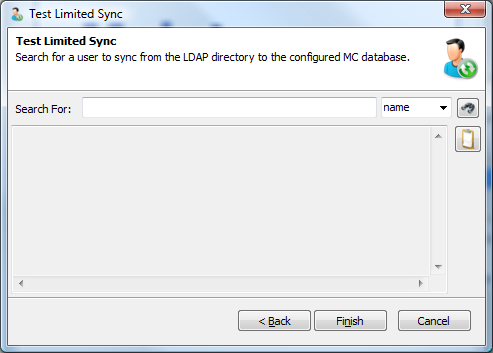
This test tool performs a limited version of the standard sync. It will search for a single user in the LDAP directory and attempt to sync that user into Maintenance Connection. In the case of multiple connections, you will first need to select the connection to use.
Type the name in the search box and select the find button to begin the search. Wildcard searches are acceptable and multiple users can be synced at a time using this tool. The clipboard button will copy the sync results to the clipboard.
Appendix: Q&A
In this area are various questions and answers that may not be covered in the rest of the installation guide.
Assigning Repair Centers to Labor/Requesters
Repair Centers are often an important part of being able to properly manage service requests and the access to work orders. Repair Centers are assigned based upon the following priorities:
- If a Repair Center ID has been entered in User Defined field UDFChar1 of the assigned Access Group for the user.
- The default Repair Center
- Blank by default if the user is a Requester (MC will assign service requests to the default repair center)
Importing unmapped fields into MC from LDAP
If there is no option in "Configuring LDAP Field Mapping (Active Directory Only)" for importing a field into MC then importing those fields into MC can be accomplished by using "Scripted Field Import Mapping". Simple SQL UPDATE scripts can be used to import these fields.
An example script for importing a custom LDAP field as a Craft is presented below:
UPDATE [Labor]
SET [CraftID] = @SourceValue,
[CraftName] =(SELECT LaborName FROM Labor WHERE LaborID = @SourceValue AND LaborType ='CR'),
[CraftPK] =(SELECT LaborPK FROM Labor WHERE LaborID = @SourceValue AND LaborType ='CR')
WHERE
LaborPK = @LaborPK
Appendix: Environment Setup testing and problem shooting
You need the Application Pool setup to run these tests. See Appendix: Create an Application Pool.
The feature delegation item (see Appendix: Turn on Windows Authentication Feature Delegation) needs to be turned on.
Test 1
1. Create an application pool (as noted above) if you don't have it.
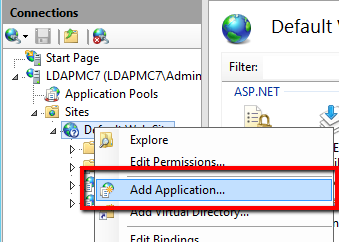
2. Open "Internet Information Services (IIS) Manager"
3. On the website that MC is installed (usually "Default Web Site") right click and select "Add Application"
4. Create an application:
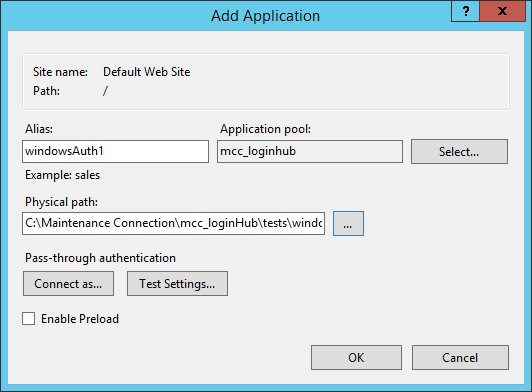
Alias: windowsAuth1 Application Pool: mcc_loginhub Physical Path: (Your MC install folder), so typically you will enter: \mcc_loginHub\test\windowsAuth1 If you use the … button, it will set it incorrectly to an 'absolute' path such as "C:\Maintenance Connection\mcc_loginHub\tests\windowsAuth1" – if you do this, just delete the "C:\Maintenance Connection" from the front.
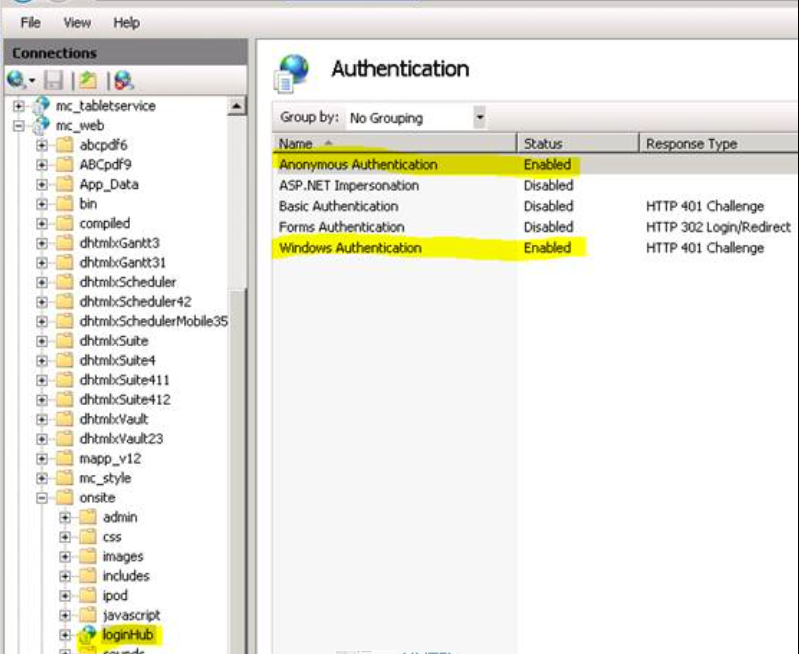
5. Configure "Authentication" on the new Application
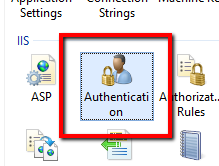
6. Disable "Anonymous Authentication", so that only one is Enabled: The Windows Authentication. 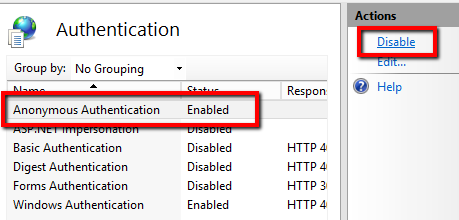 Note: if Windows Authentication says Disabled, it means something went wrong getting to this point. You will have to Enable Windows Authentication, but make a note that it wasn't set, in case there are problems as you continue that may making finding out why it was wrong important.
7. In a browser open http://{servername}/windowsAuth1
8. On the server,
9. And on a normal 'client' computer.
10. If you have multiple Active Directory Domains – open it on one normal 'client' computer in every Active Directory domain.
11. If everything is setup correctly you should see on every browser you opened the text: If you are looking at this in a browser – the Windows Auth1 page loaded.
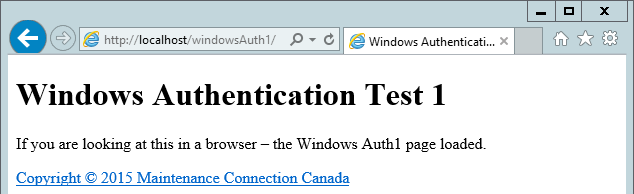
If this test shows a Username prompt, there is likely a problem that needs to be resolved. It should NEVER prompt from a 'client' machine. If it prompts from a 'client' machine then the server is not able to understand your logon details, and there is a problem with the server's setup and connection with Active Directory or there is a 'network' problem.
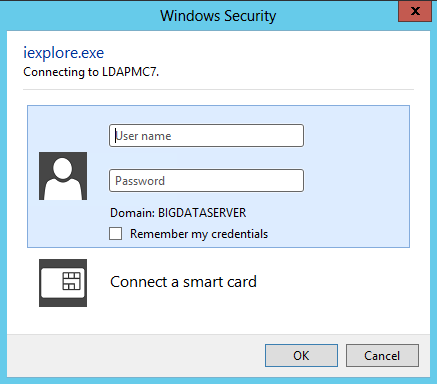
If it is prompting from the 'server', it could be because you logged in as a local user account (not a network account). In this case, enter in the user name and password of a network account, hit OK, then hit F5 to refresh the page to verify that you are not being asked 'every' time.
If you still get this prompt, then the server is not able to understand your logon details, and there is a problem in the server's setup and connection with Active Directory.
Summary:
If prompting always on the server and always on the client: then the server is not able to understand your logon details, and there is a problem with the server's setup and connection with Active Directory (and there may also be a 'network' problem as below).
If prompting once or never on the server and always on the client would be the same problem or a network problem.
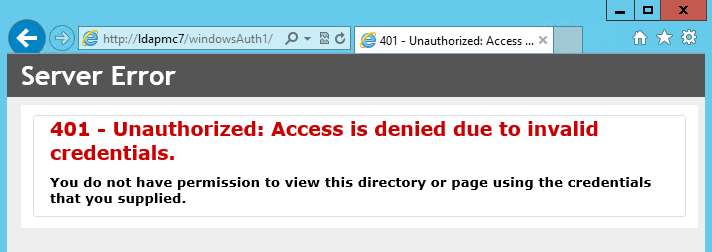
If you see a 401 error (shown to the right), this means that the credentials that you supplied (or your browser supplied for you) are considered to be invalid by the server. This may show that you either entered the credentials incorrectly, or that the server is not setup to understand your credentials.
Some other, less likely, causes of getting the password/id prompt
An article you may want to read if you get this is: http://clintboessen.blogspot.ca/2013/09/ie-10-prompting-for-credentials-windows.html
Here is a discussion about it if you want to deal with it on a browser by browser case.
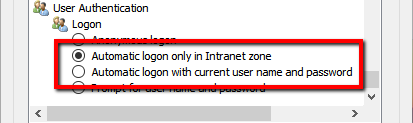
For IE : If the website is being detected by Internet explorer as not an Intranet site, then IE will not send credentials "by default". This can be changed by setting the below setting (for more details, read the above linked article).
Tools > Internet Options > Security > Custom level… > User Authentication
For Mozilla Firefox : The Firefox browser does not offer any trusted sites settings in the properties dialog; however it does provide a configuration string which can be modified to enable this functionality. Enter about:config into the address bar, enter and confirm the safety check. Search or create the preference string network.automatic-ntlm-auth.trusted-uris. Afterwards enter trusted site names as list separated by comma and space. For example like this: intra, intranet, localhost
For Chrome: Chrome takes its trusted sites settings from the same Internet Options as Internet Explorer. You can access the dialog from Chrome here:
Properties -> Show advanced settings -> Change proxy settings -> Security -> Trusted sites
Please note: you will be asked to log in the first time you access the trusted site.
None of those worked? PLEASE ... when you find the solution, let us know HOW you fixed it so we can include it in this manual. That way you will help others AND the next time you run into it and forgot how you fixed it - we will have documented it for you in the perfect location.
Test 2
This test (and all following tests) assumes that any login prompt issues that may exist have already been fixed before attempting the tests. See Test 1 directly above. If login prompts occur during the tests that are not expected, you should go back and look at the settings for Test 1 to confirm that "Anonymous Authentication" is correctly disabled. If any special IIS settings were required in order to get Test 1 to pass, then those settings need to be noted as they may be incompatible (or need to be applied in a special way) with the setup of further tests.
- Follow the instructions for steps 1-5 from Test 1, but substitute windowsAuth2 instead.
- In a browser open http://{servername}/windowsAuth2/
- On the server,
- And on a normal 'client' computer.
- If you have multiple Active Directory Domains – open it on one normal 'client' computer in every Active Directory domain.
- If everything is setup correctly you should see:
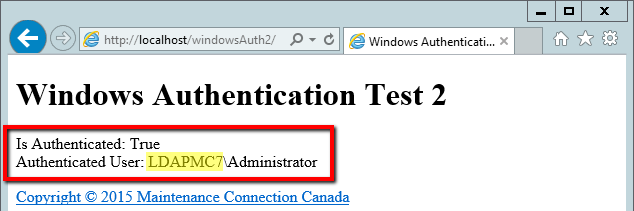
7. "Is Authenticated: True" and your username. You should also see in the highlighted are below, your NT style domain name.
Summary
If you are not seeing "Is Authenticated: True" you should recheck step 5 from Test 1.
If you are seeing some other username, or not your domain listed, you should recheck what domain/user was used to log into the computer performing the test.
Test 3
1. Follow the instructions for steps 1-4 from Test 1, but substitute windowsAuth3 instead. NOTE: Do not follow step 5, only steps 1-4.
2. If you have not previously enabled "Feature Delegation" for "Windows Authentication" then please follow the instructions for enabling that feature. ??? (See Step 5 of the initial Installation process)
3. In a browser open http://{servername}/windowsAuth3/
4. On the server,
5. And on a normal 'client' computer.
6. If you have multiple Active Directory Domains – open it on one normal 'client' computer in every Active Directory domain.
7. You should see this page:
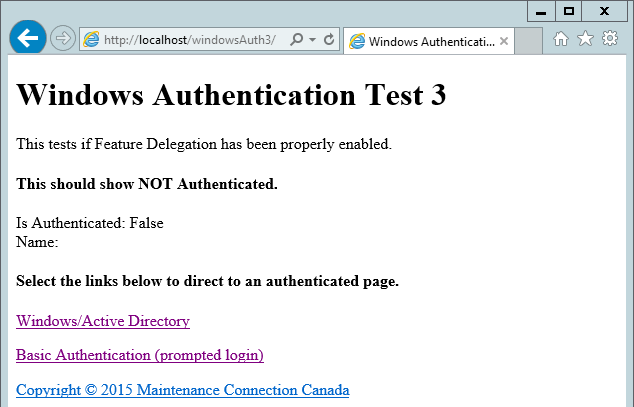
8. Select the "Windows/Active Directory" link
9. If everything is setup correctly you will see:
.png)
Summary
This test is testing if IIS Feature Delegation is correctly working on your server.
If instead of the success page, you see an error page much like this:
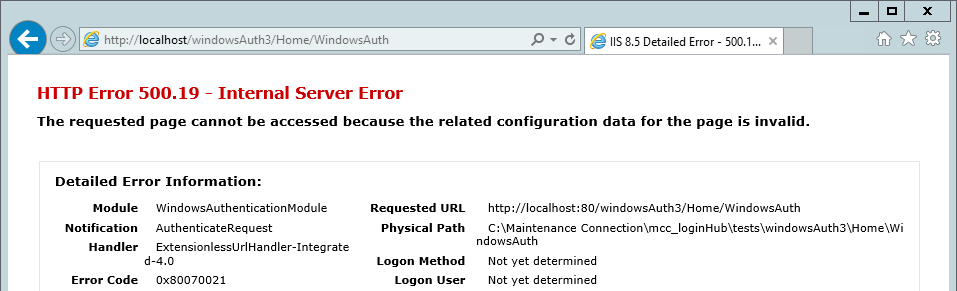
The above error page means feature delegation has not been properly enabled. This may be at the server root or at any web.config file setup between the server root and the application directory.
Test 4
- Follow the instructions for steps 1-3 from Test 3, but substitute windowsAuth4 instead.
- You should see this page:
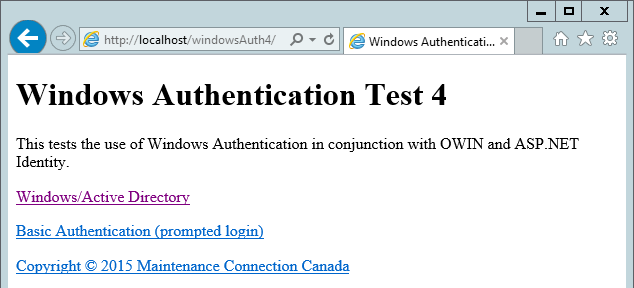
3. Select the "Windows/Active Directory" link
4. If everything is setup correctly you will see:
.png)
Summary
This tests if advanced authentication is working. Confirming that Windows authentication and basic information queries like email & SID are returning correct information.
Appendix: Install .NET 4.6.1
You need to have .NET 4.6.1 installed on the server.
If you do not have it already installed 2 options are:
- Use the web installer we provide in the /mcc_loginHub/preReq directory.
- .NET can also be installed via Windows Update if you prefer.
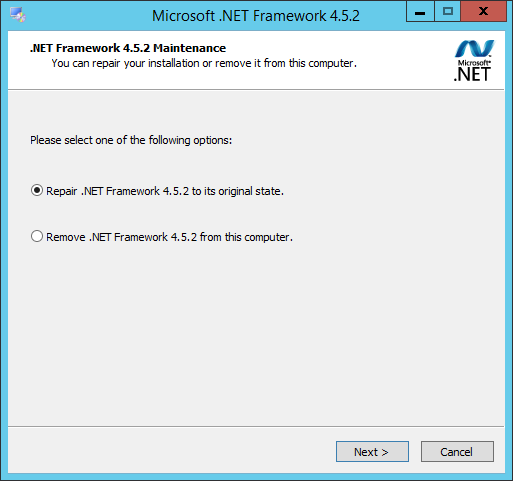
If you do not know if .NET 4.6.1 is already installed, please run the web installer provided in the /mcc_loginHub/preReq directory and it will offer to "Repair" the installation if .NET 4.6.1 is already installed.
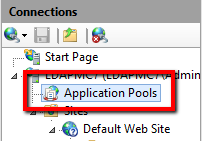
Appendix: Create an Application Pool
- Open "Internet Information Services (IIS) Manager"
- Select the "Application Pools" node (far left panel)
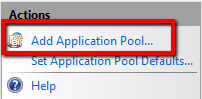 In the "Actions" bar (far right panel), select "Add Application Pool…"
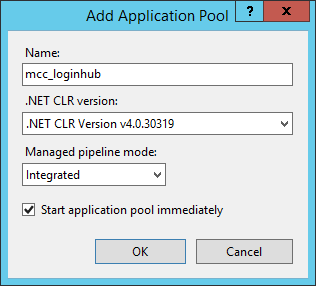 Create an "Application Pool" with:
Name: mcc_loginhub (strongly recommended)
.NET CLR version: v4.0.*
Pipeline mode: Integrated
Create an "Application Pool" with:
Name: mcc_loginhub (strongly recommended)
.NET CLR version: v4.0.*
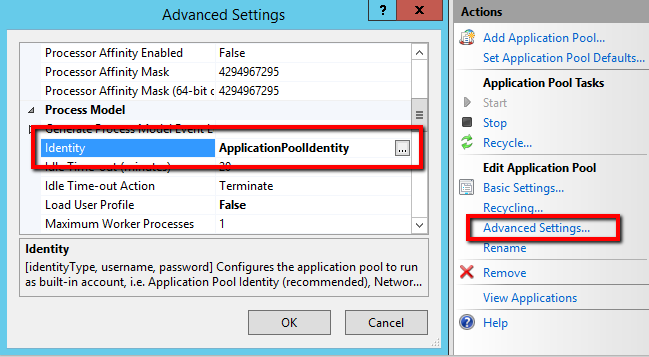
Pipeline mode: Integrated- If using Windows Authentication to log in SQL Server, you need to change the Application Pool Identity to match the account that has been setup for accessing SQL Server. Select Advanced Settings on the right panel, then edit the Identity.
Appendix: Turn on Windows Authentication Feature Delegation
1. Go to the Server node in IIS
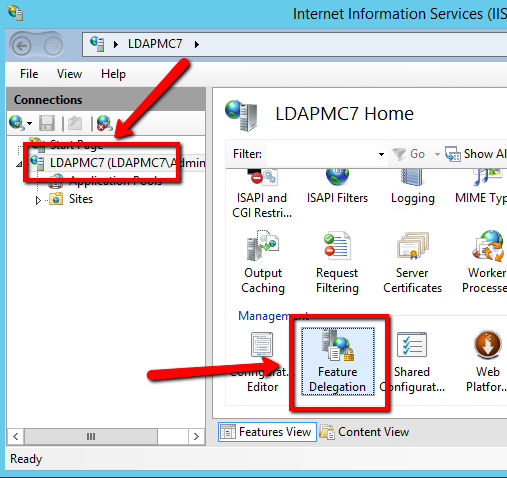
2. Open Feature Delegation (bottom center option)
3. Select "Authentication – Windows" and change the option to Read/Write
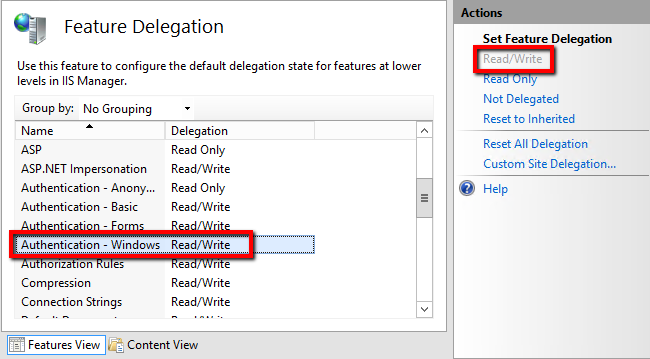
4. If you wish use the "Active Directory 👥" login provider (what we call the 'Active Directory forced login' provider) to force Username/Password prompts for every login you also want to enable Feature Delegation for "Authentication – Basic".
Appendix: Installing Automatic Login Pages into Maintenance Connection
Once the Login Hub is enabled the standard Maintenance Connection login pages do not function as a login page anymore. Login Hub specific login pages need to be inserted to enable automatic login.
- Open the file browser.
- Navigate to the Login Hub tool install folder.
- Copy all the files located in the "mcPages" folder.
- Paste the files into the "\Maintenance Connection\mc_iis\onsite" folder.
- Select "Yes" to overwrite or 'replace' the file(s) when prompted. If it doesn't ask you this question for at least 1 file – either you are copying them to the wrong location (such as \mc_iis instead of \mc_iis\onsite), or Maintenance Connection wasn't installed – and installing MC is a prerequisite of installing loginhub.
This should be done for each upgrade as well (these files will likely contain feature enhancements and/or bug fixes)
Appendix: Initial Configuration of Login Hub
- Open a supported web browser (IE 11, Edge, Chrome, Safari Mac)
- Browse to http://{servername}/mc_web/onsite/loginHub/diagnostic/
- If the initial configuration has not been completed, you will be forwarded automatically to the "Initial Setup" pages.
Initial Setup: Step 1
- If the path to the mc.ini file is incorrect this will display a red X error.
- If required change line 2 of /loginHub/web.connnection.config to point to the correct path of the mc.ini file (usually C:\Maintenance Connection\mc_iis\mc.ini).

3. Once the mc.ini file exists then the test will check if the information within the file allows for a successful connection to the mcRegistrationSA database.
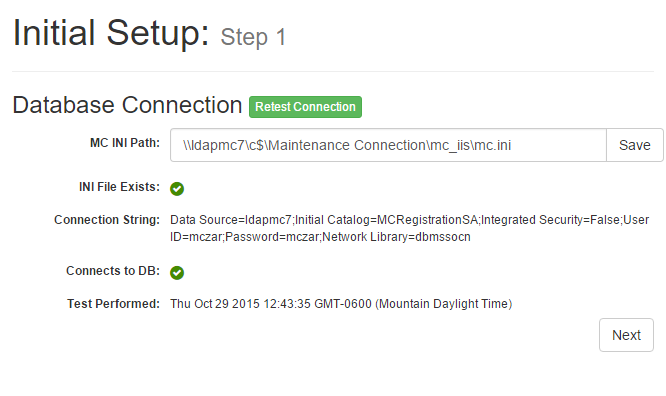
Errors in this step may be corrected by changing the Application Pool identity, or by editing the SQL User ID/Password in the mc.ini file. 4. Do NOT go onto step 2 until you have errors on Step 1 fixed.
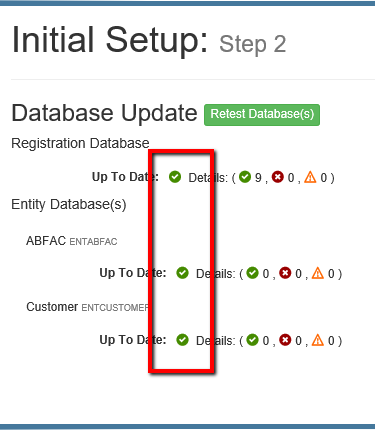
Initial Setup: Step 2
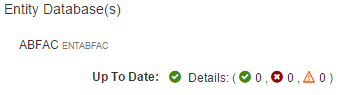
Check and update the Registration Database
This database shows one that is 'ready to go', note the 3 green check marks right after each of the 'Up To Date:' statements.
If all of them have green checkmarks (technically a white checkmark in a green circle) then you can hit next to go to the next screen, otherwise, read on.
And here is a screen shot of one where the Registration database is NOT up to date:
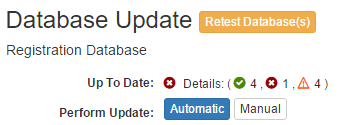
In most cases the "Automatic" update should work to update the database with required tables and stored procedures. If security settings prevent the use of the Automatic update, then use the "Manual" update process. This process is clearly documented in the UI which provides instructions for how to save the SQL Script and run it against the database.
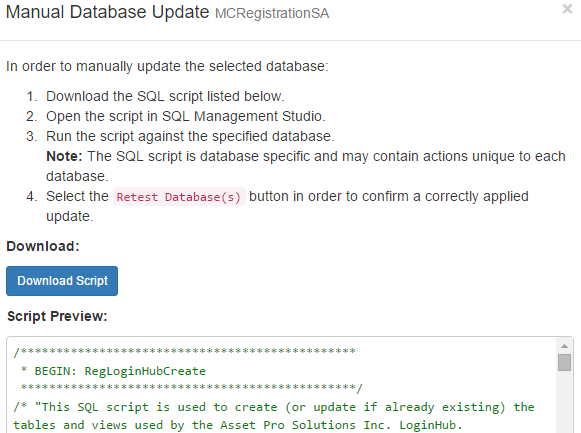
Check and update each Entity database
If any updates need to be run the same process as was performed for the Registration database will need to be repeated. Please note that if using the "Manual" update process, you will need to generate a SQL script for each database individually as the script is customized for each database.
Appendix: Configure Login Providers
Login Providers control which way(s) a user is allowed to login to Maintenance Connection.
A typical install will include the MC Account provider and 1 of the Active Directory providers.
Adding Azure Active directory
See the Azure Active directory document (a separate document) for instructions.
Adding a New Login Provider
1. Select Add Provider
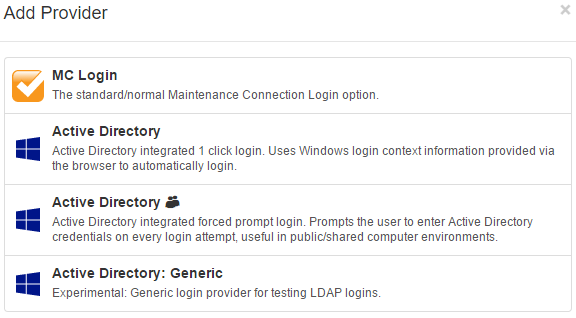
2. Select from the list of available Login Providers
3. Configure the login provider as required for your environment
Configuring a Login Provider
Login Providers can login through many different potential sources. Due to this the configuration options presented will vary.
When you have finished configuring the provider(s) make sure to select "Save" or "Save All" to ensure your settings will be used the next time a user logs in.

MC Account
This provider offers basic Maintenance Connection login options.
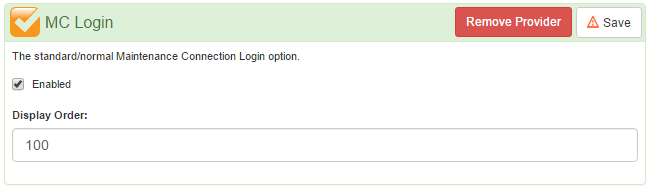
The only options offered are to "Enable" the provider and to change the order that the provider will be displayed.
Active Directory
This provider is used to make a Single Sign On (SSO) experience with Active Directory possible. If errors are experienced while using this provider see Appendix: Environment Setup testing and problem shooting for assistance in discovering the server setup issues that may result in SSO not working.
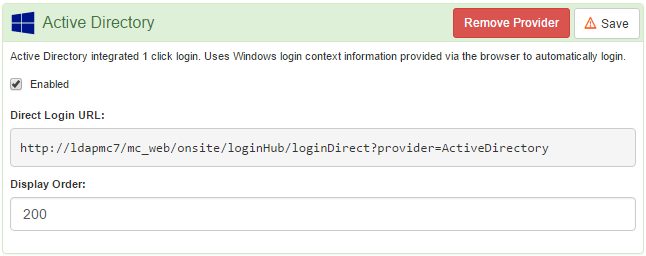
This provider can be directly logged in with. Entering the provided "Direct Login URL" into the browser will allow a User to be able to login without seeing a login page.
The only options offered are to "Enable" the provider and to change the order that the provider will be displayed on the login page.
Active Directory 👥 (Active Directory Forced Login prompt)
This provider is used to provide Active Directory login with a forced credentials entry prompt EACH time a user goes to login to Maintenance Connection. This is a very useful provider for environments where users may share their computers with other users.
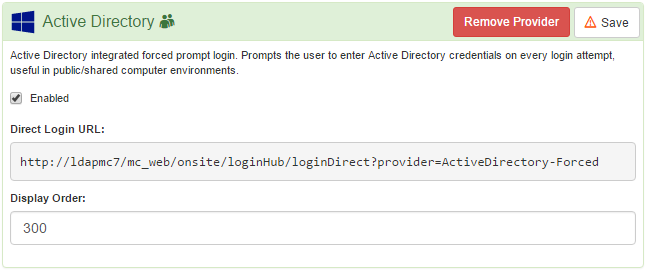
This provider can be directly logged in with. Entering the provided "Direct Login URL" into the browser will allow a User to be able to login without seeing a login page.
The only options offered are to "Enable" the provider and to change the order that the provider will be displayed on the login page.
Active Directory: Generic
This provider is largely an experimental provider used for testing if LDAP logins are working correctly. It operates very similarly to "Active Directory 👥" except it allows for a high degree of customization. This provider does not rely upon IIS to perform the actual user authentication action, instead it communicates with Active Directory directly.
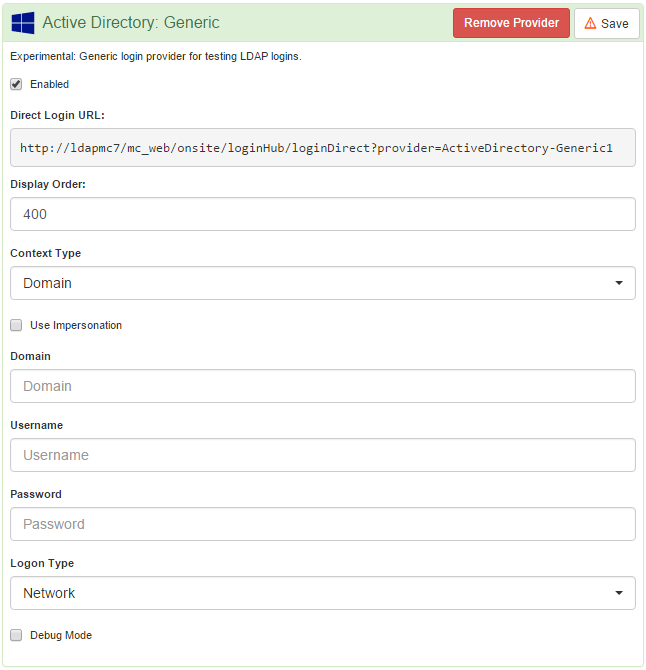
This provider provides a large number of configuration choices. If using this provider to test the communication between the IIS server and Active Directory these options should either be clear, or you should coordinate configuration with a Maintenance Connection support representative.
Appendix: Bypassing the Login Screen
Users who use only 1 application can use the Direct Login URL Builder in order to create custom crafted login URLs. This tool can be found at the bottom of the Login Hub diagnostics page.
Login URLs must be tested and not every combination is guaranteed to work.
The URL builder can be used to directly jump to a particular login provider (like Active Directory), and/or ensure that a user is not prompted to select an application.
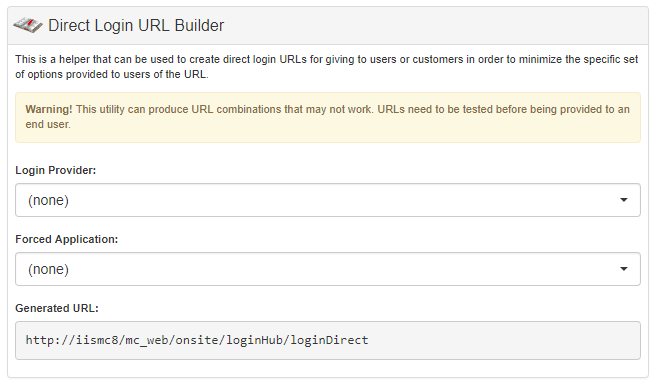
Proper security roles are applied and a user will never be allowed to login to an application that their user account does not already have valid access to (for instance a Forced Application of MRO will not allow a Service Requester user to log in to MRO).
Appendix: Setting up Login to MC Express
Login to MC Express requires manual setup to occur in the MC Express. In MC Express the web.config file must be edited to include <add key="LoginHubLicensed" value="true" /> in the file. The value can be found in the web.config.template file that ships with MC Express. If this value is not present in the web.config.template you must install a newer version of MC Express in order to be compatible with LoginHub.
Logging into MC Express via LoginHub is done via the LoginHub login screen and NOT via the normal login screen in MC Express.
Potential Errors
If MC Express fails to login correctly you will receive an error screen like this one: 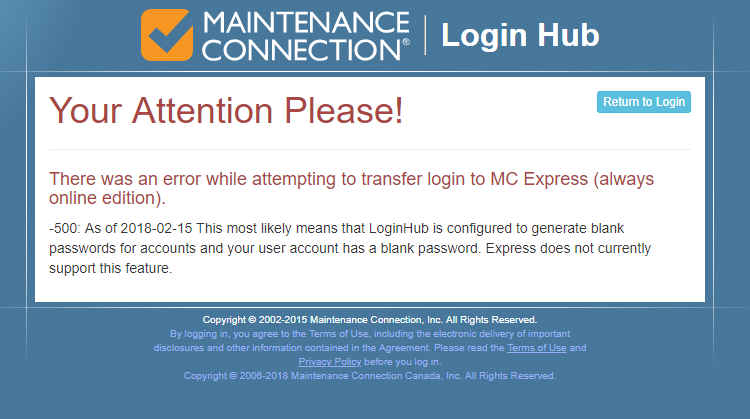
This error screen should be self-explanatory. For any error messages that are unknown or unclear the error messages are pulled directly from MC Express and help should be requested from MC Express support.
Appendix: Setting up Login to MCEverywhere
Login to MCe or MCxLE is automatically enabled by detecting if a user has the access group permission "mceACCESSMODULE". This permission is automatically installed along with a standard installation of MCEverywhere. The access group right is typically defaulted to FALSE so it will need to be enabled before MCe users will be able to successfully login via LoginHub.
Logging into MCe via LoginHub is done via the LoginHub login screen and NOT via the normal login screen in MCe.
Appendix: Colors
The list colors are generated by hashing together the values below and then entering the result as a seed color choice in a color chooser component.
We use an industry function that weeds out a large number of colors,
- Colors, combined with white/black text, some body of 'experts' have decided could be invisible for various color blind people, especially those that 1 in 10 males have – the so called red/green color blindness. In addition, testing with one color blind individual revealed that the different colors chosen by this algorithm, while not being distinguished the way a non-color blind person would, were tonally different enough that they could 'remember' which was by the tone, rather than color like non-color blind people can.
- Colors that are considered 'bland' by that body of 'experts', colors that are too close to middle grey (so that text can clearly stick out against it and not be hard to read),
- And colors that that body of 'experts' have decided are 'unpleasant.'
Side note:
The color blind issue is one that has been part of every piece of software my companies have written since about 1986. 1 in 10 males is 'red green' color blind. And there are some other color blind nesses that affect males and females, albeit not at the 1 in 10 rate.
This is a real factor among maintenance people, while I don't have factual specifics, among the many color blind people I have met through the years, they tend towards jobs such as maintenance, and away from jobs that require color acuity, and they have told me that this has become a bigger problem for that portion of the population since the invention of color screens for computers, so among the MC/MCC customer base this is likely greater than the population average 10%.
In our software development we have never worried what the exact percentage is because, even if it is only 1 in 10 males, that is a lot of our users and we are very careful with 100% of our UI design to take this as a critical design criteria. We also make sure that we never have color as the only indication of important information. Color is only used in our software as a secondary aid to the about 95% (male/female combined) that are not color blind.
There are many designs that are rejected because they would be hard to read for color blind people. I won't go into the specifics, but having interviewed several dozen color blind males through the years, we have built up a good understanding of what would be visible and what would be invisible.
On the other hand, we do not design our software to be ideal for 'functionally blind' people as they wouldn't typically be able do the work that requires the software. We have offered to our customers the option at a low cost to produce a high-contrast version should it be desired, but to be honest, the amount of data that needs to be shown on small mobile screens and the size of the text in MRO makes it impractical for a functionally blind person to use our software or MRO etc..,
There are still enough colors that it is highly unlikely that 2 databases beside each other will be similar to each other so that users can memorize the color.
By using a fixed formula, the colors are not technically random, but are predictively pseudo-random among the colors that were approved.
By being predictable (same color given the same data), the color/tone picked will always be the same as long as the input data doesn't change.
- This allows users to memorize choices by color (and this is a very common user interface things – people stop looking at the text, they even stop looking at the actual image and just click on icons based mostly on color. This takes advantage of that very human reality to make the use of the application easier in the long run.)
- This allows customer user guides and manuals to be able to state the color and/or show exactly where to click.
- This allows users to refer to their choice when talking with each other by color knowing than 9 out of 10 males and 99 out of 100 females will be able to recognize what they are talking about without listing a long string. (The other 5% are functionally color blind and very little can be done, my experience with several is they were not able to describe the tones to another in a way that would be definitive.)
By being pseudo-random it avoids several databases being a similar same color or tone, making it harder to quickly choose the next time in.
By being pseudo-random, making a tiny change (like adding a space) to the incoming string will typically result in a large change in the resulting color. So two very similar databases should have 2 very different colors/tones.
And of course, they only ever see these colors on this page if they have 2 or more databases that they have access to.
While we don't officially document/support it other than in this appendix. We have offered to one customer the option of paying to have a change added to the product that would let the colors for each of the lists be chosen for the system. (He chose not to, he didn't feel it was worth paying any money to change the colors.) if someone really hates the colors and is not interested in paying a custom fee to allow , we can for straight billing for hours assist in the following options.
- Someone could create 2 links for themselves, one for each database (documented), and then just skip that page entirely, and he can go it from Windows and (undocumented by us) change the link, if he puts it on his desktop, to use any icon/color they wants. (We do not document how to change the color/icon, but an internet search would likely be the best way to find how.)
- They could go into their database and one at a time , make tiny changes to one of the values below such as adding a space until he gets a color that all the stakeholders are happy with Once selected, as long as the values below don't change, the color won't change, and we have committed to that for customers for upgrades, so this is intended to be upgrade/forward compatible. Obviously some of the values like the GUID and ConnectionKey should not be altered, but many others like the Address should be able to have spaces added with no issues.
Values that control the color:
- Address
- Address2
- Administrator
- AdministratorEmail
- City
- Code
- ConnectionKey
- Country
- Fax
- Guid
- Industry
- Logo
- Name
- Order
- Phone
- PhoneExt
- State
- TypeCode
- Website
- Zip
Appendix: Error Screens
Other error screens may be documented in a section related to the product the error screen is talking about.
No License Installed
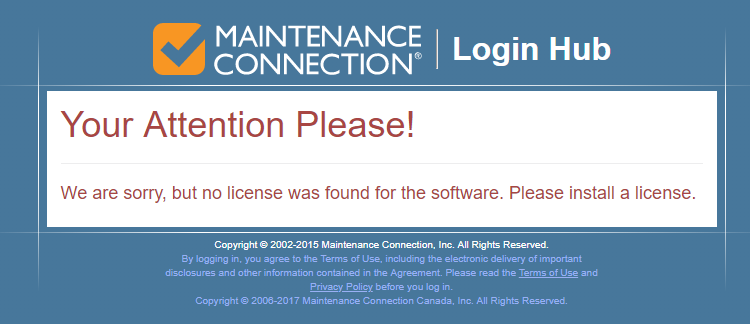
Installation has not been completed yet. Ensure a license is installed in the LoginHub Service in order to clear this error message.
SMA Cancelled
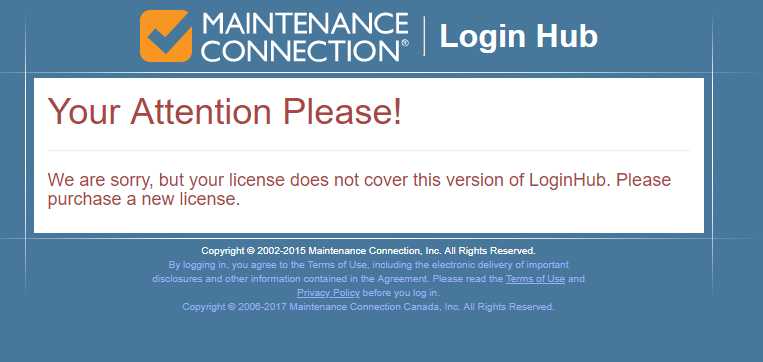
This error occurs for customers who have decided to cancel their SMA contract and stay with a previous version of the software. The customer must purchase an updated license, renew their SMA or reinstall the last version of the software that their SMA covered.
Appendix: Issues you might run into upgrading from pre 7.0 versions
Case Study 1: one cause of 404.15
The installer told us:
While using the 'Configure' tool and running a sync I get the following error message below. The Login Hub AD connection test passes and the AD to Access Groups is setup as it was in LDAP v5.
When I try to open the Login Hub diagnostic webpage I get:
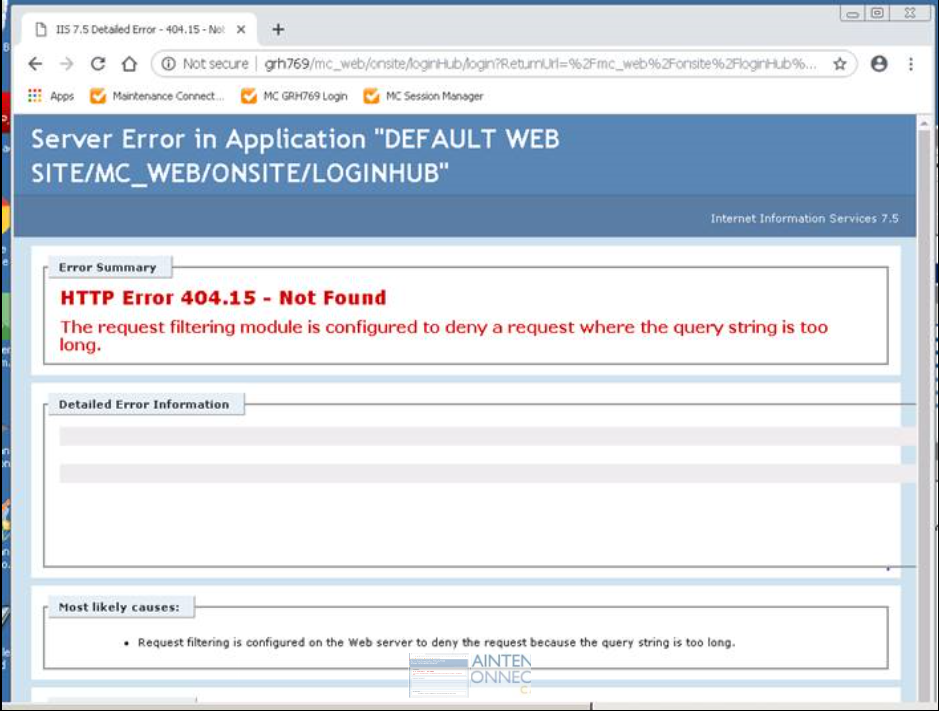
After multiple discussions back and forth, the installer informed us that:
What the issue ended up being is that "Anonymous Authentication" needed to be enabled for the 'MCe LoginHub' IIS setup. I couldn't find this documented but as soon as I made this change it worked, and I could get into the 'Diagnostic' webpage to complete the setup.
All seems to be working well now, including the Service Requester 'direct access' URL that it generates.
Appendix: Things that are not documented in this manual yet
While it would be nice if we ALWAYS had everything FULLY spelled out properly … this section contains, at times, items that we WANT to properly document, but better to give a BIT of info than wait until we have time to fully document properly.
To enable Remote Confuguration:
AllowRemoteConfiguration
it needs to be in the web.custom.config file
set to true
And in 8.3 it was added to the web.custom.config.sample file