

 Maintenance Connection Everywhere (MCe) · EAM/CMMS manuals
MCe 10.0.4 and newer
There are THREE supported methods of install.
Option 1: Fully automatic from the beginning. This is the recommended way for most customers.
Option 2: Manual install, followed immediately by setting up for automatic upgrades. This is the recommended way if you do not have timely access to the automatic setup, you want to get going quickly, and then over the next day or so will set it up for the automatic process.
Option 3: fully manual, not installing the automatic upgrade. This way is supported for install, but for upgrades there will be a 'support services' charge for each upgrade.
Note that as of 10.0.4, LoginHub is directly part of the MCe product family, one install installs both products and you use the MCe UI to set the LoginHub settings. If you are UPGRADING from an older version of LoginHub, please see the LoginHub upgrade instructions in the LoginHub section of the documentation.
This document discusses setting up the Fully Automatic option.
Fully Automatic upgrade.
This method become our 'standard' install method as of MCe 8.4
Then install the tentacle
The 10,000 foot view is this:
- Install tentacle (probably polling) so that all UPGRADES will be smooth and easy. This is MANDATORY as of Nov 2018 to receive free (no support services charges) for upgrades.
- Do the rest of the normal install.
- Run a minor upgrade to verify it is all working.
Now the details:
Install tentacle(es) if not already installed. Typical setup time 15 minutes
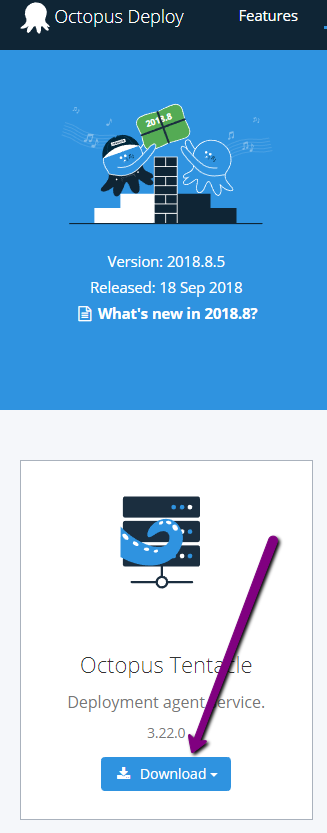 First get the Tentacle install file into some good directory like c:\tools or c:\temp on the MCe server.
As of 2018.009.18, Tentacle can be downloaded from https://octopus.com/downloads
Since MOST servers it is hard to download a file from a browser to (security reasons primarily) you will be best served downloading it to your machine then copying the install package to the server.
Run it (an MSI last time we checked) to install it
Then run the tentacle software to install a tentacle.
Choose Listening Tentacle if you can. (Some IT will not permit Listening.) We are considering changing this advice to using polling, because we are finding customer servers have tools that go in every day or two and break a working listening tentacle. So go ahead and using Polling if you wante.
Chose Polling ONLY if there is no other option.
Enter with Listen port (default usually 10933)
You will need the thumbprint of the Octopus server that you are connecting to. For most installs this will be 'our' (MCC's) Octopus server and its thumbprint is:
666B1F6B74D26E32D1FB1530DF53A4893954B0B3
For other servers: go to the dashboard on your Octopus, choose configuration, find the Thumbprint setting.
Install
Repeat on SQL Server
Some systems have the MRO database SQL Server and the MCe server as separate servers. If so, repeat the above instructions now on the SQL Server.
Setup Octopus to recognize the tentacle(es)
This next step must be done by someone with admin access to the Octopus server you are using. You will normally contact support@maintenanceconnection.ca to arrange this. Best to give them heads up for when you want to do the install to minimize the latency.
Add Tenant – a descriptive name like 'My Company MCe'
Add Deployment
- Select the type, as above (so Listening is the most likely)
- Hostname such as mcc-on.com
- Direct connect, click next
- Display name e.g. "mcc-on SaaS"
- Environment, normally this will be 'Production'
- Target roles: In many cases: Database and Web, but in others just one per deployment
- Choose "Include only in tenanted deployments" for SaaS and 'on Prem'
- Associated Tenants: The exact def of this will depend in the future.
- Then hit Save (circa 2018.09 – upper right)
Now, in infrastructure, go to Connectivity.
Calamari will do the actual work
Install Calamari
 Now, go through Tenants,
- Select the Tenant, e.g. Alcor
- Connect project e.g. MCe
- Choose the environment, most likely 'Production'
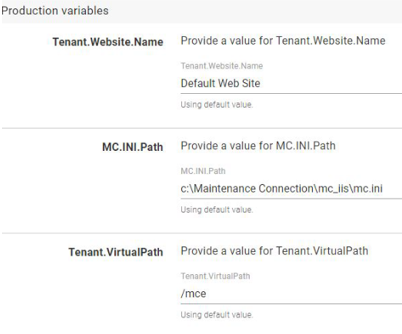
- Fill in the variables
- Change the Tenant.Website.Name to some thing reasonable.
- The other defaults may be wrong, they are based on a 'standard' setup circa 2018.
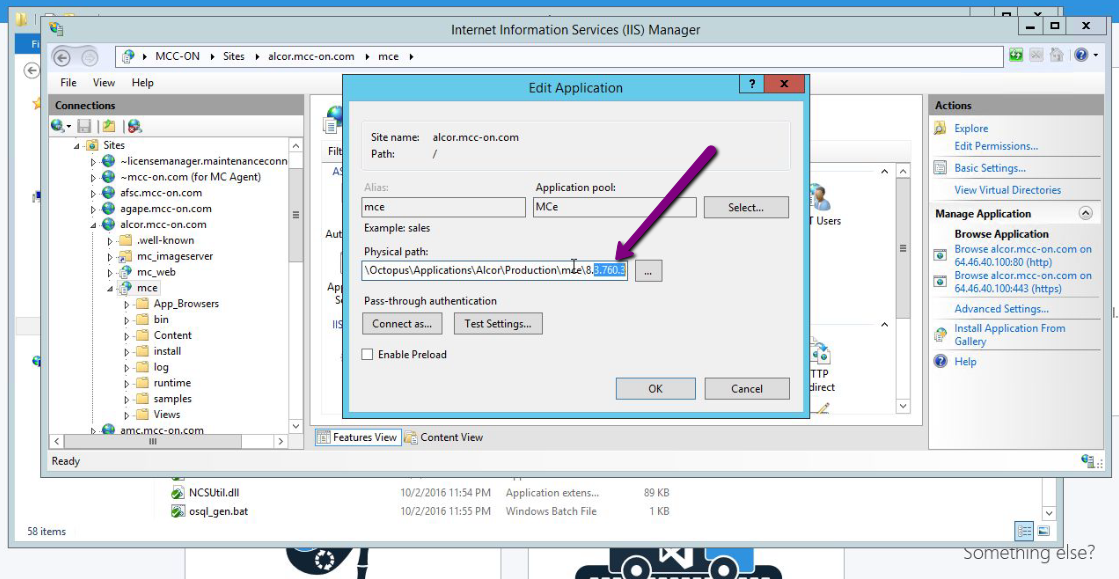
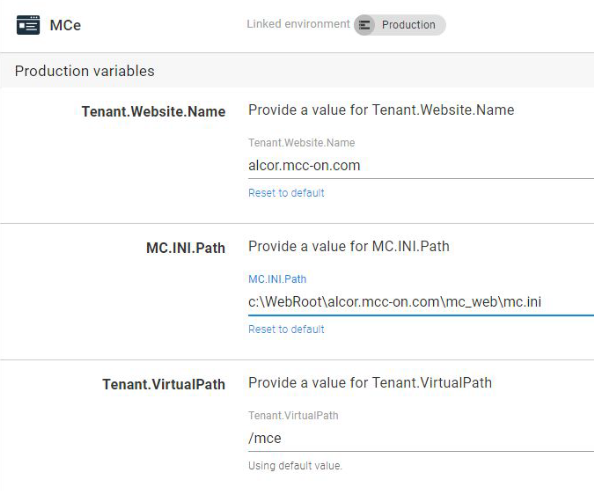 Here is a live example from our MCC-ON server:
The /mce is our standard and should always be used for new installs, for existing installs, check what it is (some might have /mcxle etc..,)
Go to Dashboard,
Open the MCe project
Choose the version to deploy
Choose the Deploy button to the right on the line for the tenant.
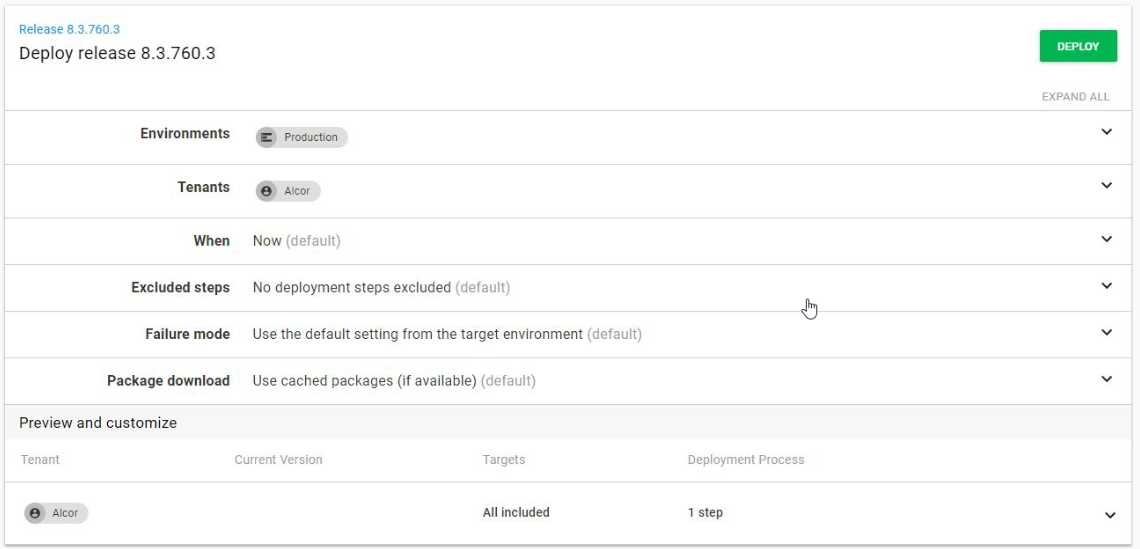
Click Deploy
You can then verify: (We just did an 8.3.760 install in the screen shot below)
Manual Steps
Note that the 'manual' starting with MCe 8.4 will be 'billable by the hour' for upgrades. If you do the Manual step to 'get going quickly' you should THEN do the 'automatic' step.
Why would you do manual then automatic?
Because the Automatic requires you give us two or three values to install at our end before it works.
If, due to time zones, holidays etc.., we are not available or if you give us the wrong value, it might take one or two business days to get the automatic way going.
As a result, you MIGHT find it beneficial to first do an manual install, then do an automatic install.
Install steps
For both NEW and UPGRADE Run _PreInstall.SQL Script on the ent Databases ahead of time.
If you are upgrading from 8.2 or earlier or you are installing fresh, this step applies to you.
If you are upgrading from 8.3 or higher (8.4 etc..,) this step does NOT apply to you, it has already been done. But, as usual, it won't HURT if you run this step again, it just won't provide any benefit.
You can safely run this step months in advance of the install/upgrade.
This step is not strictly required, but unless you really cannot, please run this step to make the install/upgrade smoother. Even if you just do it a few minutes or an hour or two before.
On most servers, these have only been taking a few minutes to run, but on one server that had a lot of assets and was very a very underpowered SQL server, it took 30 hours to run. (That customer was in the process of upgrading their server soon because it was so slow in general for MRO, but it hadn't been upgraded when we ran it, but it still might have taken an hour or so on their new server.)
Prerequisite: MRO must be installed, we ALTER the tables, adding columns, we don't create them from scratch.
There are a few SQL files that can be run before the install/upgrade that will make the install/upgrade run faster. These can be run weeks or months ahead (or hours), but on servers that have lots of assets, may take several hours to run – and can save several hours later when you do the install/upgrade.
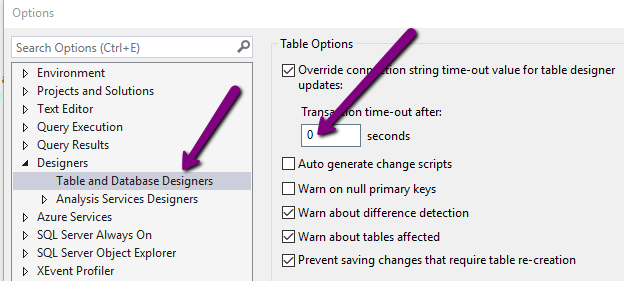
To run this, in modern versions of SSMS (circa 2017) you need to set the timeout to 0 otherwise this following script will very likely timeout.
_PreInstall.sql
Prerequisites
Modern browsers
We document in more detail elsewhere, but we know that people tend to test on the server they installed on so …
- We do not support the IE browser, it has been replaced with Edge and it is so outdated we cannot run on it. Only products that are severely crippled and/or not using any modern features can run on IE 11 and our product is way beyond that.
- We only support the 'now current' Chrome, Edge and Safari browsers. It is VERY common for servers to have 'vastly outdated' version of Chrome, that Google doesn't support and we have no realistic way of running on.
So … make sure your Chrome or Edge browser is updated to no more than about 6 months old, ideally up to date, before trying to test MCe.
HTTPS
HTTPS: As of January 2017, we only officially support MCxLE/MCe in HTTPS. If you need assistance running as best possible TEMPORARILY in HTTP. Chrome announced in Nov 2018, that applications like MCe would stop working as they are taking away a major feature we use that has been there for many years – even IE has that feature, it is that old. They kept their promise. MCe no longer runs on HTTP in Chrome.
Edge is going the same way, but are a few months behind. Safari is expected to follow suit soon as well.
You know how to install MC's MRO
This installation guide assumes previous experience in installing MC's MRO (database and software)
You have sufficient time
Installs take typically
- Installer Time: less than 10 minutes for an experienced installer (longer if you have several ent databases). But if this is your first time, allocate 30 minutes to allow for understanding and learning each step.
- Computer Time: Depending on how big the database is, in particular, how many assets, you should allocate 10 minutes for most upgrades. For new installs and for the 8.3 upgrade, it can take up to several hours EXTRA for two steps of the to run 'unattended'. Much of this time can be saved by pre-running a series of SQL scripts ahead of time to save time during the install/upgrade
You've prepared users if possible
For upgrades, the simplest for all existing users is for them to sync and use the retire device, wait until the server upgrade is complete, then log back in. At a minimum, they should ensure a successful sync so their data is saved. We try to make this unnecessary, but 'upgrades' are one of the 'least tested' parts of a program because of the extreme amount of time it wakes to test upgrades. So having users sync their changes before an upgrade is always a good idea.
MRO is up and running with HTTPS
You must have the Maintenance Connection MRO web site up and running. You are adding a new directory/application to the web site, not adding a new web site.
We run in the standard MRO supported configuration (SQL Server installed with defaults – verify with us if you have or want to have non-standard settings. For example we know that if you use a different collation it causes problems, with some collations as bad as nothing working as all, which really is better than with other collations where there are subtle issues that may be very difficult to figure out.)
There are 1000's, really billions of ways you can set up windows server when you think about all the options. In general though, if it works for MRO, it will work for MCe.
You need 'these instructions' and a copy of the Install executable exe.
You need 'this' install document and
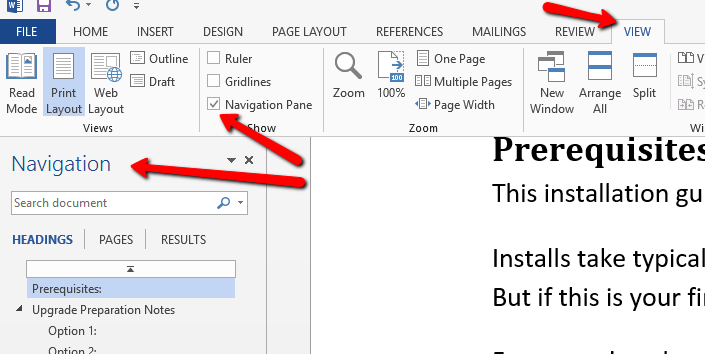
This document uses headers for easy moving back and forth through the document. We recommend you turn on the MS-Word Navigation pane. If reading in PDF, most PDF readers have a similar feature.
Preparation
IMPORTANT During an upgrade you, the person performing the upgrade, cannot be already logged in to MCe. The scripts have not run yet and lots will fail. YOU must be logged out in order to perform the upgrade correctly.
You need a copy of the Install/upgrade executable file – placed anywhere, but really, you should put it where you are going to install or where you have previously installed.
The 8.3, the install/upgrade exe can be found in this location: http://files.maintenanceconnection.ca/mce/v83 The file name will look something like this: MCe_v8.3.752_InstallOrUpgrade.exe but the exact version number will be different
If you are upgrading from a version older than 8.0, you need to have all users retire-device (completely log out) before you run the upgrade. (In MCe 5.3 this was just simply called 'logout')
If you are upgrading from 8.x to 8.3, we have tried hard to make the upgrade smooth, but it certainly doesn't hurt to ask users to retire-device (In 5.3 this was just simply called 'logout')
One known issue, if you are upgrading from 8.0 to 8.1, 8.2 or 8.3, the PDA lock will not be 'unset'. (We no longer use the PDA lock) so it may be necessary to manually unset them from MRO.
Install/Upgrade process. Note that MOST steps are NOT needed for upgrades
 THIS STEP SHOULD ONLY BE REQUIRED FOR NEW INSTALLS .NET 4.6.1 needs to be installed, some other products may only require 4.5.2 such as our loginHub, 4.6.1 will work for both this product and our products that only require 4.5.2.
Here is Microsoft's official web page telling how to determine whether you have 4.6.1 installed: https://msdn.microsoft.com/en-us/library/hh925568%28v=vs.110%29.aspx It is a quick and easy check – so please do it and don't skip this step. Looks like that page is gone (2028.08.30) and this one seems to be an alternative: https://docs.microsoft.com/en-us/dotnet/framework/migration-guide/how-to-determine-which-versions-are-installed
If you do not have it, you need to add it. .NET can be installed via Windows Update, and the link above gives you links to Microsoft's comments on how to install several.
- THIS STEP SHOULD ONLY BE REQUIRED FOR NEW INSTALLS Visual C++ 2013 Redistributable to be installed
- o Download link: http://www.microsoft.com/en-ca/download/details.aspx?id=40784
o Download the x64 edition as all supported systems that this may be installed upon are x64 only (Server 2008+ are all only x64)

- THIS STEP SHOULD ONLY BE REQUIRED FOR NEW INSTALLS On Windows Server 2012+
o When installing IIS 8, install Web Sockets, it's an optional IIS component, this will result in better performance.
- BOTH NEW AND UPGRADES: If you didn't do it during the preparation steps above. Download and run the MCe installer/updater to unzip into a destination directory. See the preparation steps above for file location.
 For NEW installations only1: Run the SQL scripts that are inside the .sql directory.
- The regInstall.sql needs to be run against the Reg database.
- The entInstall.sql needs to be run against each (All) of the Entity databases.
Note: These scripts can be safely run multiple times. The first time they will do work, the subsequent times they should exit without any errors, they just will not accomplish anything. So if you are unsure whether you ran them – run them (again)!
Note: Starting with 8.3.758, the _PreInstall.SQL does the entinstall.sql as well. So if you run reginstall.sql against the Reg database, and you run _PreInstall.SQL against all the ent databases, you do NOT have to run the entinstall.sql against any database. But, as above, if you forget, it won't hurt if you run it.
If you run them against the wrong database, they will not cause any 'harm' but they also won't do any good. They do check for some common tables to see if you are running them in a reasonable database (reg vs ent vs not at all MRO).
- THIS STEP SHOULD ONLY BE REQUIRED FOR NEW INSTALLS Make sure you have, for the next step, a AppPool that
- uses an AppPool that .NET 4.6.1 as the framework version (4.6.1 is an upgrade to 4.0 so it shows as 4.0).
- is using "Integrated" Managed pipeline mode (classic may appear to work, but will cause issues)
- Is used ONLY for this copy of MCe. Each install of MCe on a server MUST have its own Application Pool. This also means you can run multiple copies of MCe on the same server. Good 'default' names are mcxle or mce.
If you are upgrading and replacing the existing application, you do not need a new AppPool.
- THIS STEP SHOULD ONLY BE REQUIRED FOR NEW INSTALLS If you want logging to work (highly recommended) then add the application pool identity user to have write permissions on the install directory (username will be "IIS APPPOOL\<name>" where name is the name of the application pool you specified above, such as the suggested mcxle or mce).
e.g. "IIS APPPOOL\mcxle"
The exact way you add permissions varies from version to version of windows and may depend on group policies and other setting made on the server. One common way is to: 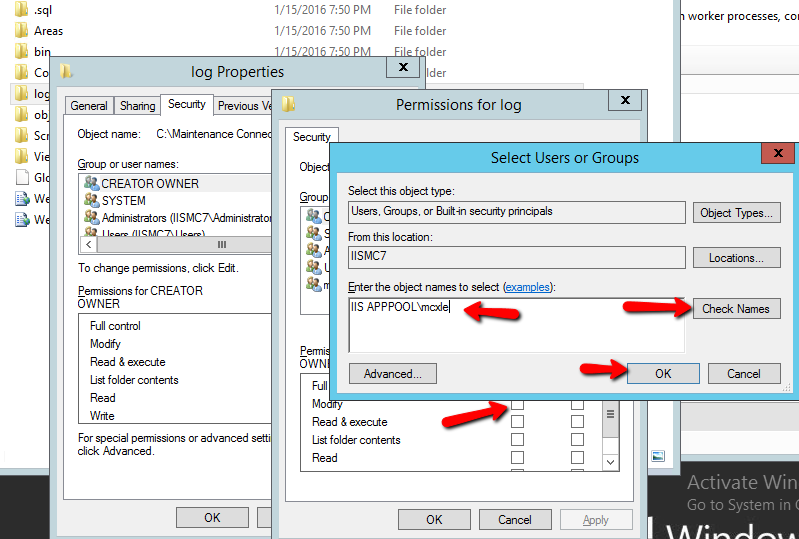
- r-Mouse on the directory you specified when you ran the MCe Installer,
- choose properties
- choose the security tab
- choose the edit permissions option (opens a new dialog)
- choose the Add (for add group or user names ) option (opens a new dialog
- Put the "IIS APPPOOL\<name>" in the box labeled "Enter the object names to select"
- Press the Check Names button, if OK press the OK button to close the dialog
- Then grant at least Modify permission, then click OK to close the dialog
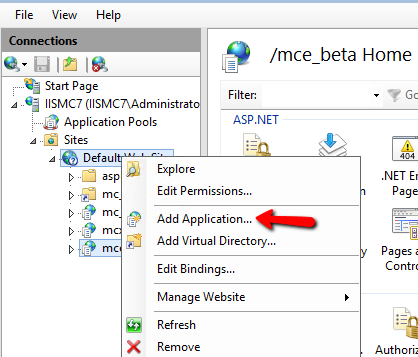
- THIS STEP SHOULD ONLY BE REQUIRED FOR NEW INSTALLS This step is needed for new installations but it is not needed for upgrades that are being installed in the existing director. Create an Application in IIS that points to the installation directory. Use "Add Application", do not use "Add Virtual Directory". The exact wording varies from version to version of IIS manager. But the key is – you are adding an application and pointing at the directory it is in.
- THIS STEP SHOULD ONLY BE REQUIRED FOR NEW INSTALLS Edit the web.connection.config to change the directory pointer (line 2 starting at column 43) to point to the correct mc.ini file (this should already be correct for a default install of MC, but check to make sure anyway.)
- THIS STEP SHOULD ONLY BE REQUIRED FOR NEW INSTALLS On all Windows Servers
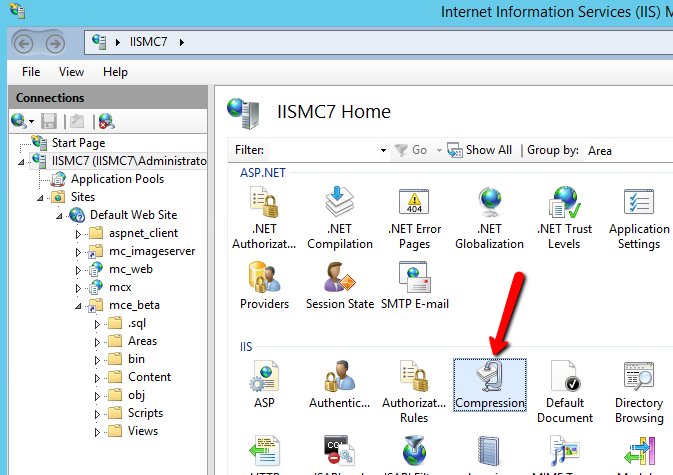
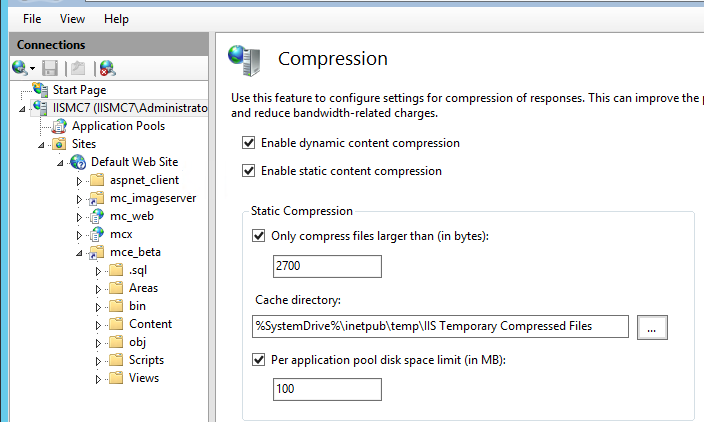
- Enable Dynamic Content Compression in IIS. This will result in faster download times.
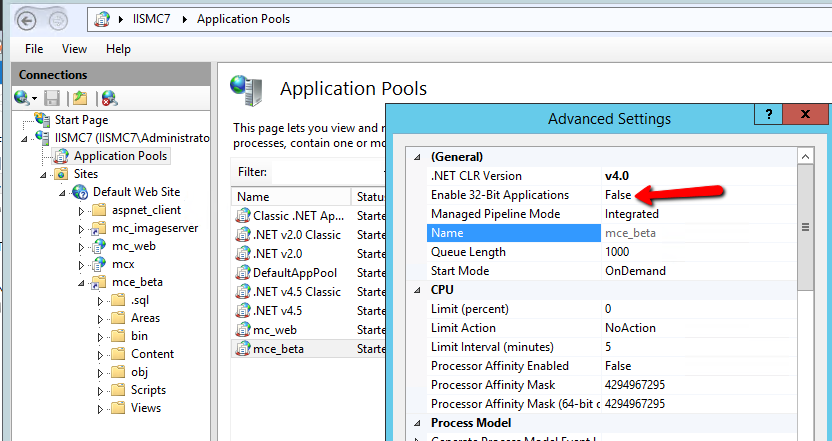
- Make sure that the Application Pool created for use for MCe is set to 64bit mode. It is worded differently on different versions. Some need 64bit 'true', others need 32bit 'false'.
- If this is not set the Application Pool will crash upon first load (and second and so on). A crash actually stops the pool and it must be manually started afterwards.
- THIS STEP SHOULD ONLY BE REQUIRED FOR NEW INSTALLS If you turned IIS off for the MCe/MCxLE directory earlier – turn it back on now
- Necessary for NEW, sometimes necessary for UPGRADES Install licenses(s) see License appendix below
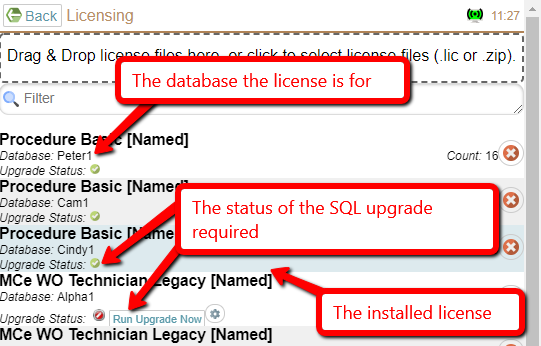 BOTH NEW AND UPGRADES Run the SQL Upgrade scripts: (required for new and upgrades). Go to the MCe login page, double click the logo, choose licensing, if the database has a green checkmark beside the SQL status, you are done, if not, click the Upgrade button.
To get to the license manager:
- Double click the MCe logo (on the login page, OR from the left menu if already logged in)
- That will bring you to management tools
- Select the license manager
- Perform license steps required
- Run the Upgrade, if necessary, run it more than once to get it to say the Upgrade status is complete.
- BOTH NEW AND UPGRADES Please at this point read carefully the NOTES appendix before continuing.
- BOTH NEW AND UPGRADES Do a quick test. At this point assuming an otherwise default Windows and MC setup it should work from an HTML 5 browser. In most cases, you should be able to browse to <servername>/<application pool name> e.g. myGreatServerName.com/mce Note that you can NOT do this from a incognito window, and note that many times the browsers such as Chrome on a server are very much out of date and will therefore have to be updated before you do this.
Appendix: Install Licenses
Step 1 – obtain a license
You can be emailed a license from the person you get these from. OR …
If you have an account on the Maintenance Connection Canada licensing system you can generate your own. See who in your company has this right and/or ask to get one if you need one.
Go to: https://Licensemanager.maintenanceconnection.ca – it is best/easiest if you do this using IE 11. But you can do it with a few extra steps with any modern browser.
Save a license file somewhere you can use it in the next step.
Step 2 – install the license
- Double click on the logo (from either the login page or from the left hand main menu if you are logged in)
- That will bring you to management tools
- Select the license manager
- Perform license steps required
drop your license file there, assign it to a database, and click the green checkmark to install it.
While you are in the License manager, make sure the upgrade is 'run' on the database. In the screen shot below, you can see the upgrade was successfully run on all the ones that have a green checkmark, but needs to be run still on all the ones with the red checkmark and the 'Run Upgrade Now' button.
Appendix: Notes
- We do not support Windows Server 2003 (.NET 4.5 and later will not install on Server 2003 and we require 4.6.1)
- We will soon stop officially supporting Windows Server 2008
- SQL Server requirements
- Must be running in SQL 2008 R2 compatibility mode or higher. This will change soon due to Microsoft dropping support for this.
- We do not currently validate if the SQL scripts were run, you will just end up with really cryptic errors, so make sure you have, from the Licensing page, run the upgrade scripts successfully before trying to log in.
Known causes for an immediate application crash upon load:
- Not having successfully run the SQL upgrade scripts (needed on new as well as upgrades, they are 'upgrading' MRO as well as upgrading from older MCe)
- Visual C++ 2013 Redistributable not installed (make sure it is the 64bit version!)
- Sharing the application pool with another instance of MCe (each install of MCe on a server MUST have its own Application Pool)
- Also the settings required for MCe is different than MC, so it cannot be shared their either
- Application pool is set to allow 32bit
Note there is also 1 additional cause that has been reported against a library that we use in MCe:
- Permissions issue. Read only access appears to be required against:
- Root drive (usually c:)
- User folder (usually c:\users{application pool identity})
- MCe install folder
Appendix: Install .NET 4.6.1
You need to have .NET 4.6.1 installed on the server.
If you do not have it already installed the easiest option is to install via Windows Update.
Appendix: Older instructions that no longer matter, included here so you know we didn't forget them!
We used to require you run a sql script, this is NOT required anymore. We now automatically do this for you. If you did it by mistake because you are used to doing it – no problem! It still had to be done, it is just that we automatically do it for you now.
Run _PreInstall.SQL Script on the ent Databases ahead of time.
If you are installing new or you are upgrading from 8.2 or earlier, this step applies to you.
If you are upgrading from 8.3 or higher (8.4 etc..,) you can skip this step. But, as usual, it won't HURT if you run this step again, it just won't provide any benefit.
Footnotes
-
1: If you are familiar with 6.9 and older instructions, these new instructions ARE correct – you no longer need to run scripts for upgrades, we do that automatically now. But you must manually run for installs so we know that the database is supposed to support MCe. There are no A/B/C scripts anymore. ↩