

 Maintenance Connection Everywhere (MCe) · EAM/CMMS manuals
Preamble
This is the setup process for Okta to work with the Maintenance Connection LoginHub and the Maintenance Connection family of products Accruent and Maintenance Connection Canada. Once this is setup you will be able to login to MC Everywhere (MCe/MCxLE), MCExpress, MRO, Technician Workstation, the MRO report tool and MRO's Service Requester.
Please note that authentication & authorization is a complex process that includes lots of double checks and encryption, attention must be carefully paid to each part of the process since seemingly minor things can cause decryption failures or cause a security double check to not pass. These failures often require billable support time since they end up needing to tie up some of the most technically knowledgeable in order to diagnose very tiny settings differences that are hard to identify.
This is a case of taking an extra 15 minutes to do it slow and careful will usually save hours and dollars.
As of 2020.10, good documentation on the okta side for sending LoginHub information can be found at https://developer.okta.com/docs/reference/okta-expression-language/
Okta Setup Process

Start by logging into your Okta administration panel. For the purposes of our screen shots in this document, we are providing them using the Classic UI because Okta does not currently allow you to add a login application any other way.
Switch to the Applications tab (third from the left at time of writing)
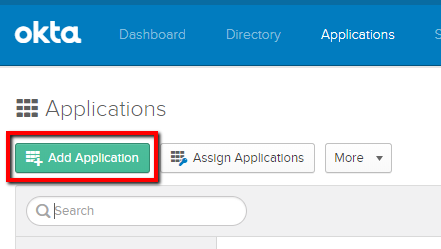
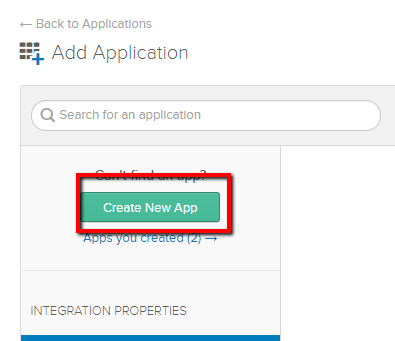
You will now Add the LoginHub application. As of writing we are not in the Okta official list, so you need to Create New App. (You may want to first search for LoginHub to see if we have been added by Okta into their official list.)
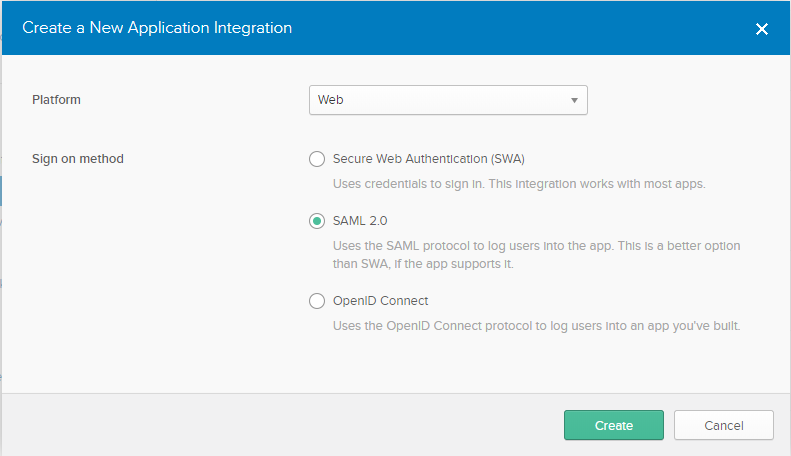
We support Okta's SAML 2.0 and Okta's OpenID Connect sign on methods. Which method is chosen is largely up to your license, experience with a provider type and customer preference. OpenID Connect has fewer configuration options so works well with defaults, SAML 2.0 is highly configurable and works well with more complex configurations.
SAML 2.0 Configuration
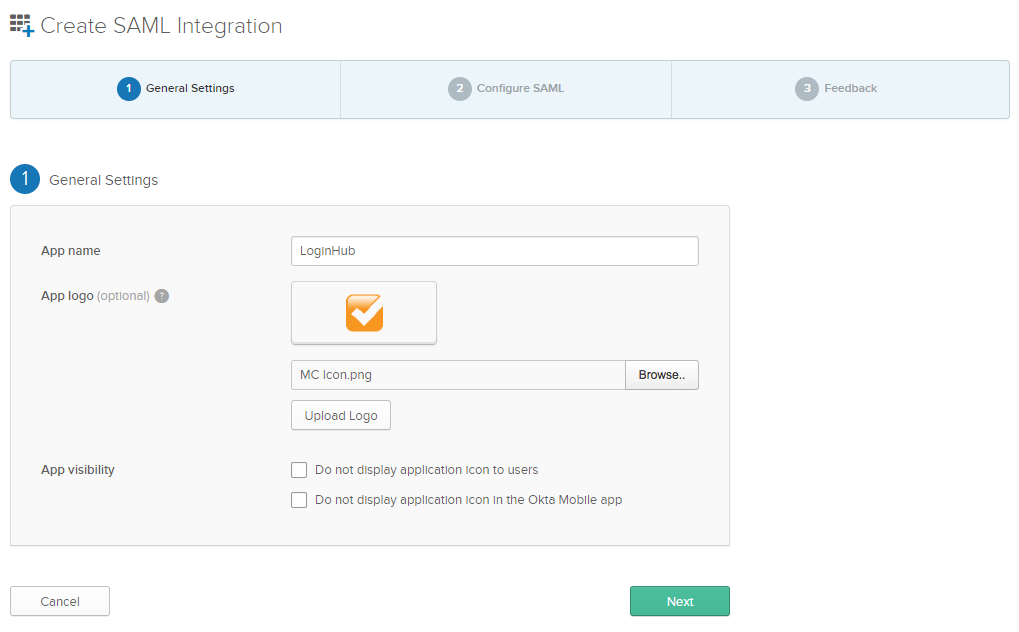
The App name can be anything you want. You will be able to login to MC Everywhere (MCe/MCxLE), MCExpress, MRO, Technician Workstation, the MRO report tool and MRO's Service Requester. All of these are "one" app from Okta's perspective.
We provide via email the App logo, but you can use anything you want obviously. We are submitting to Okta, at which point the logo above will be our default logo.
The app visibility settings are at your discretion.
Select NEXT
The values at the top are obligatory. Cut and paste from this document.
Single Sign on URL:
https://one.loginhub.app/Saml2-Okta/Acs
Audience URI: Same value as above.
https://one.loginhub.app/Saml2-Okta/Acs
See the screen shot below for the next set of checkboxes and dropdowns.
There is nothing in the Advanced Settings that you need to change.
Looking at the Attribute Statements:
The left hand side (id, givenName, surname, email and role) are the attribute names we need to receive from Okta. Those listed above are the required attributes you must set Okta up to send to us.
In our sample below, we chose to pass the role based on the Okta groups, and we chose to pass all the roles. More info about roles below.
The right hand side is the 'formula' in Okta to provide the data we need. In the cases above, all the formulas are very simple, just specifying what Okta calls it, and many times that may be all you need. But in other cases you will need a more complex formula, for details or assistance, check the Okta documentation or talk to your Okta support personnel.
There are several other attributes that, if you allow OKTA to send to us, we will pass them on to Maintenance Connection. The current complete list is:
- id
- role. Please see the discussion in the footnote if you are going to pass more than one role.1 We use Role in YOUR lookup table that you create in LoginHub, to look up the access group for this user.
- givenName
- middleName (optional)
- surname
- name (optional, otherwise we will build it from given, middle, sur)
- initials (optional, otherwise we will build it from given, middle, sur)
- homePhone (optional)
- workPhone (optional)
- mobilePhone (optional)
- pager (optional)
- fax (optional)
- repairCenterID (optional)
- craftID (optional)
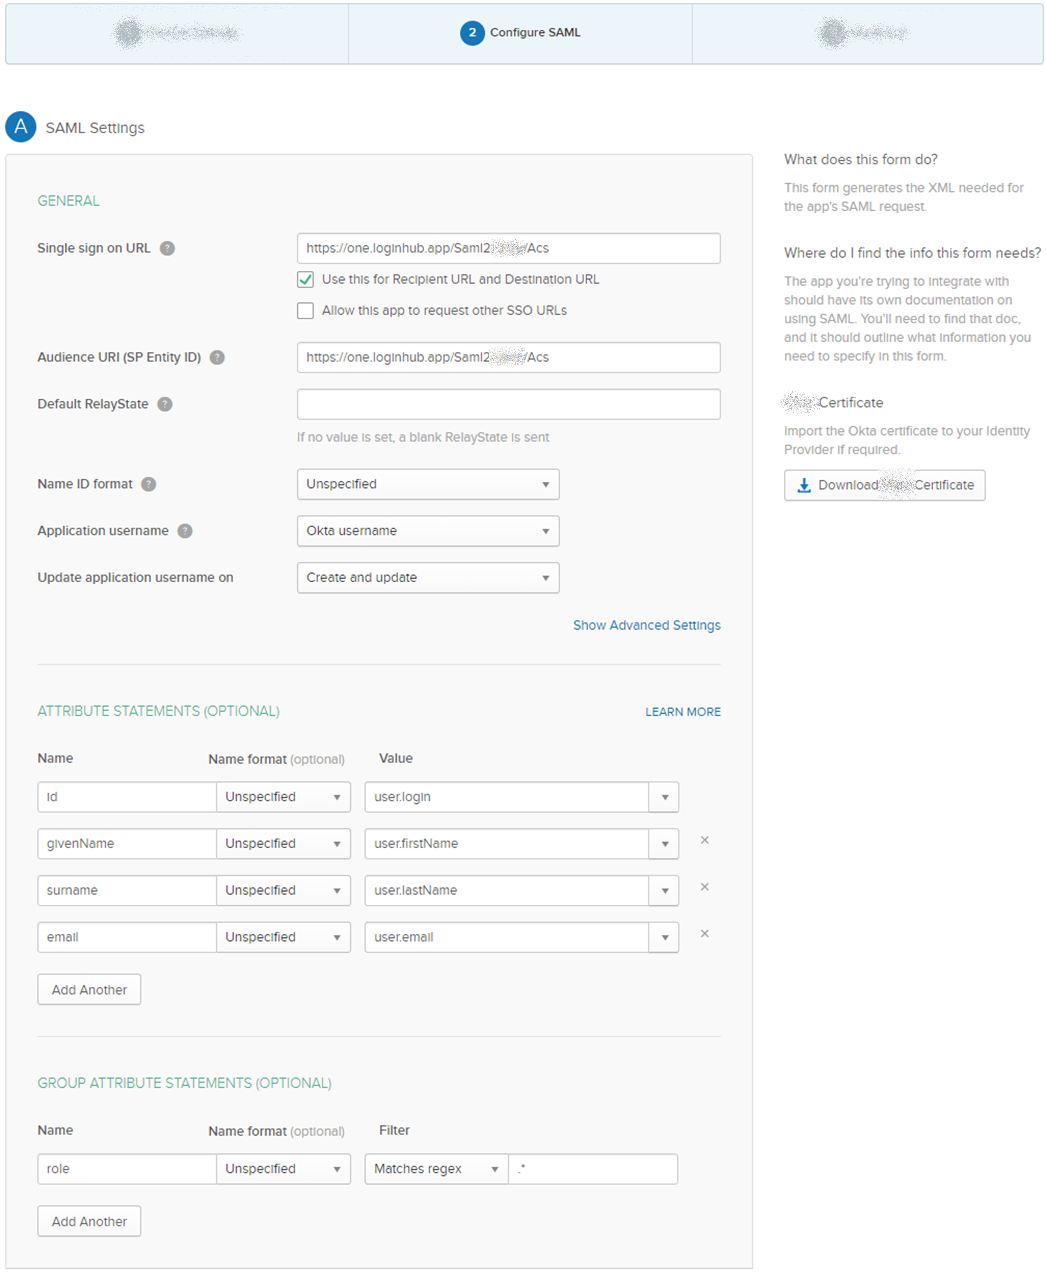
Please note (details below) that the EXAMPLE in the screen shot of the role being ".*"is NOT a good example for most production deployments. Typically "mc.*" or something similar will be the proper value. The dot star value will return all the groups, and you really want to be limiting this to 1 or 2 or else you will exceed browser limits for cookie size and total cookies per domain.
The role can be passed in either or both of sets of attributes. In our sample we grab it from the Okta groups as we feel most users will do it that way. Note that if the user can change the attribute … that would be a security issue that we recommend against. So normally, roles should come from the groups.
The roles you pass us must exactly match what you have setup in LoginHub.
You can list role multiple times to make your Okta formulas easier, so you might have several rows all that have, on the left side, the attribute 'role'.
OpenID Connect Configuration
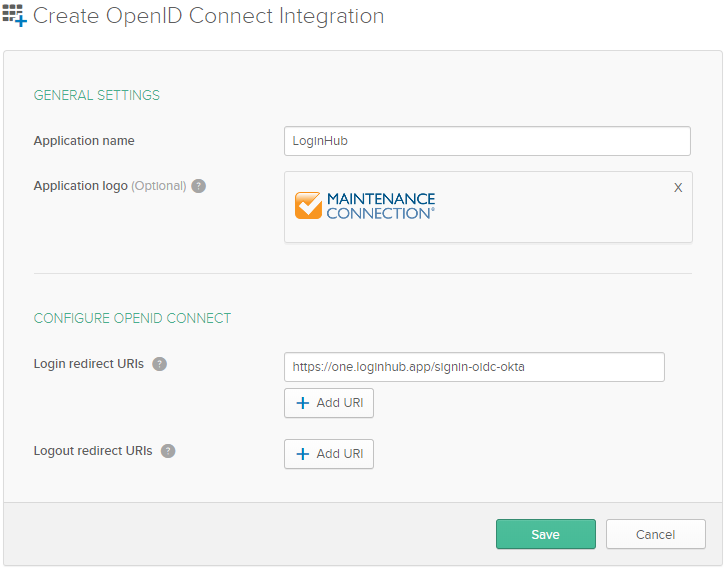
When you select OpenID Connect the initial configuration steps are drastically reduced.
- Application Name Can be any value. We recommend "Maintenance Connection", or "LoginHub"
- Logo Any value can be entered. We recommend and will provide a Maintenance Connection logo on request.
- Login redirect URIs Must be: https://one.loginhub.app/signin-oidc-okta
Grant Type
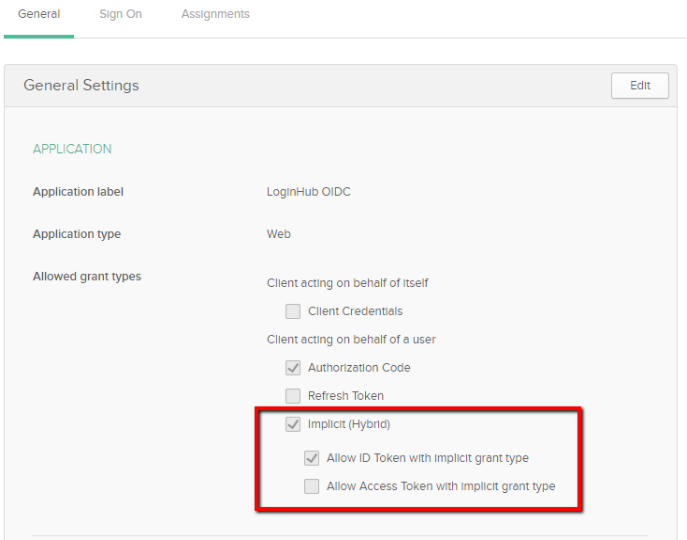
O nce the application creation has completed, you need to edit the general settings for the application. The grant type of "Implicit (Hybrid)" and "Allow ID Token with Implicit grant type" must be selected.
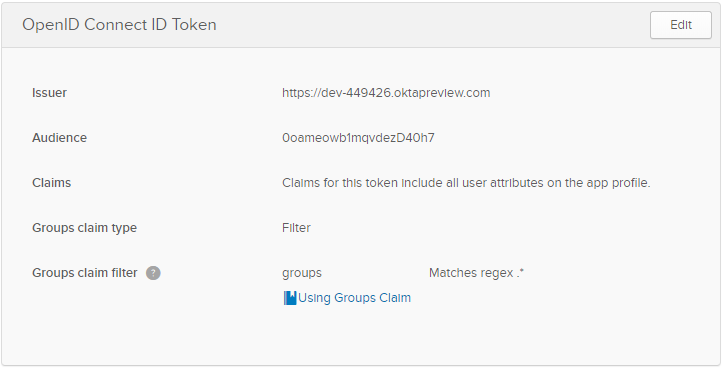
OpenID Connect ID Token
On the application "Sign On" tab, the groups claim called "roll" needs to be configured in order to return the claim called "roll".
For testing ONLY:
The easy testing default is to use "Matches regex" and a value of ".*" which means you type in a decimal "." followed by an asterisk "*" in the input field. Any other value needs to be setup and Okta can assist with choosing the correct values. The reason for using ".*" is that, in testing, the problems associated with this is not too difficult to work with (clear cookies). Also, the assumption is that you are using a test user that was set up for this, so that test user won't have a lot of groups.
If you are using your domain administrator, or someone else with a lot of groups, then this shortcut won't work in testing because too much data will be returned, you will have to fix it and clear cookies for the domain.
The .* has the advantage, with a test user, that if you made a minor typo on the group name, either in your provider or in the setup, you will still be able to complete your testing.
For production:
There is a practical limit of 2.
Typically you will have the MC active user and in many cases you will also have a 'Service Requester" and you active users will have both claims.
This is because of BROWSER restrictions, not LoginHub restrictions. Cookie lengths are limited by the browser. If your group names are 1000+ characters long, then 2 might be too many as well. Some browsers have as low as 8K (circa 2020.10) of cookies per domain. The browsers change this periodically, up or down.
Accurent's Maintenance Connection has a limit of one and only one.
We use intelligent rules (that you define with the preference list) to lower it to the one and only one to give the user. If more than one, you need to make sure your rules will grab the correct (likely the most powerful) one.
We HIGHLY recommend you have a unique prefix for the groups per application, and we recommend your group names be kept as short as practical (50 or less characters is considered short) with ideally any individual is never assigned more than 1, or, if you put in the preference list
Sign On Policy
Configure the sign on policy to allow the correct users to actually login to the application. If this is not configured correctly a VERY vague error will be thrown by LoginHub (since Okta returns a fairly vague error to LoginHub).
Assignments
Don't forget to assign people or groups to be able to access the application.
Setting Up For Login
After the Okta side of the setup has been completed, data/settings must be collected in order to make login work in LoginHub.
SAML 2.0 Login
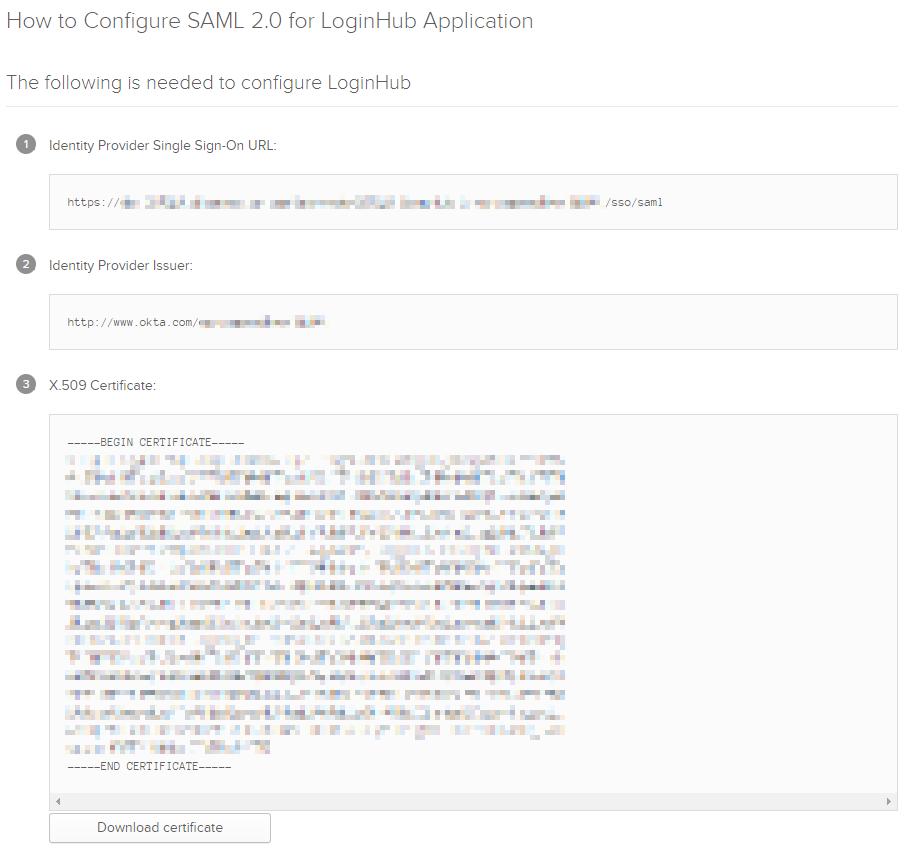
The following data must be provided/collected in order for proper login to be successful:
- Single Sign On Service URL Item #1 from screenshot below
- Entity ID Item #2 from screenshot below
- Certificate Item #3 from screenshot below
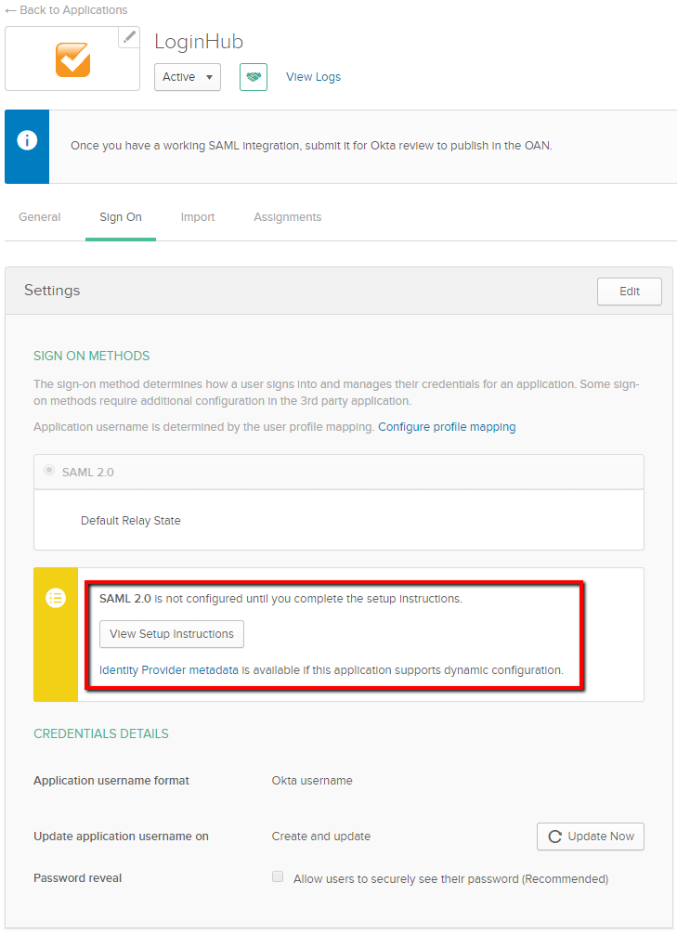
The required settings are collected from the "Sign On" Tab of the Application that was setup.
Select the "View Setup Instructions" button in order to display the settings required.
OpenID Connect Login
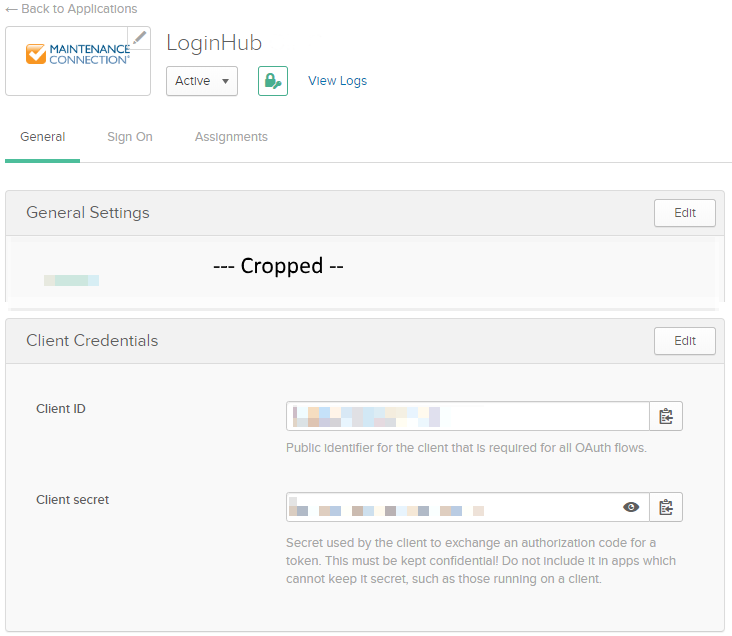
The following data must be provided/collected in order for proper login to be successful:
- Client ID
- Client secret
- Authority / Provider URL
The first 2 settings can be retrieved from the Application settings page in the Admin panel.
The final setting "Authority" will need to be built. Okta has documented the process here: https://developer.okta.com/docs/reference/api/oidc/#endpoints
In the simplest situation the URL will be: https://<your okta server>/
Footnotes
-
1: For the role claim, you can pass multiple of this claim. We don't restrict how many, but the browsers do in terms of cookie size limits, and they change the limit from time to time (in 2020 they changed the max DOWN for 'security' reasons.) As a result, we officially support TWO roles being passed, any more than that may require support services and may not be possible. We do offer some regex based filtering so that if you pass us a large number of roles, we can, before it goes in the cookie, trim the list down, such as saying conceptually "only pass on the roles that start with MC_". If you have a provider that gives you the ability to trim it down to just the one or two roles that might apply to the user, then we strongly recommend you do it at this point rather than at the later point with the regex. ↩