

 Maintenance Connection Everywhere (MCe) · EAM/CMMS manuals
Preamble
Configuration in Maintenance Connection Everywhere, MC LoginHub and MC DataHub has been designed to be flexible, friendly to cell phones and optionally remote accessible. This allows for a great degree of flexibility from sharing configuration work between IT Professionals and Maintenance Connection Administrators, to fixing/changing configuration on the fly via a cell phone over spotty internet.
The configuration options are very powerful so broad access is not recommended. But due to the secure remote access keys (discussed in detail later in the document), it is possible for reasonable changes to be undertaken by properly trained and qualified administrators without connecting to the server. (You DO for security reasons have to connect to the server to initially set it up)
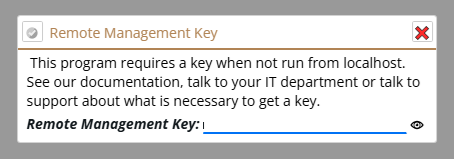
If you are doing this JUST to get rid of the Remote Management Key dialog, rather this will let you generate a 1 minute key to access the Remote Management where you can then work for an hour without entering a new key.
Opening Configuration
System configuration in MC Everywhere, MC DataHub and MC LoginHub is accessed from the Management Tools section in MC Everywhere. This area is accessed by this url: <your server>/mce/#/managementTools
Configuration must be opened in a modern browser such as Chrome, Brave, Edge or Safari. You will get an error page if you attempt to open the configuration from old versions of modern browsers or Internet Explorer.
You can also open the management tools by double clicking the MC Everywhere logo on the Login Page or the application menu.
From LoginHub the management tools page can be opened by double clicking the word LoginHub on the login page (it will redirect you).
Open the Advanced Tools from Management Tools in order to get access to the System Configuration.
Remote Configuration
System Configuration is very serious, it can make a system work and contains many important security values (such as passwords). For this reason, configuration is only accessible via "localhost" by default. The server checks your access location and will require a "Remote Access Key" as per the dialog above if you attempt to access the configuration without being on localhost.
If you are accessing the server via localhost and get a "Remote Access Key" prompt, that means you are actually NOT accessing the server via localhost and instead are accessing the server via a load balancer, SSL offloading or other network device. There are 2 things that must occur in this case:
- Acquire a Load Balancing license for the software you are using. (MC Everywhere, MC DataHub, MC LoginHub) This is required since Load Balancing, SSL Offloading and several additional proxying settings are only available if you have the correct license.
- Add a record to the server's hosts file to cause requests for the domain you are accessing to actually be directed to 127.0.0.1 instead of the network device.
If you want to configure remotely on purpose you can add Remote Access Tokens in the configuration (covered later in the document) which will allow administrators remote access to the configuration system.
Database Connection and Database Upgrades
Connecting to the database is essential for the application to work correctly. Typically, the installation process will ensure that database connection information is properly filled in for the application to be able to connect to the database.
Connection Information
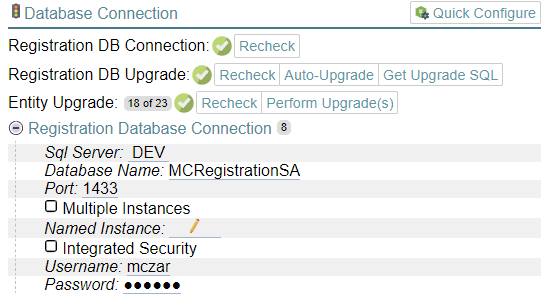
If the connection information changes, or was incorrect during installation the Registration DB Connection test will fail and the "Registration Database Connection" configuration section should be opened in order to correct the connection information.
Enter the correct connection information and then select Save button on the changes banner in order to commit the changes.
The database connection information must be saved to the appsettings.json configuration file in the application install path. Due to this and directory security it may not be possible to write the file directly. In that case the application will instead write an appsettings.json file in the /log subdirectory and instruct you with an error message to move the file. If the application is blocked from writing to the /log directory you will need to fix that since it will directly impact your ability to receive support since logging is one of the first items often requested by the support team.
Database Upgrades
In order for MC Everywhere to be able to successfully configure (and run) the database(s) need upgrading. If the Registration database needs upgrades (or just to make certain), select the "Auto-Upgrade" button. If the SQL user account that connects to the database doesn't have enough permissions to directly upgrade the database, you can generate a SQL script (the "Get Upgrade SQL" button) that can then be run manually via SQL Server Management Studio.
You can also directly request a URL via the browser in order to automatically trigger a database upgrade if required. The URLs that you can use are:
- Registration Database: <server>/mce/upgrades/reg
- All Licensed Entity Databases: <server>/mce/upgrades/ent
- A Single Entity Database: <server>/mce/upgrades/ent/<connection key>
To detect if a database upgrade is required (and generate SQL if required):
- Registration Database: <server>/mce/upgrades/preview/reg
- A Single Entity Database: <server>/mce/upgrades/preview/ent/<connection key>
The URLs are non-interactive endpoints. This means they do NOT provide convenient user feedback during an upgrade and only report success or failure at the end. Some databases can take minutes, other may take HOURS to upgrade. If a response is not fast enough for you, or the upgrade reports a SQL Timeout error, it is recommended to generate the SQL script and run it manually in SQL Management Studio.
Entity Upgrade
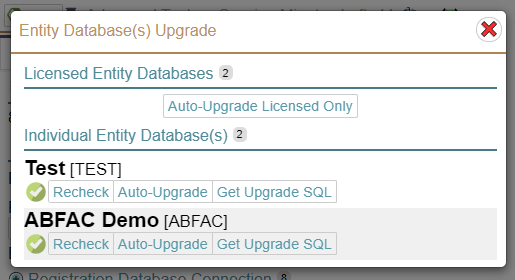
Upgrading entity database(s) is a slightly different experience from upgrading the Registration database. This is because many databases may exist for many purposes and not all of them may be licensed or even currently used.
The bubble next to "Entity Upgrade" lists the number of licensed databases vs the total known list of entity databases.
The checkmark represents the upgrade status of only the licensed databases. When performing major product upgrades, new database installs, or other system maintenance, this checkmark may be inaccurate because the database(s) that need to be upgraded are not yet licensed.
Selecting "Perform Upgrade(s)" opens a popup which will offer a full list of all the known Entity databases and individual upgrade buttons for each database.
Important Note
Large databases or large version jumps can make the upgrade process VERY slow. Databases have been shown to upgrade in 2 minutes, and other databases have taken more than an hour. If the database is known large and this is a first install of MC Everywhere or MC LoginHub v10 it is recommended to use the SQL Script generation option and manually run the upgrade in SQL Server Management Studio. This will take slightly longer (SSMS runs scripts slightly slower than the query engine in MC Everywhere) but it will not time out and if errors are detected a more interactive error report will be available.
Retrying an Upgrade
The upgrade scripts in MC Everywhere are designed to be retriable. If a script fails due to a timeout or network disconnect the script will be able to be re-run with no worries.
System Settings
Single Entity Database
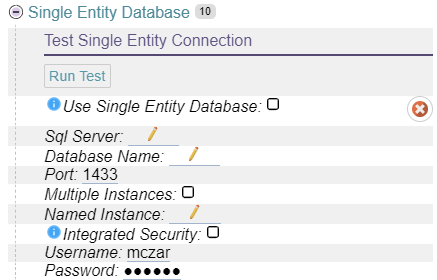
MC Everywhere offers a simplified setup experience for customers who only have a single entity database on their server. This bypasses several other setup steps for connecting to databases allowing this common setup to be quicker.
Enter the connection information in the correct fields. Once entered, save and then run a test.
The test is only effective for single entity database configurations and designed to return an error when not running in single entity mode.
SMTP
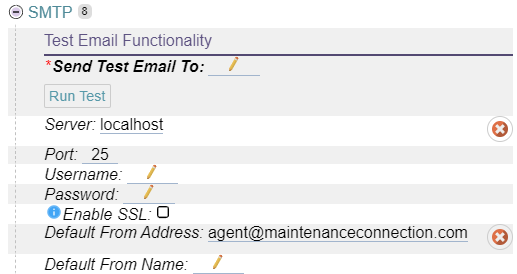
SMTP settings must be set in order to successfully send emails as required. This involves everything from signup, notifications, and error reporting or support requests.
The SMTP system will automatically upgrade to TLS requests if the server supports the STARTTLS command.
The "Enable SSL" switch is a specific SSL (not TLS) feature, this is typically only useful for legacy SMTP servers that have older SSL support and do not support the modern and recommended STARTTLS feature and TLS encryption (often on port 587).
When settings are set, Save them using the gold/yellow Save banner/button and then you should send a test email.
Remote Access Tokens
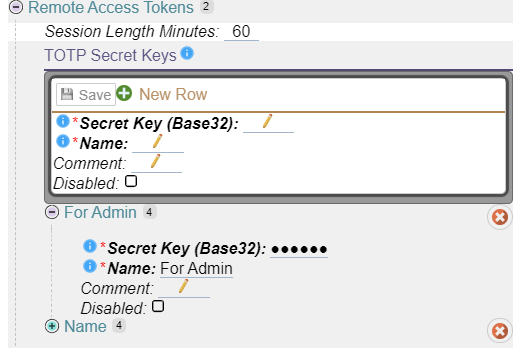
Remote Access Tokens make it possible for System Administrators (non-Maintenance Connection IT staff), or Administrator level Maintenance Connection users to be able to make important system configuration changes without having difficult and time-consuming access requests in order to modify configuration files directly on the server itself.
This is also built to ensure auditing since users who make changes are tracked in the database. And due to this being system configuration this needs to be capable of working when many standard login type process may actually be broken.
A Remote Access Token is based on a standard TOTP (Time-based One Time Password) token. This means that common applications such as Microsoft or Google Authenticator can be used to provide the rolling passcodes that enable the feature. Since TOTP is a standard you can use any standards-based tool you wish in order to generate the encryption keys to make this feature work. In order to provide instructions, we have found a free online tool that generates the required values for tokens.
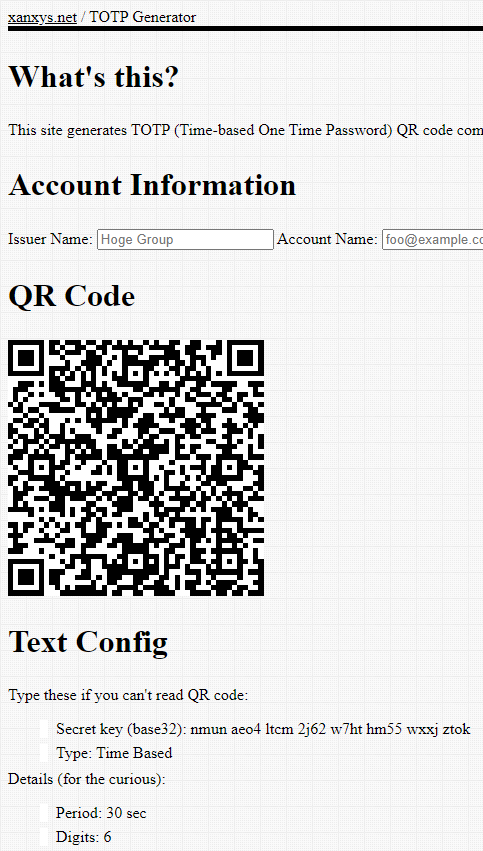
Sample Online Token Generator
Using the generator at: https://www.xanxys.net/totp/. The generator automatically creates a new token and QR code.
The value displayed in "Secret key (base32)" needs to be copy/pasted over to the new row secret key.
The QR code /or/ the secret key needs to be scanned or entered into the Authenticator application that will be used.
After entering Name (and comment if desired), you will be able to save and create the Remote Access Token.
Paths
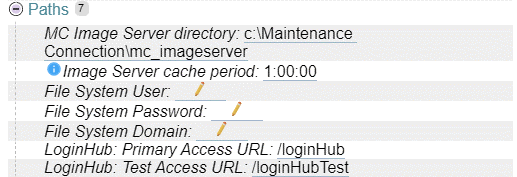 This section makes files and paths work correctly when using MC Everywhere, MC LoginHub and MC DataHub.
MC Image Server Directory
This is the physical path (local or network) that is setup for storing files and attached to IIS as /mc_imageserver. For several reliability reasons (save file retry being one), MC Everywhere proxies requests to this physical path separately from IIS.
File System User / Password / Domain
When reading or writing files to the image server path, this is the user account that will be used. If no account is configured then the user account for the IIS Application Pool hosting MC Everywhere and/or MC LoginHub will be used instead.
LoginHub Primary Access URL / Test Access URL
This is used to configure LoginHub to load when setup in IIS with custom directory paths. This feature is available for configuration but using it may require billed hourly support.
Security
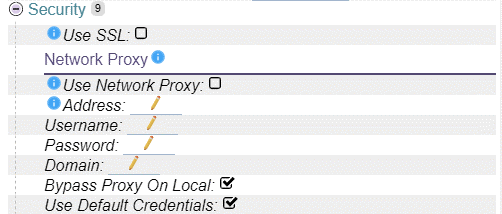
This configuration section controls security options.
Use SSL
When enabled, causes MC Everywhere and MC LoginHub to force redirect users over to HTTPS.
A useful feature, usually good to have on, there are a few occasional cases where IIS has its own redirects, or a network proxy already has a redirect where this feature may cause redirect loops, so it is available to be turned off.
Network Proxy
Several features in MC Everywhere and MC LoginHub require the ability of the server to be able to call other APIs and servers on the network or internet (depending on enabled features). If you have a forced (non-transparent) network proxy, these are the settings that can be used to enable the proxy.
Address
The network address or URL of the proxy. This often should contain http: and may also need to contain a port. Due to proxies existing very early in the network stack there are no actual requirements for what is here other than what is required for your specific proxy.
Username / Password / Domain
If authentication on the network proxy is required, add those details here. Depending on the specific proxy these may or may not require actions like escaping (depends on the proxy).
Bypass Proxy On Local
If the proxy should be called when the target address is considered to be local to the network instead of the public Internet.
Use Default Credentials
If the system should attempt to load the Internet Explorer proxy credentials. This is a useful feature BUT only works if the Application Pool user is a REAL user account that has previously logged into the server and had those settings set. Even then sometimes these settings don't always like to load, thus the above User/Password is the recommended approach.
Quick Configure
![]() Quick configuration allows rapid upgrade from older products.
Quick configuration allows rapid upgrade from older products.
Selecting the "Quick Configure" button will open the quick configuration popup. In the popup you will be able to drag & drop (or click to select) a file in order to import the settings into the application. Some of the settings (eg LoginHub) will also require the selection of a license to upgrade as well.
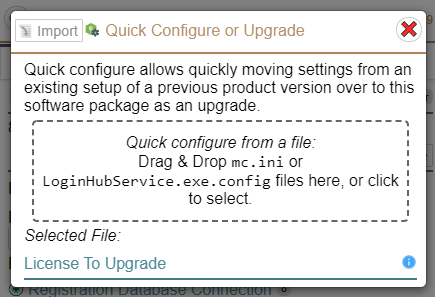
Once you select the file, and potentially the license to upgrade, select the import button in the top left of the popup.
The quick configure sets a LOT of settings which may take a while and depending on the exact source file, may find errors that will be reported back to the UI.
After the quick configure happens the application will be restarted in IIS in order to load the new configuration settings. This may occasionally cause UI weirdness, a quick browser refresh after the import has finished will ensure the UI is consistent with server state.